
Easy Cures for Common Complaints About Hot-Oil Units
Molders of high-temperature materials frequently ask these six questions about hot-oil temperature-control units (TCUs):Is smoke dangerous?Why is the pump discharge pressure bouncing all over?Why has the oil degraded and is it damaging the pump seals?Why can’t I get the mold hot enough without running the temperature above the flashpoint?Does it mean I’m running the oil too hot if I am getting carbon on the Y-strainer?If the oil has turned color, should it be replaced?There are straightforward answers and solutions to all of the above.


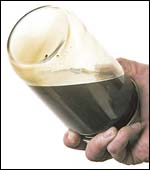
Does your oil look like this? If so, it’s in practically brand-new condition.
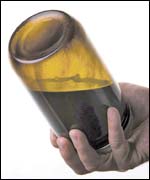
This is normal-looking oil that has been in use for a while.

This oil is borderline—near the end of its useful life.
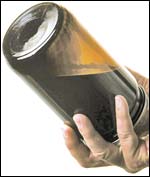
This oil needs changing— don’t wait.
Molders of high-temperature materials frequently ask these six questions about hot-oil temperature-control units (TCUs):
- Is smoke dangerous?
- Why is the pump discharge pressure bouncing all over?
- Why has the oil degraded and is it damaging the pump seals?
- Why can’t I get the mold hot enough without running the temperature above the flashpoint?
- Does it mean I’m running the oil too hot if I am getting carbon on the Y-strainer?
- If the oil has turned color, should it be replaced?
There are straightforward answers and solutions to all of the above. The first on the list are the easiest:


1. Stop the smoking
Metal expands as it gets hotter, and oil gets thinner or less viscous. That gives you the worst of both worlds for developing leaks as the hot-oil system heats up—lower viscosity and bigger openings.
Leaks usually identify themselves by giving off a light gray smoke. This smoke is actually a positive sign since it indicates that any vapors that could create a fire hazard are oxidizing to produce relatively harmless smoke. Adequate ventilation around the TCU will prevent buildup of combustible vapors.
While flanged and/or fully welded piping is typically specified by hot-oil purists, threaded fittings are widely used around molds because they are easier to work with. The best leak prevention is to cover the threads generously with PTFE (Teflon) thread tape if the oil temperature is below 400 F or a higher-temperature thread dope if the system runs hotter than 400 F.
Quick connects are pretty much guaranteed to leak after a few cycles. This will eventually result in a “non-quick” connect because black residue from the smoking oil will glue the ends together. Pump seals and packing can usually be counted on to produce smoke as they get closer to needing repair.
2. Oil & water don’t mix
If the pump discharge pressure is too low or is bouncing around and/or there is oil coming out of the reservoir vent, you have contaminated the oil with water. While replacing the contaminated oil may reduce the time required to get the unit working again, it most likely won’t completely eliminate the problem since some water will have separated from the oil and will remain in the system to contaminate any fresh oil you put in it.
The only sure way to remove water is to vent it to atmosphere. If your TCU has a warm-up or blowback or vent valve that allows oil to go directly to the reservoir, open it, set the TCU outlet temperature at 220 F and let the unit steam. As the steam subsides, slowly increase the temperature. If you want to get this over with as fast as possible, break the oil return line and connect one hose to the TCU and another hose to the mold. Put the other ends of the hoses into a clean, open drum with the hose that is connected to the TCU in the bottom so it can suck the fluid out. Fasten the end of the other hose up near the top so that the steam will flash before the liquid hits the bottom. Add enough oil to the drum to cover the lower hose, start the pump, and set the TCU outlet temperature at 220 F. Slowly increase the TCU setpoint until the oil in the drum is at 220 F. Reconnect the oil-return line to the TCU and change the oil.
3. Seals gotta wear
Pump seals will eventually wear and begin to leak. That’s nature’s way. The carbon particles you find on the outside surface of the seal can wedge the seal faces apart and create leaks.
The important thing to remember is that these particles are the residue of fluid that seeps across the seal face to provide lubrication—they did not pass through the seals. Carbon particles present in the fluid are not hard enough to damage the seal. Only metal particles can score the seal faces to create leaks. The trouble is that all particles look alike. (Hint: Try using a magnet.) If the replacement seals fail after a short time in service, the cause is metal wear due to shaft deflection, which results from improper installation or misalignment.
4. Not hot enough for you
The flash point of the oil often becomes an issue when a 350 F mold temperature cannot be achieved with anything less than a TCU setpoint of 450 F to 500 F. In many cases, the mold experiencing the problem is equipped with 0.25-in. to 0.375-in. hoses and fluid passages that are connected in series. Long, small-diameter hose runs to and from the mold increase the pressure drop, and quick connects make it worse.
This is a plumbing problem. Replace the small hoses with larger ones (same diameter as the TCU pipe connection) and oversized quick connects to keep the pressure drop as low as possible. Install headers to connect the mold fluid passages in parallel instead of in series to increase the total flow across the mold.
A centrifugal pump still may not have enough pressure to provide the required flow since the delivery volume decreases as the discharge head pressure increases. But positive-displacement pumps, which have higher discharge pressures, may not be the answer. Since 0.375-in. passages will pass a maximum of only 5 to 8 gpm, positive-displacement pumps will lift the relief valve, causing most of the flow to recirculate back to the pump suction.
A bypass line with a manual valve should be installed at the mold or as close as possible to it, with a pressure gauge upstream of the valve. The valve should be set so that the gauge reads 5 psi below the relief-valve setpoint. This will reduce the frequency of the heater on/off cycles and allow closer control of the mold temperature.
5. When to change the oil
The compact design of most TCUs results in a higher reservoir temperature than is optimal for oils. This will cause any brand of oil to oxidize and form acids that eventually produce carbon as they circulate through the heater. Antioxidants will delay carbon formation only until they are used up. Some types of oil form hard deposits on the heater elements while others produce suspended carbon solids that form sediment in stagnant areas.
Periodic oil changes eliminate carbon formation by keeping the acid number low. The interval between changes depends on the brand of TCU, operating hours, and operating temperature. Higher temperatures, hotter reservoirs, and more hours all shorten the interval. A common mistake is to assume that lots of leaks make periodic oil changes unnecessary. In addition, continuing to operate the TCU with the vent or start-up or warm-up valve open increases the rate of oxidation and can cause fluid to go bad in much shorter time—days rather than months.
6. Fluid has turned dark
This is not always a problem, since all oils turn darker when exposed to heat. The easiest thing to do is take a small sample in a glass jar. Note: When you take your sample, make sure the temperature is below 180 F and the pump is running, so as to provide a representative sample. Light-yellow to honey-colored oil means minimal degradation. Dark amber is about normal. Black means it’s time to change it. If you can’t get the oil to flow into the sample jar, you’re too late. And if the oil comes out looking like it did when you put it in, check whether the TCU is turned on.
Jim Oetinger, sales director of Paratherm Corp. in West Conshohocken, Pa., has over 20 years experience in the chemical and plastics industries. He has been involved with consumer plastics recycling, polymer compounding, and sales and marketing of thermal fluids. Tel: (800) 222-3611


Related Content

Compact Hybrid Injection Molding Machine Launched
Sumitomo Heavy Industries Ltd. (SHI) has introduced the iM18E, promising the smallest footprint in 20-ton machines.
Read More
Completely Connected Molding
NPE2024: Medical, inmold labeling, core-back molding and Industry 4.0 technologies on display at Shibaura’s booth.
Read More
Fakuma 2023: More Details on New Machine Line
Wittmann Battenfeld has released more details on the new EcoPower B8X debuting at Fakuma (October 17-21; Friedrichshafen, Germany), which it previously announced.
Read More
Medical Grade Injection Molding Machine Line is Cleanroom Ready
JSW America says the J100ADS-110U medical grade molding machine has been optimized to prevent dust, rust and other contaminants.
Read MoreRead Next

Troubleshooting Screw and Barrel Wear in Extrusion
Extruder screws and barrels will wear over time. If you are seeing a reduction in specific rate and higher discharge temperatures, wear is the likely culprit.
Read More
Why (and What) You Need to Dry
Other than polyolefins, almost every other polymer exhibits some level of polarity and therefore can absorb a certain amount of moisture from the atmosphere. Here’s a look at some of these materials, and what needs to be done to dry them.
Read More
How Polymer Melts in Single-Screw Extruders
Understanding how polymer melts in a single-screw extruder could help you optimize your screw design to eliminate defect-causing solid polymer fragments.
Read More