
Get the Most Bang For Your Purging Buck
More processors are turning to purging compounds to clean their machines and speed up changeovers. Here are tips on how to avoid typical trouble spots when using them.

These images of ABS show just how quickly resin can oxidize and begin turning to carbon. In this case, the time lapse between the image on left and one on the right right was 60 min. at 460°F.

This Tier 1 automotive molder was put on a preventive purging program that helped it reduce scrap rates from 10-15% to less than 1% shortly after it was implemented in October.
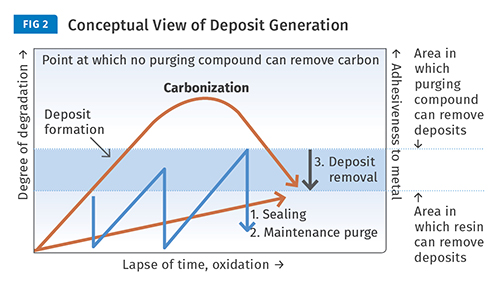
Carbonization will occur, no matter what the resin, if kept under heat in the presence of oxygen. This conceptual view shows a contamination-generation mechanism in the barrel, along with measures on how to prevent it from occurring.


More and more processors are using commercial purging compounds to clean out their systems and to help them switch from one product run to the next as efficiently as possible. But purging compounds aren’t cheap; in many cases they cost more on a per-pound basis than the resins they are flushing out. So it only makes sense to streamline the process as much as is possible. In this article, we’ll take a look at some typical issues processors confront while purging, along with solutions that will help you get the best bang for your purge buck.
OVERUSE OF PURGING COMPOUND
First and foremost, processors must audit the use of purging compound during changeovers to understand where the extra purge might be going. Sometimes operators have a tendency to take purging shortcuts in an effort to save time by using the “autopurge” functionality while purging injection molding machines.


The problem with auto purge is that the default speeds and pressures are not usually the same as those recommended by purging compound suppliers. Generally speaking, you want to purge with the highest pressures and speeds that you can safely run. You also want to keep the screw in the forward position while purging. Autopurge is rarely set up with these conditions maximized, and it will lead to overuse of purging compound, because the purge will be rendered less effective. If you want to minimize your purging expenses, make sure that your molders or setup techs are purging manually under the recommended conditions.
SCRAP RATES INCREASING OVER TIMES
A Tier 1 automotive injection molder was experiencing high scrap rates, often in the 10-15% range. During its investigation, this molder began charting defect rates. The company discovered that defect rates climbed steadily after manually cleaning screws. The only thing the firm could do to get scrap back down was to pull the screw again.
The molder went through this vicious cycle until it was put on a preventive purging regimen in November of year one. (see Fig. 1). As the molder learned optimal timing for the preventive program, it was able to drive scrap rates steadily down to well under 1%. If you are having trouble understanding why your scrap rates are what they are, begin charting defect rates and see if a preventive purging schedule allows you to break the cycle.
Increasing scrap rates can also be caused by purging insufficiently during downtime and changeovers—that is, not using enough purging compound. One way to purge insufficiently is to use a predetermined amount for every purge. Some companies weigh out “X” number of pounds and tell the operator, “This is the amount you will need to purge.” However, purging is not a one-size-fits-all activity.
For instance, the longer it has been since a screw pull and full cleaning, the more contamination you will have in your system. This is especially true in extrusion, where carbon can accumulate in low-pressure areas like dies, die heads, and blow molding accumulator heads. The purge must be carefully inspected during purging to understand when the machine has been sufficiently purged. The operator must be trained to purge as long as is necessary, within a certain tolerance range, prior to contacting a supervisor. Just putting the machine back into production after purging “X” number of pounds is not the answer.
It is also critical that processors that use purging compounds understand and come to terms with the fact that, at some point in time, a full manual cleaning of the screw still may be necessary. If screws, barrels, nozzles, dies, or die heads have not been cleaned in a long time, a purging compound may not be enough. Purging compounds work best when used as a preventive measure, as opposed to a reactive measure. Clean everything manually, and then get on a purge program.
DIFFICULTY ELIMINATING PURGE RESIDUE
As important as it is to purge out contamination or resin, it is equally important to get back into the production resin after purging. This is the concept of “purging the purge,” and it is an area where multiple tradeoffs are at work.
When discussing purging compounds, it is critical to understand the primary tradeoff of cleaning power vs. residue. Although not perfectly linear, there is a strong relationship between how well a purging compound cleans and how difficult it is to get all of the purge out when moving on to the next resin. Mineral- and glass-filled CPCs tend to require more effort to displace than a purely resin-based grade with lower cleaning power. One way to get the best of both worlds is to purge first with a glass-filled grade (screw and barrel only), followed by a lower-residue grade prior to going to the next material.
Processing temperature and material affinity are typically the best predictors of success in eliminating residue. First of all, make sure that you are operating in the recommended temperature range for the purging compound and the resin. Note that these temperature ranges must sufficiently overlap. If you are using a purging compound below its recommended temperature range, it could become stiff and leave excess residue behind. If you run a low-temperature resin like PVC, look for a purging compound designed to run at lower temperatures, instead of using a general-purpose grade.
Material affinity is also critical in that, if the base resin of the purge is not sufficiently similar to the replacement resin, there can be issues with residue. If you are purging olefins, look for purges with olefinic bases. Conversely, if you are running ABS, look for a styrenic purge. Material affinity is also very important to the overall purging process, so not only will purge displacement be better, cleaning will be better and more efficient when using purges with similar base resins.
DIFFICULTY STARTING UP AFTER WEEKEND SHUTDOWNS
It’s time to shut down for the weekend ... what do you do? Many operators simply turn off the barrel heaters and go home for the weekend. Upon starting back up Monday morning, scrap rates are high and it seems to take forever to get into production. The issue here is the misconception that shutting heat off means the resin will just cool down and solidify harmlessly. The truth is that it can take hours for the plastic in the barrel to cool off enough to stop degrading. Over that time, carbon is forming in the barrel and adhering to any metal surface it can find.
Take a look at the photos to the right. We took natural ABS and subjected it to 460 F heat for 60 min. The first image shows the natural ABS at the start. The next one shows the material after 15 min under heat, then 30 min, then 60 min. These images show just how quickly a resin can oxidize and begin turning to carbon. If you were to simply shut the heats off with ABS in the barrel on Friday evening, you would be greeted by significant carbon buildup on Monday morning. To avoid this—and the accompanying losses in efficiencies at startup—seal the screw and barrel prior to shutdown.
The term “sealing” refers to using a heat-stable purging compound during shutdowns and extended downtime events like preventive maintenance (PM) or mold changes. The heat-sensitive resin is displaced by a purging compound that keeps oxygen from entering the screw as the purge cools. At startup, simply run another barrel full of purge through the system, and change to the next resin. Before you know it, you will be running good parts.
Weekly sealing can also decrease the need for maintenance purging (see Fig. 2). Carbonization will occur, no matter what the resin, if kept under heat in the presence of oxygen. The only questions are how long it will take, and what is the degree of carbonization. Some resins will get into the danger zone more quickly than others, but it will happen eventually. The key to avoiding carbon is preventive purging. And sealing will make things that much better.


Related Content

Know Your Options in Injection Machine Nozzles
Improvements in nozzle design in recent years overcome some of the limitations of previous filter, mixing, and shut-off nozzles.
Read More
How to Set Barrel Zone Temps in Injection Molding
Start by picking a target melt temperature, and double-check data sheets for the resin supplier’s recommendations. Now for the rest...
Read More
How to Get Rid of Bubbles in Injection Molding
First find out if they are the result of trapped gas or a vacuum void. Then follow these steps to get rid of them.
Read MoreRead Next

Advanced Recycling: Beyond Pyrolysis
Consumer-product brand owners increasingly see advanced chemical recycling as a necessary complement to mechanical recycling if they are to meet ambitious goals for a circular economy in the next decade. Dozens of technology providers are developing new technologies to overcome the limitations of existing pyrolysis methods and to commercialize various alternative approaches to chemical recycling of plastics.
Read More
People 4.0 – How to Get Buy-In from Your Staff for Industry 4.0 Systems
Implementing a production monitoring system as the foundation of a ‘smart factory’ is about integrating people with new technology as much as it is about integrating machines and computers. Here are tips from a company that has gone through the process.
Read More
Understanding Melting in Single-Screw Extruders
You can better visualize the melting process by “flipping” the observation point so that the barrel appears to be turning clockwise around a stationary screw.
Read More