
How to Split & Clean Flat Dies
Notice a drop-off in quality of your flat film or sheet? It may signal that a die ‘split-and-clean’ is due. Here’s how to get going.
Cleaning supplies such as die soap and copper gauze should be in your toolbox.
As the die body is raised, cut the molten polymer strands that stretch between the die bodies
Always use the protective cover when transporting the die or when torqueing the die-body bolts.

As the last reassembly step, install end plates on the die with cleaned and anti-seized bolts, followed by the end seals and the end-seal push plates. The end-plate bolts should not be torqued until the die has been brought up to operating temperature and the lip gap has been set.


At least once a year, a flat extrusion die for film, sheet, or coating must be disassembled for standard maintenance—a procedure called a “split-and-clean.” Typically you’ll know this procedure is due when you see a fall-off in quality. The purpose of the procedure is to remove polymer buildup from the flow surface inside the die, lubricate all moving parts of the adjustment system, and inspect the die for possible problems requiring part replacement or repair of critical surfaces like the flow areas. This not only protects your investment in the die but helps maintain optimal productivity and end-product quality.
To make a complete cleanout of polymer possible, the die has to be hot. Working with a hot, heavy die can raise safety issues and expose the die to possible damage from mechanical impacts. To minimize these concerns, it is important to follow carefully the recommended steps for carrying out a split-and-clean.


The following items should be on hand:
• The tool box that was supplied with your die. It should include a set of jack bolts for splitting the die bodies and a set of Allen wrenches for removing the die bolts.
• End-seal gaskets and, if needed, body seals.
• Cleaning supplies, which your die supplier may offer for sale as a kit. Included are copper gauze, die soap or other cleaning agent, brass scrapers of various sizes, an abrasive pad, heat-resistant gloves for handling hot die components, and a jar of high-temperature anti-seize for applying to coated threads and guide pins.
• A torque wrench—highly recommended to help ensure a more even torque across the die-body seal. Uneven torqueing can cause leaks.
• A wedge-shaped cardboard or other protective cover to be placed over the lip area.
• A working surface strong enough to support the weight and temperature of the die. Your die supplier may sell a specially designed die cart for this purpose.
• An adequate lifting device.
Before lifting the die, inspect the eye bolts. Make sure they are not bent or cracked; if they are, do not use them. They can break when lifting the die, causing injury to people and damage to the die.
The die-body bolts should be loosened while the die is still on line, leaving four body bolts hand-tight, one on each end and two toward the center. This will prevent the die from cooling during off-line disassembly. Once the die bolts are loose, unplug the electricals.
When working around the die, pay close attention to avoid impacting it, especially the front edges, the pilot, or the ends. Always use the protective cover when transporting the die or when torqueing the die-body bolts. No power tools should be used. No matter how carefully you handle them, damage will occur to the flow and seal surfaces.
DISSAMBLING THE DIE OFF-LINE
Once the die is placed on the working surface, remove the end-plate and seal-plate assemblies, and then use Allen wrenches to remove the die-body bolts—remembering that these will be hot. Underneath each bolt (except on some older dies) is a washer that must also be removed. Place the bolts and washers on a heat-proof surface and clean each one.
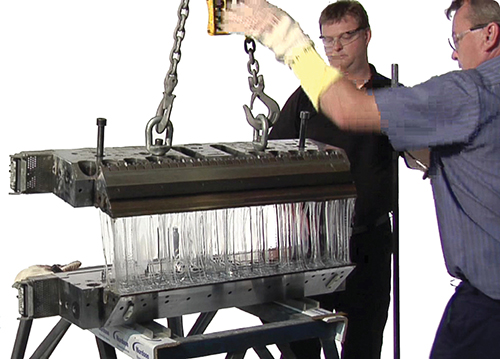
Before separating the die bodies, attach the lifting device to the eye bolts and make sure that the lifting chain is drawn tight in a perfectly vertical position so that the upper die body will be lifted straight up. Next, apply a generous coating of anti-seize to the jack bolts and insert them into the jack-bolt holes (designated by the letters JB) on the die body. Hand-tighten all of them, turning each approximately the same distance.
At this point, remove the protective cover from the front of the die and insert brass, aluminum, or high-temperature plastic shim stock—slightly smaller than the lip opening—between the lips. This will protect the lip surfaces in case the surfaces bang against each other as the die is taken apart.
Continue tightening the jack bolts. Some will loosen as others are being tightened, and the lip gap will start to open up. Check on the back of the die to make sure that the splitting of the die is even. If the opening on one side is narrower than the other, you need to apply more pressure to the jack bolts on that side. As the die bodies separate, the lifting chains become loose and have to be periodically readjusted as you apply more tension to the jack bolts. Keep turning the bolts evenly, keeping an eye on the gap between the die bodies to make sure that the bodies are parallel. Do this several times until the upper die body clears the dowel or guide pins that align the die bodies. At this point you can use the lifting device to raise the upper die body.
CLEANING THE DIE
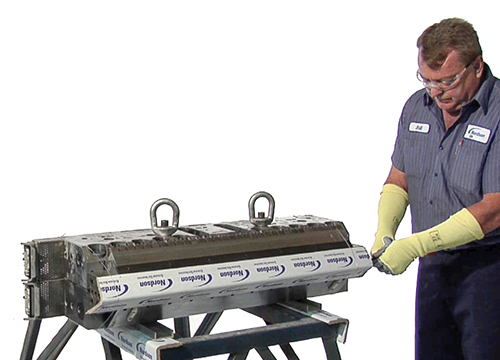
As the die body is raised, cut the molten polymer strands that stretch between the die bodies. Then move the upper die body away from the other half, remove the jack bolts so that they do not seize up, lay the upper body down on a clean, protected surface, and turn it over.
Once the bodies are separated they will start to cool quickly, so you will need to remove the polymer as quickly as possible. Having a co-worker (or co-workers if it is a large die) clean one of the die halves while you clean the other is a good idea.
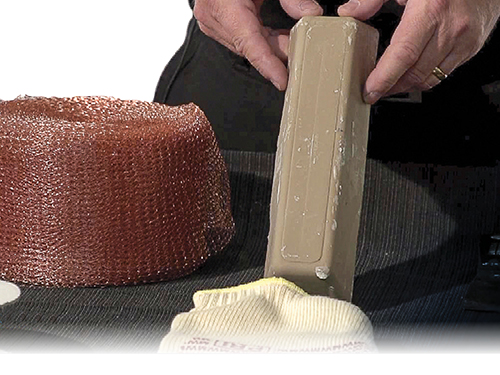
Using an assortment of brass scrapers, remove all of the polymer from the flow surface, the front lip edge, and the seal surface. Scrape the die lengthwise where possible.
Next, apply the die soap to all of the above surfaces, working on one section (about 2 ft) at a time. The soap will melt as it is applied. Using steady pressure, rapidly clean away the die soap with the copper gauze, being careful not to let the hot soap splatter onto you or a colleague and also avoiding getting the soap into the threaded body bolt holes, where it would be very difficult to clean out. You will need to change to fresh gauze periodically.
Once the polymer has been completely removed, wipe the flow surface with a clean cotton rag to remove any film or haze left behind. Use the abrasive pads on the seal areas of the die and on the ends—but not on the flow surfaces, which they can damage.
Next, using compressed air, blow out each individual die-body hole. Finally, remove the die-lip adjusting bolts and clean, lubricate, and reset them. Consult your owner’s manual on how to do this.
Now is the time to inspect the flow surfaces and front edges of the die to see if there are nicks, dents, or dings that need repair. It may be possible to minimize the damage while the die is on-site at your plant, but in general it is not possible to do a full repair.
Consult your die supplier. Many variables affect the severity of the damage and the type of repair that is required. You may need to send your die to the supplier for rework, although the supplier’s service team may be able to polish out dings at your facility—or, for a short-term fix, fill in a ding with nickel.
REASSEMBLING THE DIE
Before placing the upper body over the lower one, apply a thin coat of anti-seize to the dowel pins and place the shim stock on the die-lip surface of the lower body.
You will need to work with a colleague as you lower the upper body onto the lower one. One of you will hold the upper body straight, using a straight metal bar, as it is being lowered into position, while the other person closely monitors the positioning of the upper body onto the dowel pins and uses a steel handle to keep the die halves completely parallel. (Note that in cases where the die bodies are of unequal masses, differentials in thermal expansion may cause difficulty at this stage. You may have to wait until the die has cooled off completely before rejoining the die bodies.)
Once the upper body has been lowered onto the pins and the lift chains have become loose, there is often still a gap between the bodies. To remedy this, take two body bolts, coat them with anti-seize (on the head and threads as well as on both sides of the washers), insert them into the center of the die, and, using Allen wrenches, hand-tighten them, making sure that the die halves are parallel as they are being squeezed together. (You may need more than two bolts for longer dies.) Then, starting from the center, insert the remaining body bolts, all similarly prepared with anti-seize.
Torqueing of the body bolts should be done after the die has been put back on line. Before torqueing, place the protective cover over the lip area. Refer to your owner’s manual for the body-bolt torqueing sequence and specifications. Using nice, smooth movements of the torque wrench, begin with the four center bolts, using a crisscross pattern between the four. Then move on to the next outer bolt on each side, and so on until all bolts are tightened.
Finally, install the end plates. At that point, your die is ready to go back into production.


Related Content

Bonding, Sintering Tech Advances Metal Bonding for Mold, Die Components
NPE2024: Punch Industry USA exhibits P-Bas, intended to replace the use of 3D printers when producing mold and die components, as well as a variety of mold component supplies.
Read More
Is Your Die Flow Changing Despite Following All the Correct Formulas?
Maybe the problem is that you're starting up with a dry die. Here are tips to solve this issue.
Read More
Updated Software Reduces Die Design Iterations
New software said to reduce the number of fine-tuning iterations and die development time by at least 50%.
Read More
Spiderless Pipe Die Touts Material Savings
Capable of providing a finished extrusion with OD from 2 in.-15 in.
Read MoreRead Next

How Polymer Melts in Single-Screw Extruders
Understanding how polymer melts in a single-screw extruder could help you optimize your screw design to eliminate defect-causing solid polymer fragments.
Read More
People 4.0 – How to Get Buy-In from Your Staff for Industry 4.0 Systems
Implementing a production monitoring system as the foundation of a ‘smart factory’ is about integrating people with new technology as much as it is about integrating machines and computers. Here are tips from a company that has gone through the process.
Read More
Advanced Recycling: Beyond Pyrolysis
Consumer-product brand owners increasingly see advanced chemical recycling as a necessary complement to mechanical recycling if they are to meet ambitious goals for a circular economy in the next decade. Dozens of technology providers are developing new technologies to overcome the limitations of existing pyrolysis methods and to commercialize various alternative approaches to chemical recycling of plastics.
Read More