
Keep Leaks Away From Your Film Line
Tips & Techniques
Here’s a guide on how to keep these leaks from occurring in the first place, and how to clean them up the right way if they do happen to crop up.
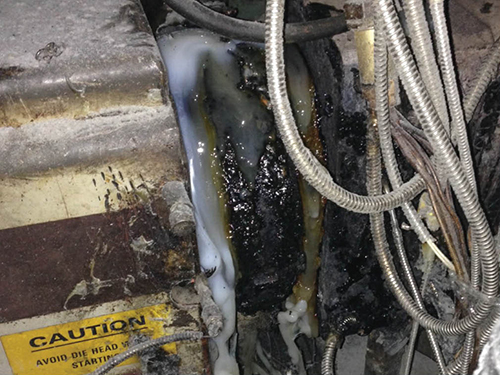
If sealing surfaces are not clean and properly aligned, eventually polymer will leak from the extruder head clamp onto wires, causing damage and delaying pro
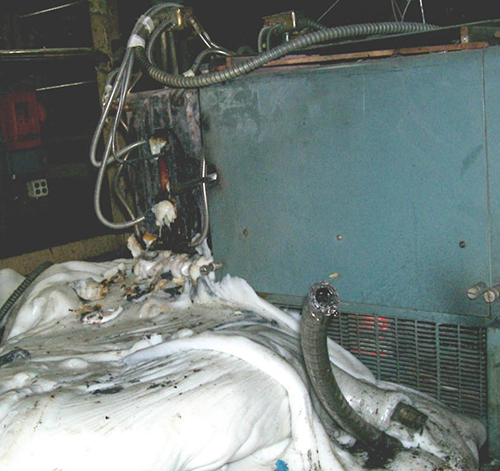
Here, a leaking screen changer was allowed to drool on the floor for days.


Leaking plastic often causes substantial damage to wiring and other extrusion parts that eventually cost time and money to repair…while production waits. Another expensive loss to production and quality often occurs when extrusion components are inadequately cleaned. These problems can usually be traced to a poor understanding of how things work. Here’s a guide on how to keep these leaks from occurring in the first place, and how to clean them up the right way if they do happen to crop up.
SEALING SURFACES


All extrusion systems have sealing surfaces that have to operate hot and must seal against a few thousand psi in order to prevent plastic from leaking. These are metal-to-metal surfaces found in extruder flanges, adapters, dies, etc. When delivered new, these surfaces are free of dents, scrapes, and burned polymer. They will seal without fluoropolymer O-rings or high-temperature gaskets if they remain in this condition. The width of these (often slightly raised) surfaces cannot be too narrow or the steel may crush. If they are too wide, there won’t be enough pressure to allow them to seal properly. Quarter-inch (6-mm) wide sealing surfaces around flow cavities generally provide the best results.
Then, in order for these surfaces to seal, they must be aligned so their surfaces press against each other equally, all the way around. On dies or any parts held by bolts, the bolts must be torqued randomly and evenly around the pieces. On adapters or any screw-together parts, it is wise to tighten them normally until they bottom out. Then break them loose, and tighten them again rapidly. On extruder flanges, where most leakage occurs, align the gap between the two flanges parallel to each other using a pack of long feeler gauges.
Take note of the die package; if it can move sideways (horizontally) easily, then side-to-side alignment is not as critical as top-to-bottom alignment. After alignment is confirmed, tighten the head clamp or bolts. They should be retightened when hot. Note that if the extruder is not level, the top of the blown film die will not be level, assuming all other pieces of the system are built and aligned properly. Level the extruder first.
If any sealing surface has scrapes, grooves or dings in it, leakage is inevitable. Also, any burned polymer that accumulates on their surfaces will eventually keep them apart, allowing new melted polymer to enter between them. This starts an unpleasant chain reaction, as the newly wedged polymer will then exert its pressure in all directions, which could pry the sealing surfaces still further apart.
In this scenario, tightening the leaking surfaces is like trying to squeeze every particle of polymer or carbon out from between two flat steel surfaces. You may slow the leakage, but you probably will never stop it completely unless you repair, clean, and align the sealing surfaces properly.
CLEANING DEGRADED RESIN
Polyethylene (or most resins, for that matter) will degrade from the dual effects of heat and time. First it turns yellow, then brown, and ultimately black (carbon). Degradation is accelerated when you add in oxygen from the air.
Extrusion machine builders go to great pains to ensure that there are no voids or dead spots in flow cavities where the plastic touches and flows within hot steel. All such surfaces must be polished and perhaps even plated to a mirror-like finish to reduce resin hang-up. However, during processing, the viscous plastic molecules that actually touch these flow surfaces will stop moving. Nearby plastic will slow for some time until more plastic pushes it forward. This increases the residence time of that particular plastic and accelerates degradation.
Because of this, and because all systems are not perfect, don’t ever stop the flow of plastic through the system unless absolutely necessary. Instead, keep the extruder “drooling” at a slow speed (around 5 rpm), during any necessary shutdown of production in order to reduce resin degradation.
Normal shutdown and startup procedures are as simple as this:
1. Do not stop the extruder until the line is as cool as possible.
2. Start the extruder as soon as possible after any shutdown.
On blown film systems, drooling from a die with an external air ring is not a big deal as long as someone occasionally removes the resultant “chimney” of polymer before it encases an air-inlet diverter or the air-ring lips. (Incidentally, do your reprocessing people a favor and drop these drools separately onto the floor with the cold side down so they do not pick up dirt, small tools, etc. and become a mass of Olympic rings that others must untangle later.)
Drooling in an IBC die is far more challenging. I’ve heard that some processors have designed devices that cut the plastic melt as it emerges from the die lip. Then, the resultant chimney of mostly hard plastic can be removed as a strip, instead of a ring, which is very difficult to cut and remove. I have not tried this yet.
Cleaning polymer from any polished or plated flow surface must be done with soft metal tools such as brass shim stock. Otherwise these surfaces will scratch and will cause far more degraded polymer to accumulate on the surface in the future. Chrome is very hard. Nickel is less hard. Both platings are only about 1-mil thick and neither can protect the surface from damage. Even water will wear away a stone, eventually.
Blown film die lips occasionally get fouled with degraded resin that results in film with die lines, poor strength, poor optics, and a variety of other problems. It is common practice to use hand tools like 0.030-in. brass shim stock to dig down an inch or so into the die lip and scrape out the offending particles from the final lip land. Keep in mind that as you perform this task, you are introducing air (oxygen) into the die gap. It is wise to keep the extruder screw drooling at a minimum speed in order to continuously refill the die gap with resin. This will exhaust the oxygen that you allowed into the hot die gap and will help to push out the particles that you have dislodged. Yes, you will have to continually scrape new resin off the die-lip surface while doing this.
Blown film dies also can accumulate degraded resin or additives around the top outside surface of the die lips. These degraded pieces drag on the molten film surface and must eventually be scraped off the die surface. In addition, the entire exposed die surface near the lip opening must be cleaned; otherwise any residual material will just make the job more difficult during the next cleaning as it turns into hard carbon.
Die lips have corners that have been carefully rounded, plated, and polished. They are the last metal to touch the melt during extrusion. These corners are still relatively sharp and therefore can be more easily damaged than a flat surface…but they need to be cleaned also.
Cleaning the top of blown film die lips is relatively easy unless the manufacturer has machined a groove along the lips, supposedly in order to protect them from damage. A custom-shaped brass scraping tool is usually required to properly clean these recessed die lips.
Note: In my 50 years of examining die lips, I have yet to figure out how these recessed lips prevented any damage. Most damage occurs when the lip pieces are apart and are being handled for internal cleaning. It is common practice to protect die lips by leaving a bead of plastic on top of them for extended shut-downs. Also, if any clean, empty die lip is not protected with at least some tape, it could be more easily damaged and some foreign material could enter the die.
Having sweated over hot extrusion pieces and cleaned them completely, there is no way that I am going to finally reassemble each piece without spraying the flow surfaces with silicone mold release at the last minute.
During any shutdown for screw removal, die cleaning, etc., there will typically be some remaining polymer that was exposed to room air while it was hot. It has usually picked up some dirt from gloves, scrapings, dust, etc. and is probably already turning yellow. (At startup, please visualize this contaminated resin slowly oozing it’s way onto the surfaces that you have just cleaned.) At the last minute, it is advantageous to scrape away this contaminated material (if possible) and spray the fresh surface with silicone. This may require turning the screw on for a few seconds in order to push some clean polymer out for a last-minute scrape of the contaminated resin, assuming your heat is still sufficient.
A Dow chemist told me years ago that only one molecule of silicone is necessary to perform the job. I prefer to see the sheen of a silicone spray on a cleaned surface. If you are using silicone paste and applying it with a rag, use only what you need, as this product is expensive.
Note that any silicone will take some time to clear from the internal flow cavities. Excessive use can cause ripples in the film bubble at the port flow lines for 20 minutes after startup, but it will clear eventually. On any film line equipped with corona surface treating, you may need to delay pulling a bubble until the silicone has cleared so that the collapsing frame and rollers do not become contaminated with silicone.
I spray silicone onto the top of any die lips that I have just cleaned, with the extruder temporarily shut off.


Related Content

How Much L/D Do You Really Need?
Just like selecting the extruder size and drive combination, the L/D should be carefully evaluated.
Read More
Cooling the Feed Throat and Screw: How Much Water Do You Need?
It’s one of the biggest quandaries in extrusion, as there is little or nothing published to give operators some guidance. So let’s try to shed some light on this trial-and-error process.
Read More
How Polymer Melts in Single-Screw Extruders
Understanding how polymer melts in a single-screw extruder could help you optimize your screw design to eliminate defect-causing solid polymer fragments.
Read More
Understanding the ‘Science’ of Color
And as with all sciences, there are fundamentals that must be considered to do color right. Here’s a helpful start.
Read MoreRead Next

People 4.0 – How to Get Buy-In from Your Staff for Industry 4.0 Systems
Implementing a production monitoring system as the foundation of a ‘smart factory’ is about integrating people with new technology as much as it is about integrating machines and computers. Here are tips from a company that has gone through the process.
Read More
Understanding Melting in Single-Screw Extruders
You can better visualize the melting process by “flipping” the observation point so that the barrel appears to be turning clockwise around a stationary screw.
Read More