
TOOLING: What You Can Do About Mold Buildup
It depends on the materials and additives you use, and the kinds of mold detail, but adequate venting, not overheating the material, and mold coatings are your best defenses.
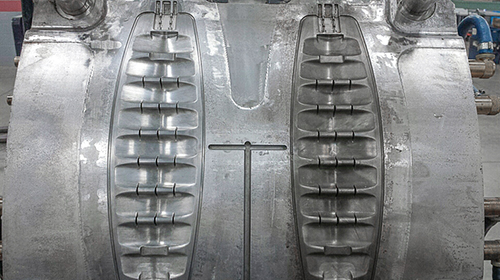
This half-cleaned tool still has buildup on the right half. Some resins are more prone to cause buildup than others, but adequate venting and not overheating the resin are essential preventive measures.
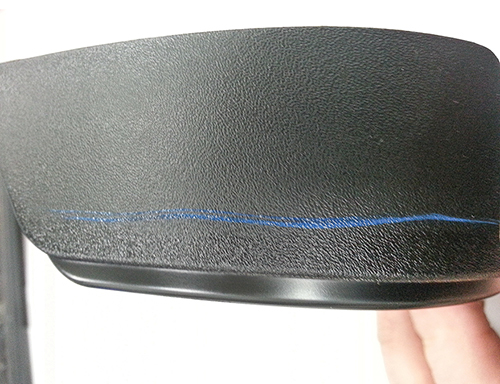
Cavity buildup can affect part gloss, as seen in the upper portion of this part (above the blue mark). The material was a copolyester TPE. The glossier portion below the blue mark was cleaned in 5 min with a special cleaner.

This month I would like to discuss buildup in the mold cavities and some solutions to address this issue, both prevention and cleanup. There are numerous root causes for mold buildup, from lack of venting, plateout from the plastic material, residue from the plastic causing cavity discoloration, and flame-retardant additives, to degraded material from running hotter than recommended or allowing plastic to sit in the barrel and not purging. Buildup can cause gloss issues on parts, visual defects, and sticking problems.
I have experience with many materials, but not all, so some of you will have first-hand knowledge of buildup issues with other materials not mentioned here. Please comment and share if you do.


On some cheaper grades of materials, specifically lower-cost polycarbonates, a nasty thick buildup can occur over time on the cavity surfaces, causing appearance and sticking issues. These deposits can be very difficult to remove. The only thing I have found that can be done to the tooling to reduce—not eliminate—the buildup and assist with the cleaning process is to apply a coating to the cavities. My preference is a diamond chrome. This provides a very hard surface that helps resist the buildup and protects the cavity surface finish.
I have also had buildup issues with nylons containing additives such as UV stabilizers and impact modifiers, where the buildup will cause visual defects with inconsistent gloss on the part. This can necessitate very frequent cleaning of the cavities to maintain gloss specs, and problems can arise if proper cleaning methods are not used. The best solution I have found with this type of buildup is again coating the tool with diamond chrome, which has a major impact in reducing buildup and protecting the cavities and gloss when cleaning is needed.
Some of you are no doubt thinking, “That costs money,” and well, yes, it does. But if the problems with part quality and cleaning time and labor justify the cost, then there is payback. If the part has tight gloss specs, causing scrap or rejects, the cost of coating the cavities is minimal in the big picture.
Buildup from lack of adequate venting can cause visual defects on the part and downtime from the need to clean the tool in the press. Venting methods are a whole topic in itself, so I will not get into it in depth here. The areas in the cavity where such buildup tends to be common are at end-of-fill areas, details that trap gas, and knit lines.
Some materials have more tendency toward gassing and buildup than others, specifically glass-filled materials. But any material can leave residue from gassing if the tool is not properly vented. This will show up as brownish stains on the steel, which can also lead to erosion. This buildup over time can also appear as a non-fill area on the part, specifically in deep ribs and details with PC and PC/ABS. It can be difficult to clean from the cavity details.
These areas are not always easy or inexpensive to vent because they are not at the parting-line surface. They typically require an insert, ejector pin, or vent pin to allow the gas to escape and require cleaning during maintenance on the tool.
Many molders will process around burns on the part, which at times is a necessity, but opens up other issues with the injection-speed changes in the process. So venting must be maximized in these situations before using processing as the solution. At times there can be a fine line between incurring flash and burns, depending on the skill and knowledge of the toolmaker. There are also times when an overflow tab is necessary on some large parts running glass-filled materials at the end-of-fill knit lines. Venting should always be part of the focus in the tool design, with attention to the material being used (see also January’s column).
Another type of buildup I have seen is the residue some materials leave over the entire cavity surface. This discolors the cavity and can appear as a brownish color. This can affect the gloss on the part over time and contribute to sticking. I have never coated a cavity to prevent this type of buildup because it can take thousands of cycles to appear.
So this form of buildup is typically not a big issue, in my experience, and can be dealt with as part of regular tool maintenance. Do not confuse this buildup with discoloration on the steel from heat stress. Fine steel details or areas with lack of cooling can discolor from the extreme heats they see.
Processing can also contribute to buildup in your cavities. By running at the high end or above the recommended range for the material, you will be more likely to have outgassing byproducts that will lead to buildup. As mentioned above, additives can contribute to buildup, especially fire retardants when run at higher temps or when melt is allowed to sit in the barrel. And, as many of you readers know all too well, some materials degrade very quickly when allowed to bake in the barrel.
As mentioned in my previous columns, my goal is always to focus on the tool to provide a large process window and address problems. But with buildup situations, I have found that all I can really do is try to protect the cavities with a coating and reduce the intervals for cleaning. So the solution to buildup does require cleaning and extra maintenance on the tool. Media blasting (aluminum oxide, glass beads, and others), dry-ice blasting, or manual polishing by a toolmaker or technician are the typical methods for removing buildup.
Last year, I also developed and put on the market a new cleaner. It dissolves the buildup (and rust), is non-corrosive, and makes cleaning in the press an option. It’s called Zap-Ox, and you can learn more about it here.


Related Content

A Simpler Way to Calculate Shot Size vs. Barrel Capacity
Let’s take another look at this seemingly dull but oh-so-crucial topic.
Read More
Why (and What) You Need to Dry
Other than polyolefins, almost every other polymer exhibits some level of polarity and therefore can absorb a certain amount of moisture from the atmosphere. Here’s a look at some of these materials, and what needs to be done to dry them.
Read More
The Importance of Melt & Mold Temperature
Molders should realize how significantly process conditions can influence the final properties of the part.
Read More
PBT and PET Polyester: The Difference Crystallinity Makes
To properly understand the differences in performance between PET and PBT we need to compare apples to apples—the semi-crystalline forms of each polymer.
Read MoreRead Next

TOOLING: Designing the Tool for the Material
To design a mold for the widest processing window and the fewest problems, start by considering the conditions imposed by the material being run.
Read More
TOOLING: Designing the Tool for the Material
To design a mold for the widest processing window and the fewest problems, start by considering the conditions imposed by the material being run.
Read More
TOOLING: Designing the Tool for the Material
To design a mold for the widest processing window and the fewest problems, start by considering the conditions imposed by the material being run.
Read More