What You Need to Know About Locating Rings: Part 1
Selecting the right locating ring and putting it to good use takes a lot of thought.

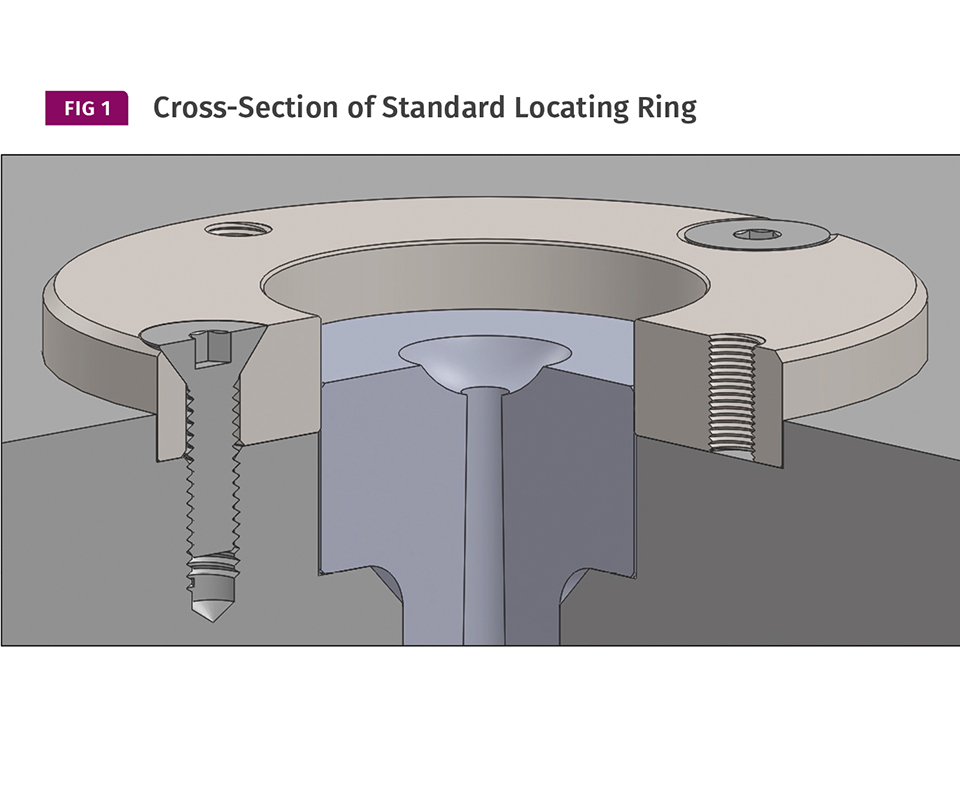
The basic type of locating ring can properly align a mold to a platen, but it is not user-friendly, especially on large molds.
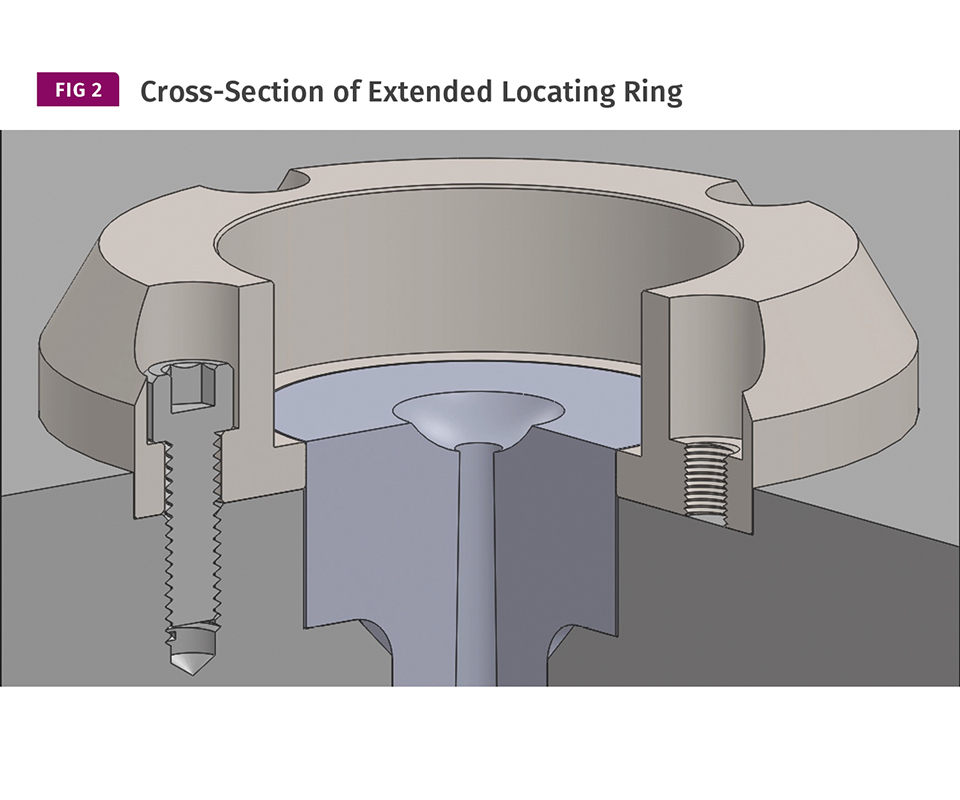
Locating rings with a tapered or extended lead-in are always a welcome sight for the setup men on the production floor, as they make it faster and easier to position the mold in the machine.
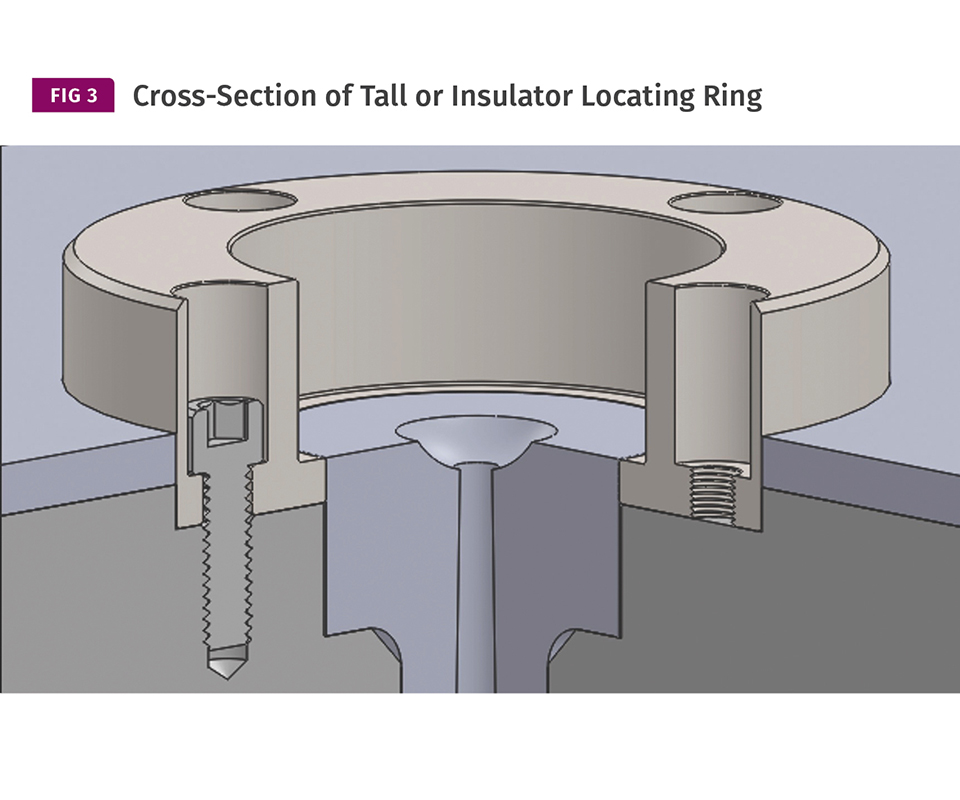
Locating rings with a tapered or “extended” lead-in generally will not work with molds having a high-temperature insulation sheet. You will need a taller locating ring designed specifically for an insulator sheet.
The locating ring must always be concentric with the orifice of the sprue, no matter where its position. If not, there will be a misalignment between the molded sprue and the machine’s nozzle tip.
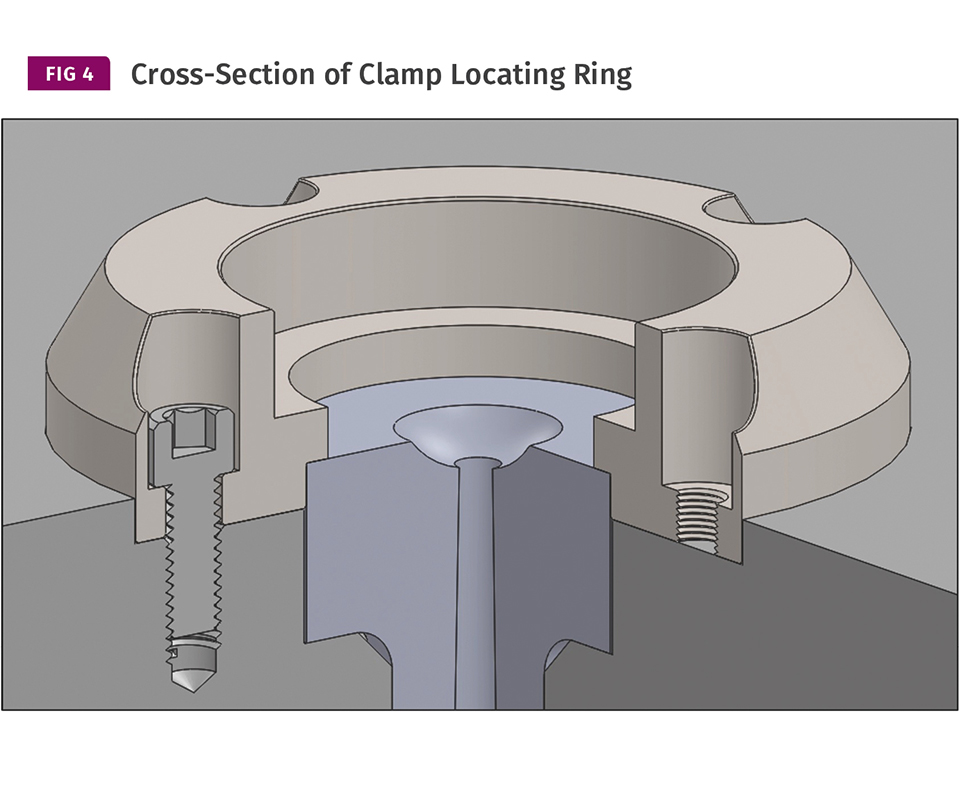
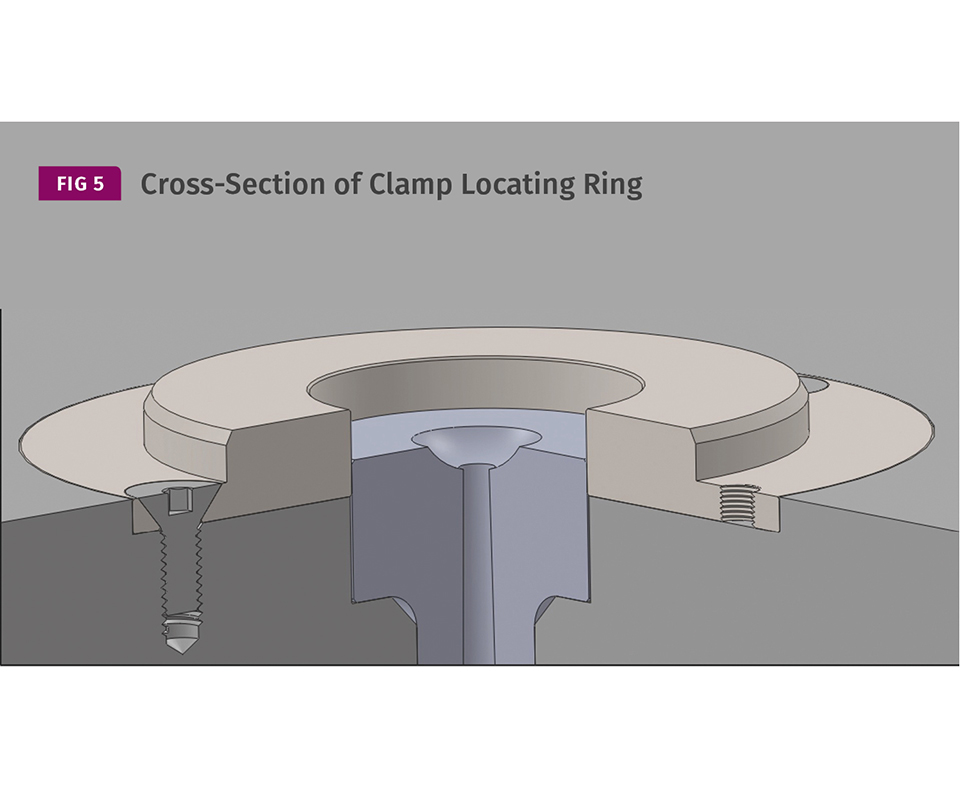
The inside diameter of the clamp locating ring is stepped down to 13/4 in. to retain the sprue bushing and prevent it from “blowing back.”
The flanged or “platen-backed” type locating ring can provide several advantages that the other types of rings cannot.
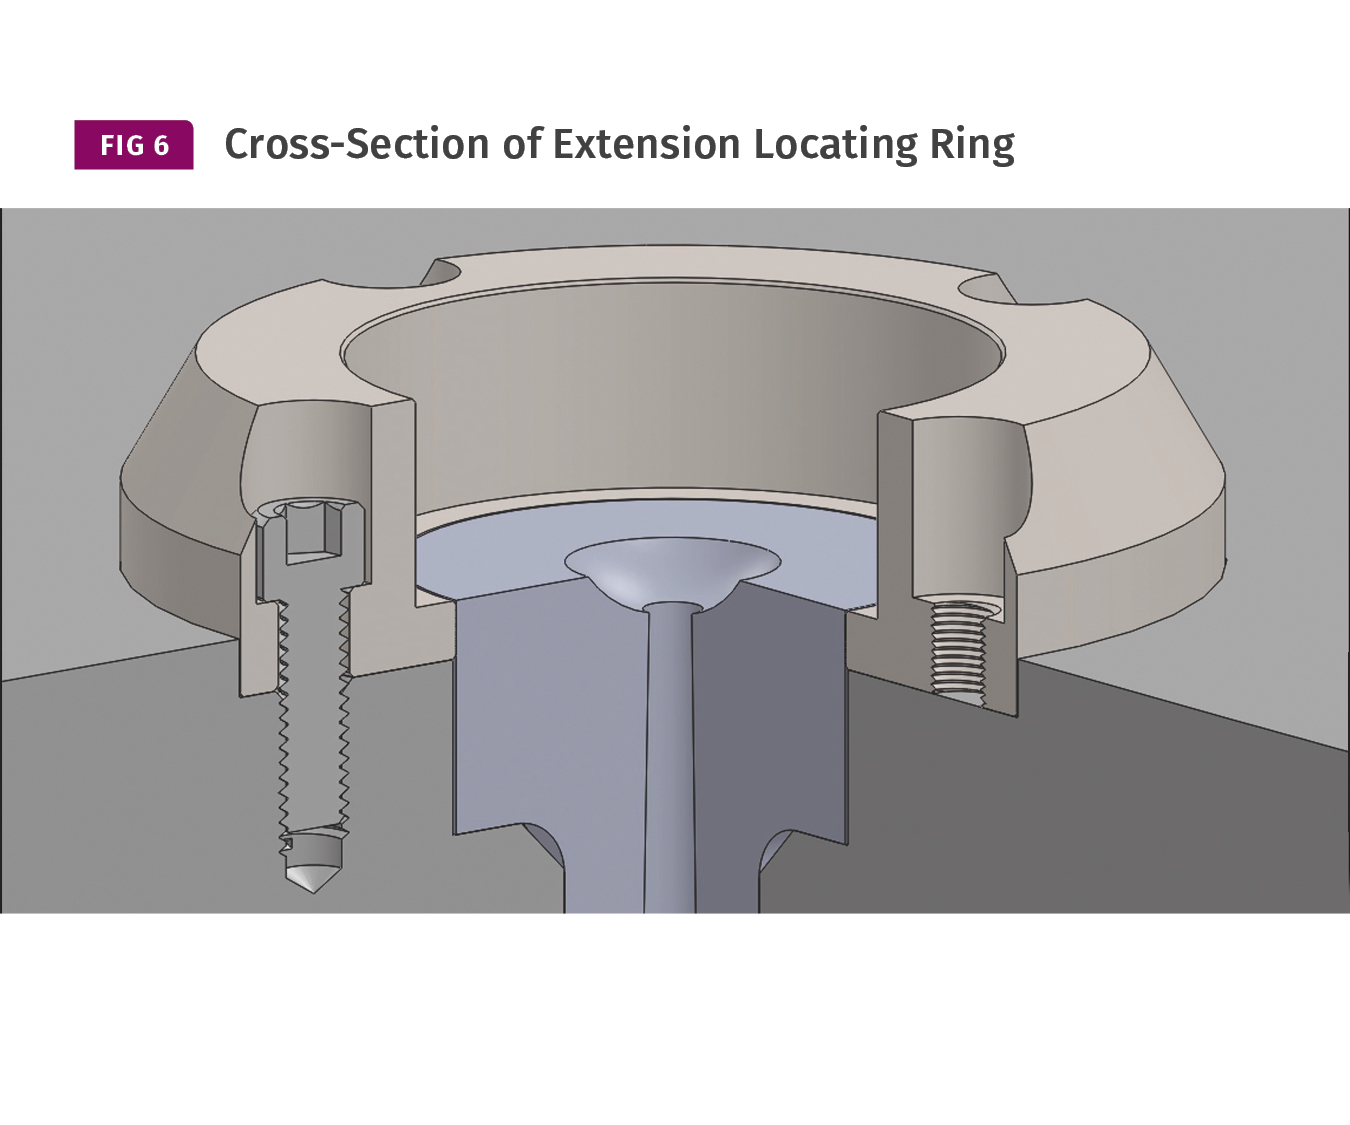
If the sprue bushing is recessed in the mold, you will not be able to seat the machine nozzle tip against the bushing without ripping the heater band off the nozzle body or nozzle tip. In this case, you need an extension or extension-nozzle type of locating ring.


It takes a significant amount of time to design an injection mold. The types of steel, heat treatment, surface finish, gate size, and a hundred other details are carefully considered. But how much thought is given to the selection of the locating ring? In many cases, not enough. This month I will discuss the various types of locating rings available and the intended function of each design.
A locating ring’s basic job function is to locate or align the orifice of the hot or cold sprue with the through hole in the machine’s stationary platen. The sprue orifice is usually in the center of a sprue bushing, and the locating ring aligns the bushing to the center of the platen. One exception is if a MUD or other quick-change type of frame is used. In this case, the locating ring aligns the frame to the platen.
The locating ring is usually in the center of the mold. Sometimes, though, the locating ring is offset by several inches to reduce the size of the mold base, such as with a single-cavity, edge-gated part.
It is also offset in a MUD or other quick-change “U” style frame. The locating ring must always be concentric with the orifice of the sprue, no matter where its position. If not, there will be a misalignment between the molded sprue and the machine’s nozzle tip.
The outside diameter of an American standard locating ring is typically 3.990 in. Smaller ones or rings mounted in a counter-bore that is larger than 3.991 in. can also cause misalignment.
There are several different types of locating rings. Almost all of them are mounted in a 7/32-in.-deep counter-bore in the top or injection clamp plate. The basic or “standard” type of locating ring can properly align a mold to a platen, but it is not user-friendly, especially on large molds. It only extends beyond the face of the clamp plate by 5/16 in. The “LN” version, which is specifically for the old Lester and Newbury machines, extends only 7/32 in. If you factor in the 0.100-in. chamfer on the front face of the rings, there’s not a lot of “land” or bearing surface holding the ring in the platen-alignment hole.
Another type of locating ring has a tapered or extended lead-in. This is always a welcome sight for the setup men on the production floor. This type makes it faster and easier to position the mold in the machine, thereby reducing potential damage to the ring and the platen. Most extended lead-in locating rings extend beyond the face of the mold’s clamp plate by 25/32 in. The initial tapered portion is about 7/16 in. long. The remaining 5/16-in. straight portion is the required land length.
Most commercially available locating rings with a tapered or “extended” lead-in will not work with molds having a high-temperature insulation sheet. Insulation sheets are typically 1⁄4- or 1⁄2-in. thick. Even the thinner 1⁄4-in. sheet will almost wipe out the land
length required to hold the ring in the platen. In this case, you’ll need a taller locating ring designed specifically for an insulator sheet. Unfortunately, very few suppliers offer this type of ring with a tapered lead-in to help guide the mold into the platen orifice.
Another type of locating ring is the “clamp” type. The inside diameter of this type of ring is stepped down to 13/4 in. to retain the sprue bushing and prevent it from “blowing back.” Bushings are usually bolted to the mold base with one or two 1/4-20 socket-head cap screws through the bushing’s shoulder. The clamp-type locating ring eliminates the need for this extra machining step, and there are no exposed screws on the face of the bushing to fill up with plastic.
However, you will need to add a dowel pin, key, or other alignment method when the bushing needs to be oriented due to the runner or part geometry. If the sprue bushing’s orientation is critical, it is best to key the bushing to the mold base—not the locating ring. Most locating rings are retained with socket-head cap screws. The screws have clearance around their head and body, which allows the locating ring (and sprue bushing) to rotate as much as one or more degrees.
The best type of locating ring to use is the flanged or “platen-backed” type. It can provide three additional advantages that the other types of rings cannot. First, since the screws are mounted outboard of the 3.990 in. diam., it’s almost impossible to fill up the heads of the mounting bolts or the threads of the jackscrew holes with plastic. Second, they provide a little more support to the center of the mold because the flange butts up against the platen. Third, you can add shim to the underside of the flange to compensate for a worn or “dished” platen. Depending on how much shim is used, a flanged locating ring can actually preload the center of the mold to help prevent parting-line flash. How important is that! If your platen is dished and you try to process around this flash, your process window becomes less robust. If you do not process around this flash, your parting-line will eventually hob.
Most locating rings have an inside diam. of 2 to 23/8 in. If the sprue bushing is recessed in the mold, you will not be able to seat the machine nozzle tip against the bushing without ripping the
heater band off the nozzle body or nozzle tip. In this case, you need an “Extension” or “Extension Nozzle” type of locating ring. They have a 31/4-in. inside diam., which provides the necessary clearance. Depending on the supplier, they are available in the standard, extended, or insulator styles.
Many mold-component suppliers offer various combinations of the different types of locating rings mentioned above. Personally, I would like to see even more combinations offered. Unless you are going to machine your own custom locating ring, choose the best one commercially available to suit each particular application. The cost difference between the least and most expensive type is not a lot and the benefits are significant.
ABOUT THE AUTHOR: Jim Fattori is a third-generation injection molder with more than 40 years of molding experience. He is the founder of Injection Mold Consulting LLC, and is also a project engineer for a large, multi-plant molder in New Jersey. Contact jim@injectionmoldconsulting.com; injectionmoldconsulting.com.
Related Content

How to Get Rid of Bubbles in Injection Molding
First find out if they are the result of trapped gas or a vacuum void. Then follow these steps to get rid of them.
Read More
The Effects of Temperature
The polymers we work with follow the same principles as the body: the hotter the environment becomes, the less performance we can expect.
Read More
How to Stop Flash
Flashing of a part can occur for several reasons—from variations in the process or material to tooling trouble.
Read More
How to Set Barrel Zone Temps in Injection Molding
Start by picking a target melt temperature, and double-check data sheets for the resin supplier’s recommendations. Now for the rest...
Read MoreRead Next

Lead the Conversation, Change the Conversation
Coverage of single-use plastics can be both misleading and demoralizing. Here are 10 tips for changing the perception of the plastics industry at your company and in your community.
Read More
Troubleshooting Screw and Barrel Wear in Extrusion
Extruder screws and barrels will wear over time. If you are seeing a reduction in specific rate and higher discharge temperatures, wear is the likely culprit.
Read More
Understanding Melting in Single-Screw Extruders
You can better visualize the melting process by “flipping” the observation point so that the barrel appears to be turning clockwise around a stationary screw.
Read More