
A Processor’s Advice on How to Get Moisture Testing Right
Follow these four steps to ensure your results are on target.
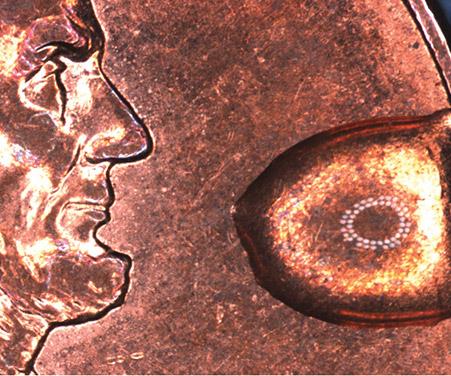
Instrument sensitivity is crucial when measuring moisture, as sometimes the amount of water is the size of a pin head.
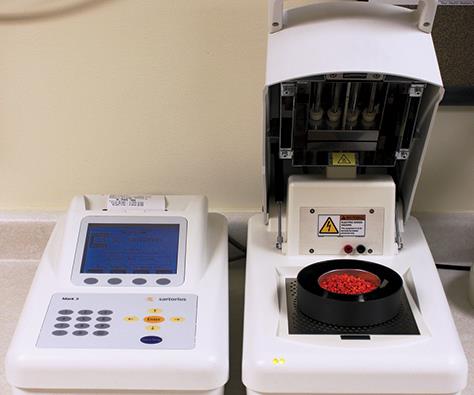
Gravimetric moisture analyzers are commonly used to determine the percentage of moisture in resin. The instrument is essentially a sensitive balance contained within an oven.
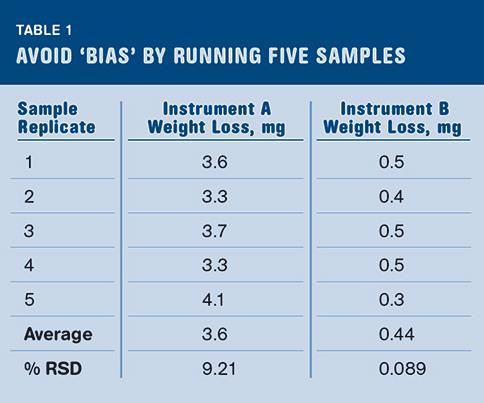
Running five replicates will give you a good idea of whether your moisture balance has an issue with a biased result. This shows real data from a pair of moisture balances tested in this way.
This study was conducted with relative humidity detection using the same type of sample. The % relative standard deviation (RSD) is much larger for the moisture analyzer due to the smaller sample size, as it is more susceptible to slight changes in the moisture quantities of the sample. By performing 10 replicates, variations in the samples can be averaged out and a true overall value obtained.


Gravimetric moisture analyzers are the most commonly used instrument for determining the percentage of moisture in resin. The instrument is essentially a sensitive balance contained within an oven. The sample is placed inside and the mass is compared before and after the heating cycle to determine the percent moisture.
Performance specifications for these instruments are often derived in tightly controlled laboratory environments rather than in a production or plant setting. As a result the values displayed on product brochures may not represent the instrument’s performance in a plant setting using your methods and materials. It is important to verify your instrument’s performance where it’s actually used and with your methods and materials.


SENSITIVITY IS KEY
It is helpful to get a sense of scale for what it is that you’re measuring with a moisture balance. If you assume that your target moisture for a resin is no greater than 0.02% and you use a 40-g sample, than you need to be able to accurately measure a difference in weight of 8 mg (0.008 g). That amount of water is roughly the size of a pin head. If your limits are even lower than 0.02%, the amount you must measure reliably is even tinier.
When dealing with measurements of such small quantities, minor issues can cause large effects in results. A variety of interferences can affect the instrument reading, including these six :
•Air currents,
•Vibrations,
•Electromagnetic fields/static,
•Whether the unit is level,
•The materials used,
•The method used.
All of these factors indicate that you should read carefully the manual that comes with your instrument and place it in the best possible location.
In addition, take the following five steps to characterize the performance of your moisture balance:
Step 1: Ensure that your moisture balance does not have a bias or interferences. Run five replicate tests with a weight placed in the center of an empty pan. The weight simulates the mass of your sample, but will not give off any mass when heated. The results of all the tests should ideally be 0%, but there are many reasons it may be otherwise.
The six common interferences listed above may come into play and cause a bias in the result. Also, something as simple as a single bead of sweat from the hand of the person running the test transferring to the outside of the test pan would be enough to give you 8 mg of mass that will evaporate. Other things may come into play as well. Oils transferred from hands to the pan, or residual oils on the sample pan from its own manufacturing process may be lost during the heating process. The moisture balance is indiscriminate in measuring what evaporates off your pan and sample. Any mass loss is interpreted as being water, whether it is or not. By running five replicates you will have a good idea of whether your moisture balance has an issue with a biased result. Table 1 shows real data from a pair of moisture balances tested in this way.
Instrument A in Table 1 shows a definite bias that should be reduced or eliminated in order to obtain true results. Instrument B shows a small amount of bias that will provide a more accurate result. The variation in measurements shown by the percent relative standard deviation (% RSD) also indicates that results from Instrument A will have much more variation than results from instrument B.
Step 2: Characterize the detection limits. One of the most common methods of determining the method detection limit comes from the U.S. EPA standard, 40 CFR 136, Appendix B. A simplified version of this method is explained here for illustration. Please refer to the CFR standard when characterizing your instrument. The process involves testing seven replicate samples the same way as in Step 1, except that to each sample a precise, known amount of water is added. The amount added should be around three to five times the expected detection limit of the instrument. Twenty milligrams is a good place to start for many moisture balances. The 20 mg can either be weighed out with purchased solid standards certified to contain a certain amount of water or by accurately measuring out 20µl of water in a very accurate syringe.
The purpose of this test is to define the minimum amount of moisture that can be detected, and to identify the minimum amount of water that can be quantified with a reasonable amount of accuracy. These two quantities are referred to as the Method Detection Limit (MDL) and the Limit of Quantitation (LOQ). Ideally your LOQ should be below the moisture level that you want to dry your materials to, ensuring that you can accurately measure a value below the specification limit. The sidebar on p. 37 shows the equations needed to calculate the MDL and LOQ from the seven replicates.
Step 3: Verify that you’re actually testing water evaporation. This step involves sending a split sample to an outside laboratory to test the amount of water that is given off by the sample. The two instruments that can do this are a Karl Fischer-type titration instrument or a moisture analyzer with a relative-humidity (RH) detector. Both instruments are selective in detecting just the water that is within the sample.
Moisture balances only detect changes in weight; because of this, other processes that have nothing to do with the moisture level can bias the result. Chemical reactions occurring at elevated temperatures in air can result in either gaining or losing mass. Some additives may evaporate out of the plastic at higher temperatures and that weight loss will be interpreted by the instrument as losing moisture.
By sending out a split sample you’ll be able to measure and compare the results from your moisture balance to the amount of actual water to make sure the material isn’t undergoing some other process that is producing a biased result.
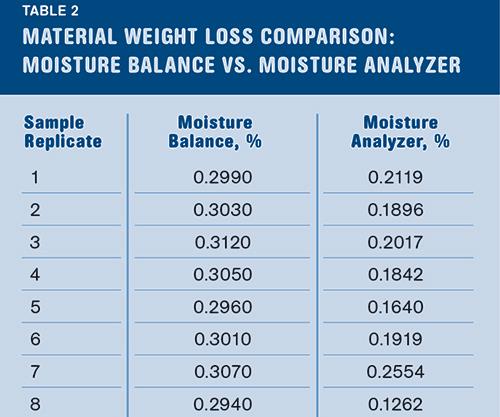
The moisture balance is only capable of detecting weight loss, regardless of the kind of mass loss that is occurring. A true moisture analyzer is capable of detecting only water loss by utilizing the RH detector, which can discern the difference between water and other volatile vapors being released from the sample. Table 2 shows that the sample is losing roughly 0.1% of its mass that is not water.
As shown in Table 2, the % RSD is much larger for the moisture analyzer due to the smaller sample size, making it more susceptible to slight changes in the moisture content of the sample. By performing 10 replicates, variations in the samples can be averaged out and a true value for the overall sample can be measured. The moisture balance required a much larger sample size for testing.
Step 4: Evaluation. Once all the data is collected it needs to be evaluated. Ideally your blank results are at or near 0 mg so that there are no biases or interferences within the instrument or the method. If there are biases, they need to be identified and eliminated to the best of your ability. This may mean moving the moisture balance to a new location or altering the method, such as using rubber gloves to avoid transferring sweat or grease onto the sample or sample pan.
The detection limits should be low enough that you can accurately measure to the specification levels of your materials. If the amount you’re trying to measure is below your LOQ that means that the value of the instrument reading is highly variable and more unreliable at that level. That ultimately translates to more variability in the measured moisture of the material that is being processed.
The samples should be confirmed to be giving off only water in the moisture balance. If you can’t adjust the method to make sure that only water is being released. then a moisture balance is not an appropriate instrument to determine the percent moisture of your material.
When these four steps are completed you can be certain whether you are getting accurate results from your moisture balances. You will be able to confirm whether your current procedures for testing for moisture are appropriate to the materials. You also will be able to identify potential problems with the testing process, if there are any, and if no problems exist, your production personnel will have confidence that they have reliable values on which to base their decisions. All of this translates into less variation in the results, which ultimately means less variation in processing, which reduces processing problems and saves time and money.


Related Content

Try This Alternate Method for Heating Your Torque Rheometer
Rheometers are generally not on all the time. And most users have found that the first test run in the instrument after heating up is not very reliable and is usually discarded. Try this method instead.
Read MoreComprehensive Optical Inspection for PET Preforms
Delta Engineering teams with Intravis to inspect preform mouth, body, thread and color.
Read More
Inline Inspection System for Wood Plastic Composites
Pixargus’ ProfilControl 7 DX WoodPlasticComposites measure all dimensions and geometrics, including deep grooves.
Read More
How Inline Vision Inspection Can Minimize Scrap in Molding
Once viewed by injection and blow molders as a necessary evil, machine vision technology today can continuously monitor and improve production while reducing costs.
Read MoreRead Next

Lab Investment Pays Off For Major Tube & Profile House
Teel started a testing laboratory in 2010 to support quality assurance and new product development and to troubleshoot manufacturing issues as they arise.
Read More
Advanced Recycling: Beyond Pyrolysis
Consumer-product brand owners increasingly see advanced chemical recycling as a necessary complement to mechanical recycling if they are to meet ambitious goals for a circular economy in the next decade. Dozens of technology providers are developing new technologies to overcome the limitations of existing pyrolysis methods and to commercialize various alternative approaches to chemical recycling of plastics.
Read More
Why (and What) You Need to Dry
Other than polyolefins, almost every other polymer exhibits some level of polarity and therefore can absorb a certain amount of moisture from the atmosphere. Here’s a look at some of these materials, and what needs to be done to dry them.
Read More