Apply the Power of a Troubleshooting Checklist to Your Process
Pocket guides provide processors an injection molding “crib sheet,” but in a process with thousands of interactions, applying if-this/then-that logic can’t always get you to a problem’s root cause.


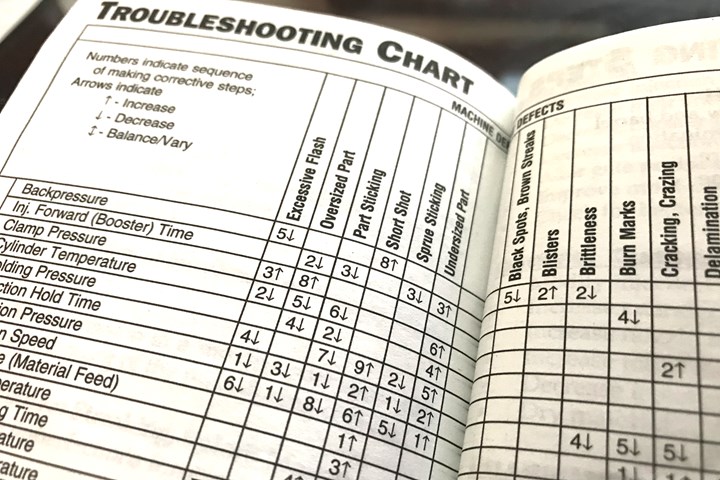
In the author's view, traditional processing guides in the hands of inexperienced personnel could encourage process tweaking without understanding root causes of problems. (Photo: IDES/Injection Molding Magazine Pocket Specs for Injection Molding, 5th edition)
It doesn’t seem to matter what area of our industry I’m in, whether medical devices or food packaging, a troubleshooting guide—also known as a process guide—eventually becomes a topic of conversation. There are few topics within the injection molding world that will provoke, shall we say, a “passionate” response from me, but these guides are one of them.
Another one is making process changes without knowing the “why”; without a root cause we are just guessing. Unfortunately, making process changes and not knowing the root cause definitely correlates with those troubleshooting/process guides. I learned early on in my career that these “guides” didn’t guide me to a corrective action to address process issues.


Third-Shift Button Pushers
I remember my days of working third shift as a new process technician at Cherry Electrical Products, formerly in Waukegan, Ill. On my very first day as a process technician, marking my two-month anniversary in the plastics industry, I was handed pair of steel side cutters and assigned six machines that I would be responsible for, including mold changes and troubleshooting.
I remember at one point asking, “How do I get rid of this flash?” and one of the senior process technicians handed me a pocket-sized guidebook. This troubleshooting handbook had a bullet point on flash, instructing me that decreasing the hold pressure or possibly the shot size would fix the issue. After trying both of those “handy” tips—sarcasm intended—I noticed that the flash remained. Albeit to a lower degree, but nevertheless, it was still there, and now some other parts within that same shot were short.
Noot all troubleshooting/process guides are as basic as my example, but they all seem to have the same focus, like a “just-get-it-done” crib sheet.
That’s OK, not to worry, because the guide also had a section on shorts. Following its guidance, I then increased the hold pressure and the shot size until the shorts were no longer present. But guess what was still hanging on to the end of some of my parts? You guessed it—flash. Keep in mind, at this point the extent of my training was limited to helping some of the third-shift process technicians with their mold changes. The training at this facility resembled the method our grandfathers used to teach our fathers to swim—throw them in the water and hope they figure it out.
Regardless of my lack of training, I had a feeling that I was missing significant aspects and characteristics of injection molding, despite what the pocket guide was telling me. Flash equals inject less material, and lower pressure and shorts equal the exact opposite. I even recall commenting that, “It can’t be that simple.”
After a frustrating night of not accomplishing much, I decided to ask one of the mold-repair team members about this particular mold. He confused me a bit with his response, which wasn’t an answer but a question of his own. “Did you have any issues with the runner sticking in the sprue?,” he asked. I replied in the affirmative and asked what that had to do with flash. He then complimented me on my brand-new, shiny steel side cutters. I bet most of you know where this is going.
At some point early in my shift when the runner stuck in the sprue, I must have unintentionally used the parting line as a leverage point to pry it out. This caused the parting line to roll over, preventing that area from shutting-off, resulting in flash on the parts. This damage wasn’t really difficult to see if I would have taken the step of ensuring there was no mold damage causing the flash, instead of just jumping into process changes. My new trusty troubleshooting guide didn’t mention that I should inspect the mold. It just went right into pushing buttons on the machine controller. Looking back, that may explain why most of the mold-repair team members referred to us process technicians as “button pushers.”
Treat the Cause, Not the Symptom
As my knowledge and skill set in the industry grew, I realized that these guides were encouraging process changes or tweaking. In fact, not only do they encourage those tweaks, they recommend them right out of the gate. No actual root-cause investigation or critical thinking required. Without addressing the root cause, even if the process tweaks seem to address the issue, the original problem is likely to return, or our process change could cause a whole new setback.

Process tweaking without understanding root causes is apt to introduce new problems.
This is simply not an effective or sustainable solution for troubleshooting and addressing a molding issue. I noticed that these guides were solely focused on the defect alone, like flash. When troubleshooting, the goal is to find out what changed in our process to allow this flash to be created. At best, the flash is a leading indicator of the root cause or evidence of what has changed in the process. Not all troubleshooting/process guides are as basic as the one in my example, but they all seem to have the same focus, like a “just-get-it-done” crib sheet.
Ultimately, trying to follow a “if-this/then-that” approach to a connected process with thousands of interactions just doesn’t work.
Once I began trialing different ideas for troubleshooting guides, I was frustrated by the lack of standardization. Since many technicians have had training experiences similar to mine early in their careers, their knowledge was based on a trial-and-error approach to both process development and troubleshooting. Each technician’s approach would be different based on individual experience. There was very little standardization on how to troubleshoot an issue effectively .
Scientific Injection Molding, or SIM, was the real game-changer for me, not only from the process-development aspect, but also how I could use a robust, repeatable process to troubleshoot quickly, effectively, and systematically. So just as with process-control limits, an effective and systematic approach to troubleshooting is achieved only through robust process development.
Troubleshooting Checklist
The troubleshooting checklist was developed to ensure a standardized approach to troubleshooting by those process technicians responsible for maintaining multiple machines throughout a shift. Nowhere on the checklist does it suggest a blind process change, but rather a step-by-step method of identifying whether the cause of the issue is one of the following: material, mold, process or machine. Each line item on the checklist is an elimination of potential human and machine errors. Process outputs such as fill time, transfer weight, and full-part weight are confirmed in relationship to process settings. Achieving a validated fill time is not an indicator of the absence of filling issues.
Remember all those times you’ve heard someone say, “The actual injection pressure is supposed to vary, based on the material viscosity?” That doesn’t mean we ignore it. If the injection-pressure output has increased with the same fill time, this is exactly a result of a shift in viscosity. It is something different and another piece of evidence to help us track down the root cause.
Other aspects of the checklist include verifying simple human errors like: is the water running? Or, if using a thermolator, is that turned on? Have we done our housekeeping, meaning are the parting line and the vents clean? A burn on a part that is running a process in which the fill time matches the validated process but shows an increase in the actual injection pressure could be an indication of a vent issue.
Many technicians have had similar training experiences. Their knowledge was based on a trial-and-error approach to both process development and troubleshooting. Each technician’s approach would be different based on individual experience.
The troubleshooting checklist doesn’t go away even if the issue is resolved. Follow-up reviews should be held with the teams, and the process technicians should present their findings to the team. These are peer-to-peer lessons learned that could prove to be valuable knowledge-sharing activities. If the root cause has not been determined, there is even an area on the checklist for process technicians to share their findings and recommend possible mold modifications or even the re-validation of the process itself. They can also indicate a machine issue or a suspected material issue. The checklist is designed to allow for efficient use of technical-talent time and keep people from getting held up at one machine for a majority of a shift.
I mentioned this above but it deserves repeating: Not a single process/troubleshooting guide I’ve ever worked with has guided me to a root cause, but they have definitely caused me some headaches. Ultimately, trying to follow a “if-this/then-that” approach to a connected process with thousands of interactions just doesn’t work. That said, there are effective alternatives that promote critical thinking and that can standardize troubleshooting just as SIM standardized process development.

ABOUT THE AUTHOR: Robert Gattshall has more than 22 years’ experience in the injection molding industry and holds multiple certifications in Scientific Injection Molding and the tools of Lean Six Sigma. Gattshall has developed several “Best in Class” Poka Yoke systems with third-party production and process monitoring such as Intouch Production Monitoring and RJG. He has held multiple management and engineering positions throughout the industry in automotive, medical, electrical and packaging production. Gattshall is also a member of the Plastics Industry Association’s Public Policy Committee. In January 2018, he joined IPL Plastics as process engineering manager. Contact: (262) 909-5648; rgattshall@gmail.com.
Related Content

How Much L/D Do You Really Need?
Just like selecting the extruder size and drive combination, the L/D should be carefully evaluated.
Read More
Are Your Sprue or Parts Sticking? Here Are Some Solutions
When a sprue or part sticks, the result of trying to unstick it is often more scratches or undercuts, making the problem worse and the fix more costly. Here’s how to set up a proper procedure for this sticky wicket.
Read More
The Strain Rate Effect
The rate of loading for a plastic material is a key component of how we perceive its performance.
Read More
PBT and PET Polyester: The Difference Crystallinity Makes
To properly understand the differences in performance between PET and PBT we need to compare apples to apples—the semi-crystalline forms of each polymer.
Read MoreRead Next

Let's Talk About the Safety of Plastics
PLASTICS’ informational campaign and website arms industry with the know-how to speak truthfully and allay unfounded fears about phthalates and BPA.
Read More
Process Monitoring or Production Monitoring—Why Not Both?
Molders looking to both monitor an injection molding process effectively and manage production can definitely do both with tools available today, but the question is how best to tackle these twin challenges.
Read More
INJECTION MOLDING: Scientific Molding Gone Wrong
Sometimes molders get trained in Scientific Molding only to revert to their old way of doing things as soon problems pop up.
Read More