INJECTION MOLDING: ‘Know Your Machine’
Many molders think they “know their machine,” but in reality do not. They get consumed by the demands of day-to-day production requirements and lose sight of the big picture.
At some point in just about all of my scientific molding classes, I am bound to write those three words in bold print on the board. My intention is to emphasize the importance of understanding the specific performance and control of the molding machine being used. It’s one thing to understand the daunting concepts of scientific molding, but getting your machine to do exactly what you want and need it to do can be quite another thing. Many molders think they “know their machine,” but in reality do not. They get consumed by the demands of day-to-day production requirements and lose sight of the big picture.
Our industry has a lack of consistency in technical terminology, controller logic, and user interface. Specific machine performance, response, and calibration can be quite different from one machine to another, even if they are identical models from the same supplier. As a result, there is no “one size fits all” approach to applying these advanced processing strategies.
Over the last couple of decades, countless molders have received training in the field of scientific molding. Once these concepts are learned, the molder is responsible for understanding the idiosyncrasies of their particular machine. Only then can the molder apply what they have learned. Making assumptions about machine control, response, and performance can quite often lead to confusion and failure. The experts teach the concepts but the molder is responsible for applying these concepts on their own machine.
Many examples of the “know your machine” concept can be found in the many contributions that John Bozzelli and others have made to the Injection Molding Know How column as well as other technical writings over the years. In my opinion, it all starts with evaluating machine performance. Experts agree that even the best scientific molding strategies will not overcome poor machine performance.
I encourage the readers of this column to review the three-part series Bozzelli wrote on The Basics of Machine Evaluation back in 2010. In these writings, he details several tests that can be performed to evaluate injection control. (See top right for links to these articles.)
Simply put, in order to apply scientific molding successfully, the machine must perform. Here are some things to consider:
•Accuracy and control of screw position (screw drift, shot-size variation, position cutoff consistency, screw-bottom zeroing, etc.): In order to achieve shot-to-shot consistency, injection must start with the same amount of material in the barrel, and transfer to the holding phase must occur at the same position on each and every shot. Another important (and often overlooked) point is screw-bottom zeroing. In order for the injection unit to transfer pressure to the plastic during pack and hold, we must maintain a cushion. If the screw-bottom zeroing is off, the molder may not be maintaining a cushion, resulting in short shots and dimensional variation.
•Load sensitivity: This test qualifies the machine’s ability to maintain consistency in fill time under varying loads (material viscosity variation, thermal cycling, etc.). Think of it like cruise control in your car, which is intended to help your car maintain a consistent speed even when road conditions change. It is very important that the load-sensitivity test be performed at multiple injection-speed settings (I usually test three). Many machines will pass this test at one speed but fail at another. So test and confirm that the machine can accurately maintain injection velocity control at all speeds within the range that you intend to use.
•Non-return valve performance: Each time we begin to inject plastic into the mold, at least a small amount of material leaks past the valve. As the valve (usually a sliding check-ring style) and the barrel start to wear, this leakage increases, as does the variation in leakage. This results in process variation. It is critical that we perform a static or a dynamic test (or both) to monitor the condition of the non-return valve. Excessively worn components must be replaced.
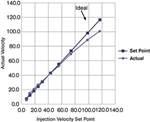
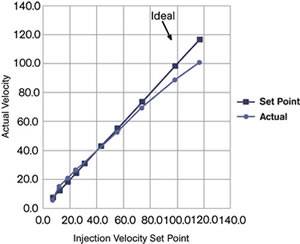
•Injection velocity linearity and accuracy: In this test, the machine’s injection velocity control at various speed settings is evaluated. Note that there are some inaccuracies in how this test is traditionally performed, primarily due to the time that it takes to accelerate the movement of the screw. One easy trick for improving the test accuracy is to use more than 80% of the shot capacity of the machine. If the shot requirement for the mold is too small, we can “cheat” by adding extra decompression, forcing the machine to use more of the shot capacity. Please confirm that the mold can handle the extra air introduced.
It’s also important for the scientific molder to understand how the machine handles deceleration of injection (overshoot). Although a great deal of this overshoot is due to momentum, other factors come into play such as controller speed, scan rates, hydraulic valve response, and drive technology (hydraulic, electric servo, or hybrid). These factors influence how much uncontrolled overshoot occurs at transfer to hold. Generally speaking, all-electric machines have less overshoot than hydraulic machines, although some machine manufacturers offer advanced hydraulic drive technology that helps to minimize this condition.
Evaluating overshoot can be done quite easily by setting the molding machine up to run “fill only” parts (short shots that contain the plastic that is injected into the cavity during first-stage injection only). Once you are producing “fill only” parts, take note of your transfer position and your final screw position. The difference between those two numbers is your overshoot.
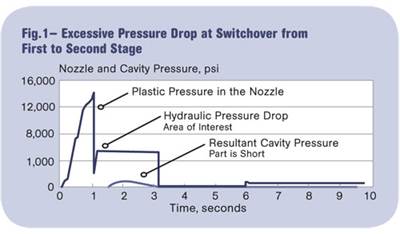
•Switchover response: This is perhaps the most subtle and complicated, yet one of the most critical of the machine tests. Problems at switchover are much more common than you may think and can lead to problems with dimensional control, shorts, flash, and other molding defects. In extreme cases this can even lead to tool damage.
•Backpressure control: Backpressure problems often go undetected; in recent months, I have found problems with backpressure control on more than 50% of 20+ machines evaluated. Problems with backpressure can lead to dimensional variation, short shots, flash, black specks, color problems, and several other molded defects. It can also lead to inconsistencies in, or extension of, the cycle time.
The best method to evaluate backpressure control is to use some sort of graphic process-monitoring capability, either within the molding machine controller or with an external device (such as the RJG eDART system). Using the graphic screen, compare the actual backpressure to the set backpressure throughout screw recovery. The greater the discrepancy, the greater the likelihood of problems. This same method can be used to evaluate the accuracy of hold-pressure control.
In cases where graphic process-monitoring capability is not available, a trained eye can detect some backpressure or hold-pressure control problems by watching the pressure gauge or digital pressure display on the controller (although this isn’t very accurate or easy to do).
•Temperature control: Injection molding machines are notorious for temperature-control issues. Part of the problem is the disconnect between the steel temperature that we can control directly and the plastic temperature that we need to control, but this isn’t the only problem. Placement and style of thermocouples and heater bands greatly influence our ability to control temperatures throughout the injection system (barrel, nozzle, hot runner, etc.). In the nozzle area alone, I often find temperature variances of up to 100° F when measuring the temperature of everything from the end cap to the nozzle tip.
•Clamp system: The importance of qualifying performance of the machine does not end with the injection unit. It is critical that the molder also evaluates the clamp system (platen parallelism and deflection, clamp-force control, etc.). The procedure for this evaluation is often included in the machine’s maintenance manual. It is also important to understand the differences in clamping systems (toggle, hydraulic, two-platen, etc.) and how clamp force is influenced. In the case of toggle systems, exact control of clamp force is often very difficult due to the influence of thermal expansion.
•Machine safety systems and equipment: The most critical “know your machine” concept is safety. Far too many molders fail to confirm the proper operation of key safety systems. Additionally, guards are removed or missing, limit switches are bypassed, and older machines are not updated to meet current safety standards. These unsafe practices should not be tolerated under any circumstances.
The “know your machine” concept does start with machine performance, but goes far beyond it. To successfully implement scientific molding, the molder must be knowledgeable in a number of other areas. Thinking and working in plastic pressure is one important skill. In order to do this, the scientific molder must know the intensification ratio on a hydraulic machine. (Intensification ratio is the relationship between hydraulic pressure and plastic pressure.)
The molder must also know how to properly produce a “fill only” sample on a specific machine. In most cases, this is done by leaving the pack and hold time on, but adjusting the pressure setting to 0 psi (or to the minimum setting allowed). The molder must watch the screw position to confirm that the screw does not drift forward during pack and hold. If it does, an alternative method must be used. The most common alternative method is to again adjust the pack and hold pressure to 0 psi and turn the pack and hold timer off. The time taken from pack and hold should be added to the cooling timer and to the screw rotation delay timer. This helps to prevent additional plastic from being extruded into the cavity during screw rotation.
Related Content
Online Versions of Process Development Course and Software Launch
NPE2024: FimmTech will introduce online versions of its Nautilus process development software as well as its Scientific Molding and Design of Experiments (DOE) process development course.
Read MoreImprove Quality & Productivity With Advanced Screw Design
Most molders are still running with screw designs that haven’t changed much in 30 years. But they don’t need to.
Read MoreAre Your Sprue or Parts Sticking? Here Are Some Solutions
When a sprue or part sticks, the result of trying to unstick it is often more scratches or undercuts, making the problem worse and the fix more costly. Here’s how to set up a proper procedure for this sticky wicket.
Read MoreA Simpler Way to Calculate Shot Size vs. Barrel Capacity
Let’s take another look at this seemingly dull but oh-so-crucial topic.
Read MoreRead Next
Injection Molding: The Basics of Machine Evaluation, Part III
In the last two issues, we started defining some basic tests to ensure your injection molding machine is working properly.
Read MoreThe Basics of Machine Evaluation, Part II
Last month we started defining some basic tests to ensure your injection molding machine is working properly.
Read More
