Melt Preparation Part 1: Melt Temperature Optimization
A homogenous melt is required for consistent part quality, but achieving it requires balancing a number of factors, including barrel usage and temperature as well as screw speed, backpressure and residence time. Learn how to prepare your melt for molding success in this two-part series.


During the injection molding process, the plastic that is injected into the mold must be molten, homogeneous and of a required melt density. This preparation of the melt happens in the molding barrel with the help of heater bands and the action of the screw. The settings of the heater bands, the speed of screw rotation and the backpressure contribute to the quality of the melt.
Each of these settings has both an individual and interactive effect on the melt quality. It is therefore important to understand the underlying theory and apply those concepts when setting up a molding process. In the first of this two-part series, we will discuss the barrel-temperature settings and the screw rotation speed. In the second part we will discuss the topic of backpressure.


The lower the barrel’s percentage usage, the higher the residence time. Conversely, the higher the barrel’s percentage use, the lower the residence time.
A note about the material’s maximum residence time in the barrel is required here. At a given melt temperature, every plastic material will degrade when held beyond a certain time. Take polyetherimide (PEI), for example: If the melt temperature is 700°F, then holding it at 700°F for more than 12 min will degrade the polymer. The maximum residence time for PEI at 700°F is therefore 12 min. If the processing temperature is increased to 770°F, then the maximum residence time is now reduced to 6 min. The higher the temperature is; the lower the maximum residence time will be. The goal should be to keep the residence time of the plastic in the barrel at less than the maximum residence time of the material at the process temperature.
Bringing the Heat
There are two sources of heat to melt the plastic: the heater bands and the shear heat from the rotating screw. The heater bands encapsulate the molding barrel and provide external heat to the plastic inside the barrel. At the same time, the screw is turning inside the barrel to auger the material forward and help melt it with the shear energy.
Consider a mold running at a cycle time of 30 sec. If the percentage usage of the barrel for the shot size is on the lower side — for example, 20% — there are five shots in the barrel. Therefore based on the cycle time, the residence time of the material in the barrel is 30 × 5 = 150 sec or 2.5 min. If the percentage usage of the barrel is high — say, 75% — then there are 1.3 shots in the barrel, resulting in a residence time of 40 sec. The two calculations above demonstrate that the lower the percentage usage of the barrel, the higher the residence time. Conversely, the higher the percentage use of the barrel, the lower the residence time will be.
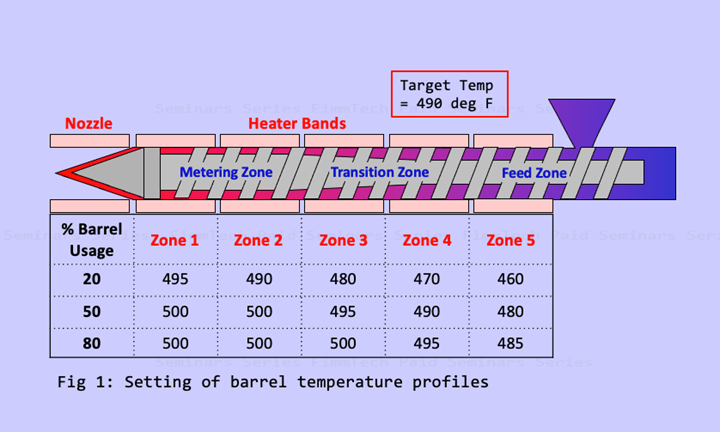
FIG 1 The percentage of the barrel being used for the shot size will affect what temperatures the molder sets for the various zones of the screw. (Images: FimmTech Inc.)
Since higher residence times can cause the material to degrade, it is best that the barrel temperatures are kept on the lower side as much as possible (Fig. 1) where the target melt temperature is 490°F. With low-percentage barrel usage, the front zones are kept around or just higher than the target melt temperature, while with a higher usage of the barrel, in order to get as much heat as possible into the plastic as quickly as possible, most of the zones can be kept closer to or just above the target temperature. The profiles must be set based on the percentage usage of the barrel and the maximum residence time. In some cases, a reverse or a hump profile may need to be used.
Speed Limits
Once the barrel temperatures and profiles have been established, the screw rotation speed must now be optimized. The barrel heats impart heat to the plastic closer to the barrel walls, but the shear from the rotating screw provides the heat to melt the plastic on the inside. The screw also performs the role of homogenizing the melt (Fig. 2). At lower screw rotation speeds, there is not enough shear, and the resultant melt temperature will be lower than the target temperature. At higher-than-required screw speeds, the shear heat can be very high, resulting in melt temperatures that are much higher than the target.
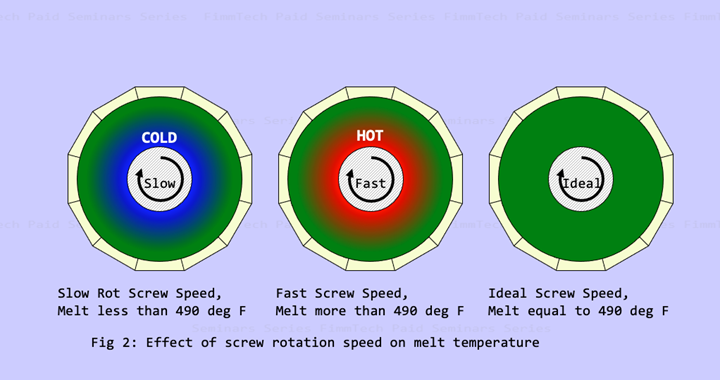
FIG 2 The screw rotation speed has a direct impact on the melt temperature.
A logical study to find the optimum screw rotation speed is therefore to plot the melt temperature as a function of the screw speed. Fig. 3 shows that the melt temperature increases with faster screw rotation. In this case, the screw speed was set at 11 in./sec. (This is the screw-rotation circumferential speed.) The additional advantage of performing this test is to be able to determine the range of screw speeds that could be used.
The barrel heats will impart heat to the plastic closer to the barrel walls, but shear from the rotating screw provides the heat to melt the plastic on the inside.
In case you would need to increase the screw speed — and reduce screw recovery times — but also want to minimize cooling time, you could do so based on data. The graph shows that with a 5°F acceptable variation in melt temperature, you could set the screw rotation speed between 9 and 12 in./sec. In fact, it could be slightly higher than 12 in./sec, but that was not tested.
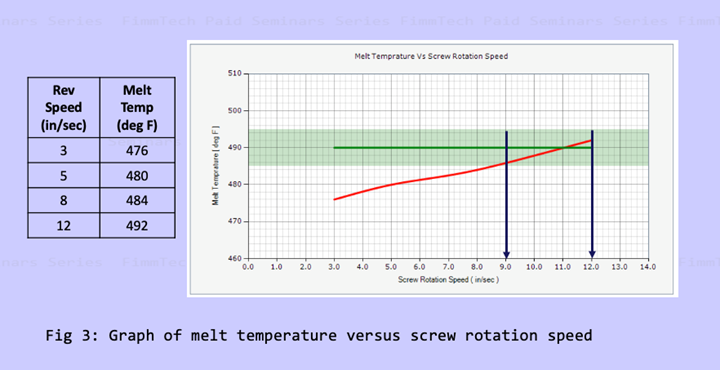
FIG 3 By performing experiments, molders can determine what range of screw rotation speeds will generate homogenous melt at an acceptable temperature.
Under (Back) Pressure
In the second article in this two-part series, we will discuss the optimization of backpressure. Optimization of the barrel profiles, screw rotation speed and backpressure constitute the holistic melt-preparation technique. We will also answer the question of whether these need to be done for every mold and machine if the material being molded is the same. As you can observe, these techniques are part-independent, meaning we are not looking at part quality but only the melt quality.
Editor’s Note: The author will be leading a half-day workshop on Melt Preparation Techniques as part of the Molding 2022 Conference (Nov. 8-10; Charlotte Convention Center; Charlotte, N.C.) To be presented at the Polymers Center of Excellence and its injection molding training lab, the workshop will walk participants through all the factors that play a role in preparation of the melt. Find out more at moldingconference.com.
ABOUT THE AUTHOR: Suhas Kulkarni is the founder and president of Fimmtech, San Diego, an injection molding service-oriented firm focusing on Scientific Molding. Fimmtech has developed several custom tools that help molders develop robust processes, and its seminars have trained hundreds of individuals. Kulkarni is an author of the best-selling book, Robust Process Development and Scientific Molding, published by Hanser Publications. Contact: (760) 525–9053; suhas@fimmtech.com; fimmtech.com.
Related Content

How to Set Barrel Zone Temps in Injection Molding
Start by picking a target melt temperature, and double-check data sheets for the resin supplier’s recommendations. Now for the rest...
Read More
PBT and PET Polyester: The Difference Crystallinity Makes
To properly understand the differences in performance between PET and PBT we need to compare apples to apples—the semi-crystalline forms of each polymer.
Read More
Are Your Sprue or Parts Sticking? Here Are Some Solutions
When a sprue or part sticks, the result of trying to unstick it is often more scratches or undercuts, making the problem worse and the fix more costly. Here’s how to set up a proper procedure for this sticky wicket.
Read More
The Importance of Melt & Mold Temperature
Molders should realize how significantly process conditions can influence the final properties of the part.
Read MoreRead Next

Improving Molding Process Capability: Understanding the PVT Graph, Part 1
Process capability is related to the variation in part dimensions from shot to shot. High values of process capability require the shrinkage of the material to be identical on each shot, which can be confirmed from the pressure-volume-temperature (PVT) graph.
Read More
Process Capability and the ‘Hesitation Effect’
Understanding the concepts of pack and hold and applying them during process development is critical for molders to achieve consistent part quality.
Read More
Optimizing Pack & Hold Times for Hot-Runner & Valve-Gated Molds
Using scientific procedures will help you put an end to all that time-consuming trial and error. Part 1 of 2.
Read More