
Back to Basics on Mold Venting (Part 1)
Here’s what you need to know to improve the quality of your parts and to protect your molds.


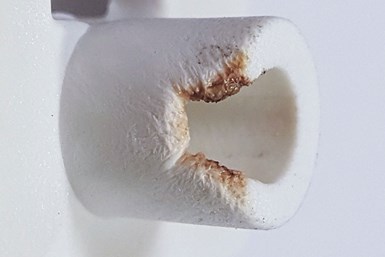
Compressed gases inside a cavity can cause spontaneous combustion, or “dieseling.” All images: J. Fattori.
There have been many articles and entire textbook chapters written about venting, but very few explain the complexity of what’s actually going on inside the mold and the effect it can have, not only on the molded parts, but on the mold itself. Without this basic understanding, the decision on where to put vents, how many you need, how wide they should be, and how deep they should go is probably an educated guess, or worse—a trial-and-error endeavor.
Let’s start off with a couple of basic facts: 1) The mold is not empty before the plastic enters it. It’s full of air. That air must escape in order to produce a good part. 2) Vents in an injection mold should let the air out, but not the liquid plastic. If you turn on the spigot to a garden hose, you will hear a hissing sound at the nozzle end for the first few seconds. That’s the air escaping out of the nozzle until the hose is full of pressurized water. Mold vents should function the same way.


The primary considerations that govern how much venting you need in a mold are material flow rate, part volume, material type and grade, shear inducers, and processing conditions.
Flow Rate
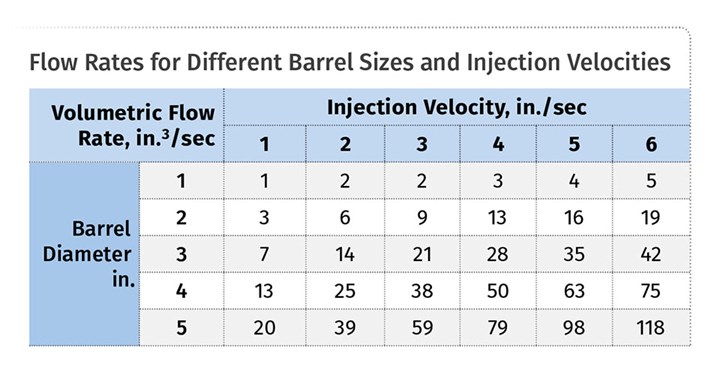
Plastic is injected into a mold at a specific rate of flow—typically in.³/sec. That’s an easy calculation to perform. Just multiply the area of the barrel × the injection velocity. The accompanying table lists the flow rates for various barrel diameters at various injection velocities. Obviously, the combination of a large barrel and fast injection yields a large flow rate. Flow rate is the most important factor on deciding how much venting you need.
The mold is not empty before the plastic enters it.
How Many Vents?
Almost everyone agrees that you can never have enough vents. Several industry experts recommend putting them 1 in. apart, or use any number of vents, as long as at least 30% of the perimeter of the part is vented. These are rules of thumb, which probably work most of the time, but not all of the time.
Let me put some perspective on the complexities of what we’re dealing with. Assume you have a 3-in. diam. screw injecting at 4 in./sec. From the table, notice the material flows into the mold at a rate of 28 in.³/sec. That’s pretty fast. If I were the mold designer, I might put in say, 10 half-inch-wide vents 0.002 in. deep. That’s a total of 0.010 in.² of vent passageway. If I run the numbers, the speed of the air going thought the vents is theoretically: 28 in.3/sec / 0.010 in.2 = 2827 in./sec, or 160 mph! You think that’s fast? Take into account that once the material flows past a vent that vent becomes useless. Therefore, the speed of the air going through the very last vent at the end of fill in this example is theoretically 1605 mph, or a little over Mach 2. Since I’ve never heard a sonic boom when molding at high injection speeds, there is obviously more to this than meets the eye.
Flow rate is the most important factor on deciding how much venting you need.
The general consensus is that the rate at which air escapes the mold should be equal to the rate at which the plastic enters into it. Let’s say you’re molding a relatively short, thick-walled part at a very slow fill speed in order to prevent getting any voids. One or two vents at the end of fill might be sufficient. But if you were molding a thin-walled part with a long flow length at an extremely fast fill speed in order to fill and pack out the cavity, you are going to need some serious venting. In fact, you probably can’t vent it enough, and will need to reduce the injection velocity in order for the air to evacuate in time. If the air cannot escape fast enough, it will cause backpressure within the cavity. That’s when part quality issues start to happen.
Quality Issues
What type of quality issues are related to insufficient venting? The more common problems you might encounter are burn marks, short shots, insufficient packing, poor surface definition, internal voids, weak weld lines, dimensional variation, splay, gloss, material degradation, warpage, plate-out, residue build-up in the vents, dead spots, and parts sticking or abrading upon ejection. This formidable list of potential issues should reinforce your understanding of the need for proper venting.
Burning or ‘Dieseling’
Some people think a small part needs only a little venting, but a large part needs a lot of venting. That’s not entirely true. It all depends on the injection flow rate. Remember, the goal is to allow the air to get out of the cavity at the same rate as the plastic coming in. Just because you have a small part with less air doesn't mean it is allowed to escape any slower.
If the air can’t get out fast enough, it is going get compressed. That’s both good and bad—but mostly bad. It is especially bad if it is a large cavity with a lot of air, because there is more of it to compress. When air compresses, it gets hotter by a process called adiabatic heating—the molecules are closer together and they collide more. To make matters worse, when air gets hot it wants to expand, which further increases the amount of compression and pressure in the cavity. That’s why the air in your tires has a higher pressure in the summer, and lower pressure in the winter.
The air inside an injection mold can compress so much that it superheats, which can cause the resin to spontaneously combust, or “diesel,” within the cavity and cause the edge of the part to burn and the cavity wall to erode. A diesel engine in a car spontaneously combusts fuel at a compression ratio of about 20:1. As any molder can tell you, there can be a fine line between a good part and a burned part. If you can see or smell burned material, which are actually carbon deposits, correct the problem as soon as possible. It doesn't take long for a cavity to erode, and cause aesthetic and ejection issues. The only good thing about the air compressing inside a cavity is that it becomes denser, and a larger volume of air will ultimately escape. After the compressed are passes though the vent, it is free to expand to its original uncompressed volume in the relief channel on the other side.
Volatiles and colorants in plastic materials can clog an injection mold vent.
When most thermoplastics get hot, they give off gases, referred to as out-gassing of non-aqueous volatiles, or NAVs. The great majority of these gases don’t adhere to the sides of the cavity or get absorbed into the plastic. They are continually pushed ahead of the melt front. These gases mix with the oxygen in the open cavity, like the cylinder in a car engine, and become combustible fuel. Some thermoplastics give off more NAVs than others. For example, PS produces very few volatiles, while PC, acetal and PVC give off quite a lot. Various material fillers, additives and colorants can also affect the amount of NAVs a material gives off. Knowing which materials give off high concentrations of gases will affect how many vents you need in order to reduce the risk of burned parts and mold erosion.
Processing Issues
If a processor experiences burning that he believes to be due to insufficient venting, he typically reduces the injection velocity, which allows more time for the air to escape. That will usually work, but is it the right thing to do first? In addition to reducing your profits from the increased cycle time, reducing the injection velocity increases the material viscosity, which can cause other problems, such as short shots.
It is a good idea to check some of the factors that can cause the material to expel so much out-gas. Maybe the material melt-flow index is too low and therefore too viscous. Maybe the backpressure, or screw rpm are too high. Maybe the barrel temperatures are too high. Maybe the feed throat is too cold. Maybe the barrel size is too big. Maybe the nozzle tip or gate size is too small. Anything that can cause the material to shear or increase in temperature will increase the amount of out-gassing.
Check the Vents

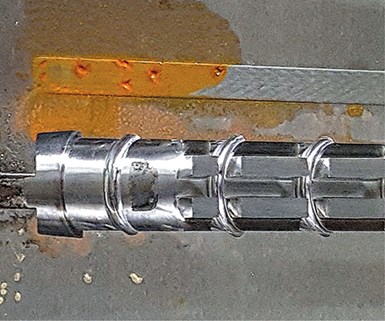
Bluing off an injection mold is a good way to check the condition of the vents.
After checking the various conditions that can create excessive gasses, inspect the vents and vent reliefs. At some point in time they will most likely clog with residue. Using mold cleaner and copper gauze will clean vents quickly and safely. Then check to see if the vents have been crushed or hobbed from going through the break-in period, or from excessive clamp force.
Reducing the clamp pressure can often solve a burning issue, and it protects the mold and platens from hobbing. Several newer machines have unique clamping-sequence options, which can regulate the initial closed position or clamp pressure, and then fully close or go into high pressure at a specified point in time. This is referred to as injection-compression or coining, and can help with venting issues, as well as weak weld lines.
The most common method used to check vents is with a dial indicator in the tool room. That’s fine, but it doesn't take into account everything else that’s going on when the mold is in the press and clamped up at high pressure. Some people like to squash a strip of solder or lead to measure the vent depths. The most accurate way to check the vents is to blue off the mold in the press. I recommend doing this in several steps. Start at very low clamp pressure and then repeatedly increase it by 10%, until you reach the pressure you are currently using. That will tell you three things: How much clamp pressure it takes just to get the two halves of the mold to seal off around the perimeter of the cavity; what the minimum clamp pressure is to prevent flashing; and what the condition of the vents are when the clamp is at the selected pressure setting.
Flow analysis can simulate the temperature and pressure of trapped gas
It is not uncommon for a molder to place a piece of tape or an adhesive-backed label on the parting line where a part is burning to check if there is a venting issue. If the mold has heat- treated cavities and cores and the clamp pressure is reduced, that may be OK for a couple of shots to prove out the root cause, but leaving anything on a parting line for an extended period of time is nothing short of reckless, especially if the cavity or core is relatively soft.
Flow Analysis
Most of us know that flow analysis is extremely accurate at predicting the flow pattern of the material within the cavity. It shows us the weld-line locations, the dead zones and the last place(s) to fill. What you may not know is that at least one flow-analysis program that I know of can actually simulate the temperature and pressure of trapped gas, or gas that will not escape fast enough through the vents. By changing the process parameters, or adding more vents in the solid model, additional simulations can predict whether the problem will go away—before the steel is even ordered.
For those of you who like to perform a flow analysis after the mold is built, make a series of progressive short shots to determine the last place to fill, as well as any weld lines or dead corners. DuPont recommends the following: “Venting problems … may be made more obvious by spraying the mold with a hydrocarbon or kerosene-based spray just before injection. If venting is poor, the hydrocarbon will cause a black spot where the air is trapped. This technique is particularly useful for detecting poor vents in multi-cavity molds. A convenient source of hydrocarbon spray is a rust-preventative spray.” Now that’s old-school!
About the Author: Jim Fattori is a third-generation injection molder with more than 40 years of molding experience. He is the founder of Injection Mold Consulting LLC Contact jim@injectionmoldconsulting.com; injectionmoldconsulting.com.


Related Content

What You Need to Know About Leader Pins and Bushings
There’s a lot more to these humble but essential mold components than you might suspect. Following the author’s tips could save much time, money and frustration.
Read More
How to Start a Hot-Runner Mold That Has No Tip Insulators
Here's a method to assist with efficient dark-to-light color changes on hot-runner systems that are hot-tipped.
Read More
Why Shoulder Bolts Are Too Important to Ignore (Part 2)
Follow these tips and tricks for a better design.
Read More
Tunnel Gates for Mold Designers, Part 1
Of all the gate types, tunnel gates are the most misunderstood. Here’s what you need to know to choose the best design for your application.
Read MoreRead Next

Advanced Recycling: Beyond Pyrolysis
Consumer-product brand owners increasingly see advanced chemical recycling as a necessary complement to mechanical recycling if they are to meet ambitious goals for a circular economy in the next decade. Dozens of technology providers are developing new technologies to overcome the limitations of existing pyrolysis methods and to commercialize various alternative approaches to chemical recycling of plastics.
Read More
Processor Turns to AI to Help Keep Machines Humming
At captive processor McConkey, a new generation of artificial intelligence models, highlighted by ChatGPT, is helping it wade through the shortage of skilled labor and keep its production lines churning out good parts.
Read More