Screws and Pellets: One Size Does Not Fit All
Screw design, pellet type/size and material behavior are all critical issues to consider to deliver uniform melt to the mold.
My last few columns have dealt with various issues pertaining to the nozzle and barrel. I’ve discussed the important roles these components play in providing the mold with material that is uniform in both temperature and consistency. Here I’d like to discuss the role of the screw in the process, starting with the basics of screw design and moving into often overlooked issues such as pellet size and shape and the melting behavior of various materials.
IN THE ZONE
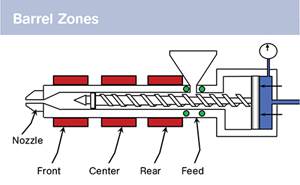
Screws have three zones: one for feeding; a second for transitioning solids into melt, also known as the compression or melting zone; and a third zone for metering.
The function of the feed zone is to convey unmelted plastic to the transition zone. Usually the feed zone accounts for about half the total length of the screw, and the flights in this section are deep. The feed section of the screw is not designed to melt the plastic, but to auger the granules forward and prepare them for melting.
The granules are “gravity fed” through the feed throat, and there is lots of air between the granules in this part of the screw. This air, as well as volatiles such as residual moisture and light fractions of the polymer (and perhaps of the additives), must be vented through the feed throat as the material begins to heat in the rear zone.
So the feed throat is a de facto vent. Don’t look into the hopper or feed throat without eye protection and without giving some serious thought to the condition of the barrel. I have seen many molding plants with patched roofs, the result of hoppers shot through the ceiling. Also, recognize that this is one reason you want the feed throat to be warm; you don’t want to condense those volatiles.
The transition zone is the workhorse of the melting process. The deep flights in the feed zone transition or taper into the shallow flights of the metering zone, which accounts for about 25% of the screw length. This transition zone compresses the granules against the barrel wall, generating roughly 80% of the energy needed to melt the granules. Plastic sticks to the barrel wall, and as the screw rotates the flights wipe off a thin film to form a melt pool between the flights of the screw. This melt pool rolls in a spiral and grows larger as the resin progresses toward the metering zone.
The transition zone is supposed to melt the pellets completely, but this is often not the case. I have a quite a collection of parts containing partially melted pellets, as well as runners with unmelted granules stuck in the gates. Ever wonder why a part in a multi-cavity mold did not fill? Unmelted or partially melted pellets may have been the culprit.
If you are present when a screw is pulled from a barrel, I encourage you to take a close look at the flights in the transition and early stages of the metering zone. Nine times out of 10 you will see a carbon layer built up behind the flights. Often you will see unmelted granules, or even residue of colors that you ran weeks ago. This shows that all the “new” resin arriving in the transition zone is not pushing all of the “old” resin out in front of it. And it means that there are dead spots behind the flights where resin “hangs up.” It sits there partially melted and degrades to carbon.
This carbon on the flight is the root cause for the dreaded black specs or carbon showers that cause you endless hours of purging. And if you decide to bite the bullet and tear it down for cleaning, don’t use wire brushes and the like. For the screw to work properly it must be smooth and highly polished with no scratches or undercuts. The concept is for plastic to stick to the barrel and “slip” off the screw. Those who mold clear parts are especially sensitive to carbon, as it is a significant cause of rejects. Eliminating the dead spots on the screw will significantly reduce carbon formation.
The metering zone of the screw pumps plastic forward to form the shot and overcome the backpressure set by the operator. Normally it is not designed to finish melting or mixing the plastic. If unmelted or partially melted granules make it through the transition zone, the metering zone will not complete the melting process.
A PELLET IS A PELLET?—NO!
Now that we’ve gone over some screw design basics, what about the resin? Can the type of resin or shape or size of the pellets influence the melting process? Amorphous resins melt differently than semi-crystalline resins. Amorphous resins like polystyrene, polycarbonate, and ABS melt like butter—they soften and mush easily as they come up to temperature. Semi-crystalline resins like PE, PP, or nylon melt like ice. They stay hard up until their melting temperature, then melt. Most semi-crystalline resins require nearly twice as much energy to melt as do amorphous resins. Amorphous resins are somewhat forgiving in the melting process, while semi-crystalline resins present a difficult challenge to get them melted uniformly.
The size and shape of pellets, and the means by which they have been pelletized, also influence melting. My experience has been that a general-purpose screw will melt almost anything as long as the granules are the same size, shape, and cut. But how often is that the case? Problems develop whenever you have a mixture of granule sizes or shapes. Non-uniform regrind—especially fines, regrind with virgin, tiny color granules with larger virgin granules, cut strand mixed with underwater die-face cut beads—all wreak havoc with the melting process. They begin to melt at different spots along the screw, creating non-uniform pockets, partially melted granules, degradation, black/white specks etc.
Most molders do not have the luxury of running just one kind of granule, so what can be done? Start by working with competent screw designers—not just the sales person, but a technical person or engineer who can prove the design works and will stand behind the product. Get prints and review them before any steel is cut. A screw designed mainly for melting semi-crystalline resins should be capable of running amorphous resins, too.
Here are some more general rules of thumb: L/D ratios should be at least 20:1 or greater. Demand that flights have a large radius (more like a farmer’s plow) that eliminates the dead spot on the flights. Make sure the metal of construction is appropriate for your resins. Ensure your screws are polished and scratch-free and have reasonably sharp flight edges.
If working with clear materials, eliminate fines and make sure your screw is chemically resistant. In addition, inspect pellets for uniformity from the supplier. Use only 25% to 65% of the barrel capacity. Evaluate grinders for granule uniformity and minimum fines generation. If you do micromolding or run screws smaller than 25 mm diam., the criteria are even more stringent. I’ll get into that in another column.
Related Content
Tunnel Gates for Mold Designers, Part 1
Of all the gate types, tunnel gates are the most misunderstood. Here’s what you need to know to choose the best design for your application.
Read MoreHow to Set Barrel Zone Temps in Injection Molding
Start by picking a target melt temperature, and double-check data sheets for the resin supplier’s recommendations. Now for the rest...
Read MoreA Simpler Way to Calculate Shot Size vs. Barrel Capacity
Let’s take another look at this seemingly dull but oh-so-crucial topic.
Read MoreHow to Get Rid of Bubbles in Injection Molding
First find out if they are the result of trapped gas or a vacuum void. Then follow these steps to get rid of them.
Read MoreRead Next
People 4.0 – How to Get Buy-In from Your Staff for Industry 4.0 Systems
Implementing a production monitoring system as the foundation of a ‘smart factory’ is about integrating people with new technology as much as it is about integrating machines and computers. Here are tips from a company that has gone through the process.
Read MoreWhy (and What) You Need to Dry
Other than polyolefins, almost every other polymer exhibits some level of polarity and therefore can absorb a certain amount of moisture from the atmosphere. Here’s a look at some of these materials, and what needs to be done to dry them.
Read More.jpg;width=70;height=70;mode=crop)

