Trouble with Your Dryer?
Although pellet drying is a relatively simple process, it is occasionally a source of consternation.
Although pellet drying is a relatively simple process, it is occasionally a source of consternation. The pellets, at times, just will not dry. If you've been following the resin supplier’s recommended drying guidelines, the cause of poor drying can always be traced back to four root causes:
Drying Temperature: Heat is the key to breaking the strong bond between water molecules and hygroscopic polymers. Above a certain temperature, the attraction the water molecules have for the polymer chains is greatly reduced, so that moisture can be drawn away by dry air.
Dewpoint: In the dryer, air is first dehumidified to a very low residual moisture content (dewpoint). This air is then heated to reduce its relative humidity. The result is drying air with a very low vapor pressure. Water molecules within the pellets, freed of their bonds by heating, will migrate toward the air around the pellets.
Time: It takes time for heat from the air surrounding the pellets to be absorbed and for water molecules to migrate to the pellet surface. Resin suppliers specify how long a material must spend at the proper temperature and dewpoint for effective drying.
Airflow: Hot, dry air delivers heat to the pellets in the drying hopper and strips moisture from the surface of the pellets and carries it back to the dryer. Airflow must be sufficient to heat the resin to its drying temperature and hold it at that temperature for the specified time.
Before looking for more sinister problems, it is always a good idea to visually inspect a malfunctioning dryer. Pay particular attention to air filters and hoses. Blinded filters or collapsed hoses will reduce airflow and compromise dryer performance. Ruptured filters will contaminate desiccant, inhibiting its ability to adsorb moisture. Frayed hoses may draw wet ambient air into the drying circuit, causing premature desiccant loading and high dewpoints. Poorly insulated hoses or hoppers may compromise the drying temperature.
Drying air circuit
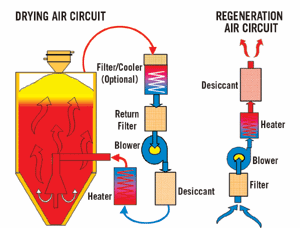
In the drying-air circuit (see Fig. 1), the drying temperature should be monitored at the hopper inlet in order to compensate for heat losses in the hose from the dryer. Low air temperature at the hopper inlet may be caused by an improperly adjusted controller, lack of insulation, or failure of heater elements, heater contactor, thermocouple, or controller. It is also important to monitor the drying temperature throughout an entire dryer cycle, watching for temperature fluctuations when the desiccant beds are switched.
If material is not properly dried when it exits the hopper, make sure the hopper is large enough to provide sufficient effective drying time. Effective drying time is the amount of time the pellets are actually exposed to proper drying temperature and dewpoint. If they don’t spend enough time in the hopper, the pellets cannot dry properly. Remember that the size and shape of the pellets or chips (and the presence of regrind) will affect bulk density, which affects residence time.
A kinked hose or a blinded filter can inhibit airflow and compromise dryer performance, but if visual inspection of the dryer does not reveal these kinds of problems, it may not be obvious whether airflow is adequate. However, a quick, easy, and accurate way to determine if a dryer’s airflow is sufficient is simply to measure the vertical temperature profile of the material in the hopper.
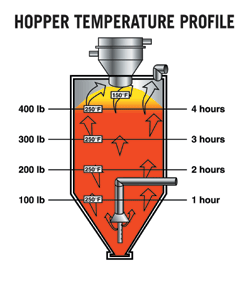
Assume the material supplier recommends 4 hr of drying time and you are processing 100 lb/hr. To verify that dryer airflow is adequate, measure the temperature profile within the hopper, paying particular attention to the temperature at the 4-hr (400-lb) level (Fig. 2). If the temperature at that level in the hopper is at the desired setpoint, then the volume of airflow can be assumed to be sufficient. If the material in the hopper is heated adequately only through the 1-hr, 2-hr, or 3-hr levels, then the airflow is not adequate to heat and dry the material at the desired throughput rate. Insufficient heating may indicate that the dryer is too small for the throughput rate or there is an airflow restriction such as a blinded filter or damaged hose. Too much air can be a problem too. Not only does it waste energy, but also it can result in a high return-air temperature, which could be detrimental to desiccant performance.
Return-air filters prevent material fines from contaminating the desiccant and compromising its moisture-adsorption qualities. These filters must be kept clean in order to maintain adequate airflow.
When it exits the top of the hopper, the drying air should have given up most of its heat. Most dryers are designed to operate efficiently when the desiccant temperature is in the range of 120 to 150 F. If return air overheats the desiccant, it will adsorb less moisture from the drying air.
Monitor the temperature of the air returning to the dryer. A high return-air temperature may indicate that the dryer is oversized for the material throughput rate. Or the material may be entering the drying hopper at a high temperature, such as when PET has been crystallized prior to drying. Or it may be simply that the material is being dried at a temperature above the normal range (250 F or less), which is required for some materials, like PET. In any of these three cases, a heat exchanger in the return-air circuit will ensure that the desiccant can effectively remove moisture from the drying air.
Regeneration & cooling
Desiccant has a finite moisture capacity, so its adsorbed moisture must be purged by regeneration. As shown in Fig. 1, ambient air is drawn through a filter and into a blower that directs it through a set of heaters. Heated regeneration air is passed through the desiccant bed, which releases its adsorbed moisture as the desiccant’s temperature rises. Moisture-laden regeneration air is purged to the atmosphere. The hot regenerated desiccant must be cooled before being moved back into the drying circuit to ensure that it can remove moisture from the drying air.
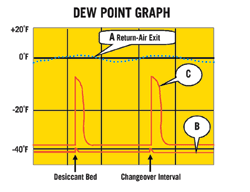
Dewpoint readings can help diagnose several problems, so monitor the drying-air dewpoint throughout an entire dryer cycle. Normal dryer operation should produce a straight-line dewpoint reading in the –20 to –50 F range. Small fluctuations at desiccant changeover are acceptable. If your dryer is functioning properly, you should see a dewpoint at the dry-air inlet at least 30°F lower than at the return-air exit. (Fig. 3, lines A and B).
On the other hand, dewpoint spikes immediately after desiccant switchover (line C) indicate that the desiccant was not sufficiently cooled before being brought on-line. Hot desiccant will not adsorb moisture well until it cools down, after which the dewpoint should drop to the proper level. Improperly cooled desiccant can result in temperature spikes harmful to heat-sensitive materials like ionomers, amorphous polyesters, and some grades of nylon.
If you see good dewpoint readings immediately after desiccant beds are switched, but dewpoint rises rapidly before the desiccant cycle ends, this may indicate that ambient air is leaking into the closed-loop circuit and causing premature loading of the desiccant. Other possible causes are incompletely regenerated or contaminated desiccant. A dewpoint reading that is consistently near the return-air dewpoint reading indicates a totally inactive regeneration circuit or badly contaminated desiccant.
Related Content
Resin-Selection Station Conveys Material on Demand
NPE2024: Powerful, space- and labor-saving station makes the connections and conveys material automatically on command.
Read MoreCentral Controller, Energy-Efficient Pump for Conveying
Wittmann debuts new control system and pump at Fakuma.
Read MoreNeed a Better Way to Convey Powders from Point A to Point B?
Vacuum conveying systems for powders and difficult-to-convey materials involves a starting point and a destination where hazards need to be avoided along the way. Here are the top 10 tips to design a system to maximize movement and minimize dust exposure.
Read MoreCut Loading Time Through Direct Charge Blending
Direct charge blender loading, a vacuum-powered automation process, can dramatically improve loading time and reduce material costs. In this article, we address ten common questions to help you determine if the systems are right for your facility.
Read MoreRead Next
Troubleshooting Screw and Barrel Wear in Extrusion
Extruder screws and barrels will wear over time. If you are seeing a reduction in specific rate and higher discharge temperatures, wear is the likely culprit.
Read MoreLead the Conversation, Change the Conversation
Coverage of single-use plastics can be both misleading and demoralizing. Here are 10 tips for changing the perception of the plastics industry at your company and in your community.
Read MoreProcessor Turns to AI to Help Keep Machines Humming
At captive processor McConkey, a new generation of artificial intelligence models, highlighted by ChatGPT, is helping it wade through the shortage of skilled labor and keep its production lines churning out good parts.
Read More