
Tooling: Back to Basics On Die Springs--Part 2
Follow these steps for proper die-spring selection and installation.


When selecting which die spring you need, start with determining the operating length, which is the amount the spring needs to compress. For the sake of example, let’s say a mold has an ejector stroke of 2 in. Perhaps you want to use the blue, medium-duty springs, which have a recommended operating range of 25% to 35% compression. Assume the annual run quantities of the mold are fairly low—about 100,000 cycles per year and you decide to use the 35% recommended long-life compression value. Therefore, the free length of your spring should be about 2 ÷ 0.35 = 5.7 in. Now round that value up to a standard length of 6 in.
If your mold has ¾-in. diam. return pins and that’s where you would like to mount the springs, you would need springs for a 1½-in. hole diam. Looking at the manufacturer’s chart (see table), a 6-in.-long spring with a 1½-in. diam. hole has a load of 17 lb at 1/10-in. deflection. Now let’s assume you estimated that 100 lb of force is needed to keep the ejector plates firmly against the stop buttons. Let’s also assume the mold is of average size and that you would like to use a total of four springs. Therefore, each spring needs to have 100 ÷ 4 = 25 lb of preload force. The preload distance would therefore need to be 25 ÷ 17 = 1.47 tenths of an inch, or 0.147 in.


You don’t want the spring force to be too weak or too strong. If it is too weak, the springs may not perform their intended task. If it is too strong, it can mask a binding condition with the ejector pins, lifters, or guided ejector system. If you are not sure how much force is required, it is better to be on the low side than on the high side, because you can add spacers behind a spring, or change to a different rating (color) to increase the force. Note: It’s very unlikely, but not completely impossible for the total spring force used in a mold to exceed the available ejection force of the machine.
Now that you have selected the appropriate springs, you have to add them to your mold drawing. The first step is to check whether there is a chance the spring can buckle when compressed. As a general rule, if the free length is more than four times the diameter, there could be a buckling problem. In the above example, the free length was 6.0 in. and the diameter was 1½ in. Since 6 ÷ 1.5 = 4, there is a slight chance that the spring could buckle during compression. To prevent this from happening, mount the spring over a recommended-diameter rod or pin, or guide it in a recommended-diameter pocket—or both, as shown in Fig. 1. Note: Both the OD of the pin and the ID of the pocket must be smooth to prevent abrading the spring.
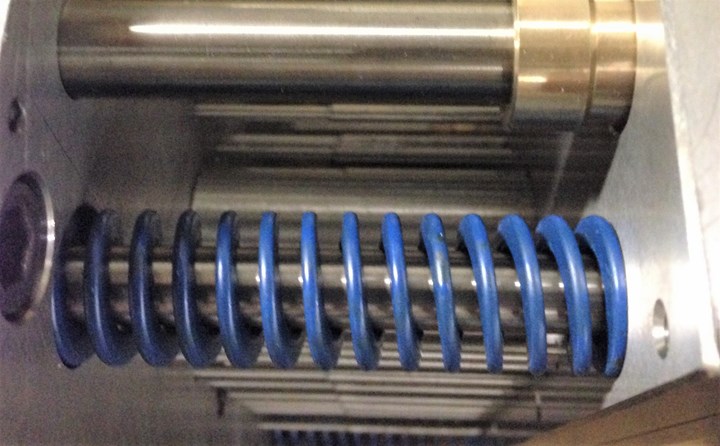
FIG 1 Spring retained by both a pin and pocket.
If the spring is mounted in a pocket, the bottom of the pocket must be flat. Springs need to work against a flat surface in order to provide uniform stress on the coils when they are compressed. Measure the diameter of the spring to determine what size radius you can add to the inside corner. Even if you can only add a very small radius, it is better than a dead-sharp corner.
There is an advantage to mounting a spring over a rod or pin. If the spring breaks, as shown in Fig. 2 , the rod retains the small pieces of hardened steel and the mold will not get damaged.
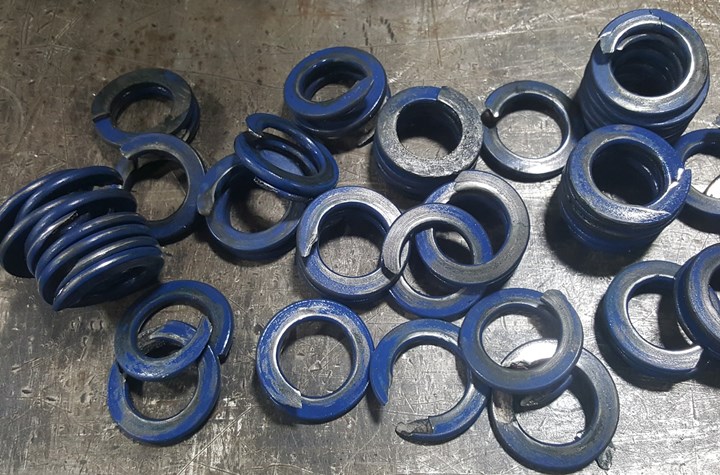
FIG 2 Shattered springs.
It is common for a mold designer to mount a spring over the return pins. One benefit of this location is that there is typically a stop button under the ejector plate to prevent the plates from bending. However, depending on the diameter of the springs, they may extend beyond the outside edges of the mold and require the B-Plate to be somewhat relieved, as shown in Fig. 3.
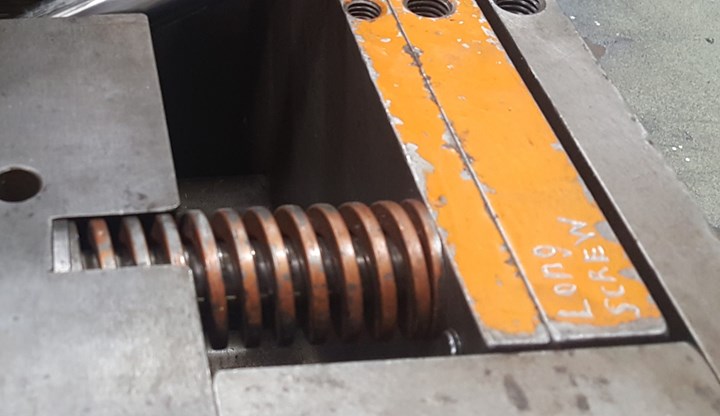
FIG 3 Break-out springs.
While mounting springs over return pins is very common, it is often better to mount them over the guided ejector pins, or over their own pin in close proximity to where the machine knockouts butt against the back of the ejector plate. This will help prevent the ejector plates from bending.
Sometimes the spring length you need is not available from your supplier. In a case like this, it is acceptable to stack springs one on top of the other, as shown in Fig. 4. However, unlike Fig. 4, the pairs of springs should be the same length, so as to avoid overcompressing the shorter spring. Stacking springs is also beneficial in avoiding or minimizing resonant frequency effects and “load bounce”—both of which are beyond the scope of this article and are rarely an issue in injection mold applications.
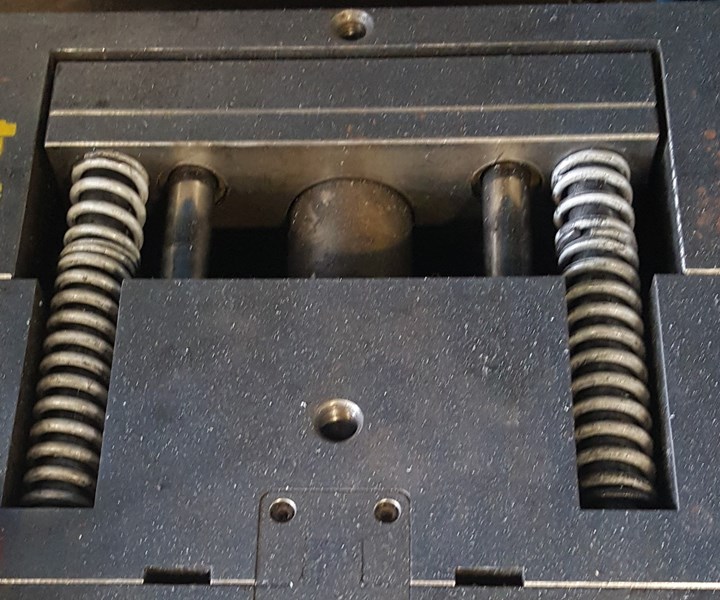
FIG 4 Stacked springs.
Occasionally there isn’t enough room to install the springs within the ejector housing. You can often overcome the problem by using a spring cage, as shown in Fig. 5. The shoulder of the cage is trapped between the ejector plates. The body of the cage can extend all the way to the back side of the ejection clamp plate. Cages allow you to pick up about another 2½ in.
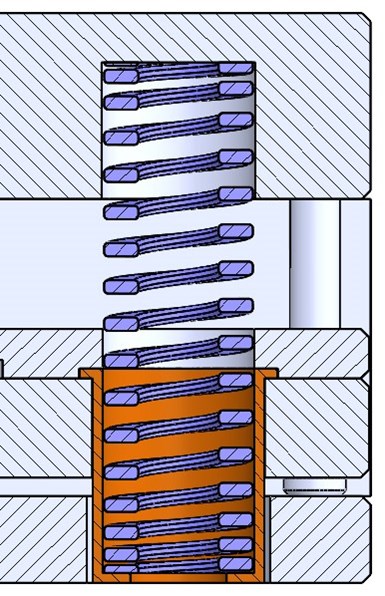
FIG 5 Spring with a cage.
Sometimes there simply isn’t enough room to install the springs within the ejector housing—even with a spring cage. In a case like this, you can install the springs on the outside of the mold, as shown in Fig 6. There are various ways of doing this, limited only by your imagination. Some molders actually prefer exterior mounting because they can easily see the condition of the springs. Other molders dislike this method because the exposed springs are subject to damage during mold handling.
You have to be careful when working around springs. The spaces between the coils are pinch points, and compressed springs have significant potential energy, which can cause a variety of potentially dangerous situations. Molds with spring-loaded ejector plates should have guards for personal protection. If you have ever seen an ejector plate slap back into position long after it should have, you know what I mean.
Preloaded springs used to retain the ejector plates can be a problem when assembling the ejector housing on the tool bench. One trick is to drill and tap the faces of two diagonally opposed return pins, so that screws with washers can retain the ejector system in position, as shown in Fig. 7.
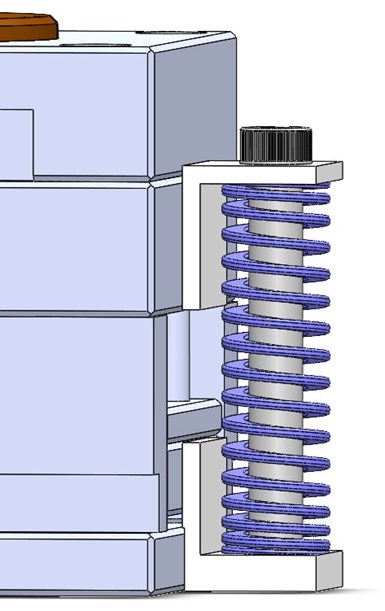
FIG 6 Externally mounted spring.
Most problems that arise when using die springs usually result from improper application and use. Here are some tips to ensure your springs perform properly:
• Always work within the spring’s physical limits and recommended ratings.
• Never mix springs of different lengths or ratings.
• Never cut or grind the end of a spring to some other desired length, or cut or grind the ID or OD of a spring. This can change the temper of the material and negatively affect the spring’s performance. Altering a spring from its manufactured state almost invariably leads to a problem or failure.
• Never place a restriction on the movement of the coils. This can cause early spring failure.
• Ensure that the springs are clear of debris. Some molds eject small parts so forcefully that they can end up inside the ejector housing and in between the coils of a spring.
• Perform preventive maintenance on a regular basis. Replace the springs at appropriate intervals to prevent downtime. Replace all of the springs at the same time to ensure an even load distribution.
• Routinely inspect springs for corrosion, which can cause them to lose their strength, and fail.
• The typical heat-resistance rating of a die spring is 445 F (230 C). After that, they start to lose a considerable amount of force due to spring relaxation. Spring temperatures increase above ambient when cycled. The faster the mold cycles, the greater the amount of heat generated—especially when using multiple ejector pulses. This is rarely a problem with most molds. However, you can get into some trouble when the mold uses hot oil, as opposed to chiller or tower water, and the heat transfers over time from the mold to the springs. Consult the spring manufacturer in high-heat applications like this.
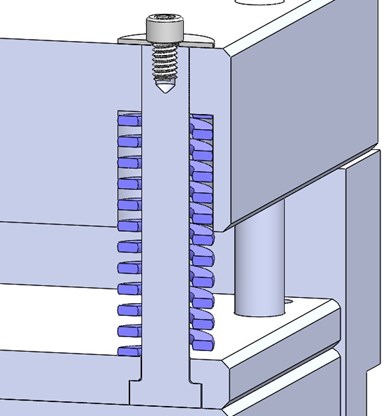
FIG 7 Drill and tap the faces of two diagonally opposed return pins so that screws with washers can retain the ejector system in position.
Finally, you need to give careful consideration to the amount of preload force when using springs for three-plate parting-line sequencing, or in other similar situations. The molding machine must overcome the preload force in order to go into high clamp pressure. This requires an increase in the mold’s low-pressure close value. Unfortunately, that value protects the mold from damage.
Most of the guidelines and recommendations mentioned in this article also apply to other applications within an injection mold—such as springs used on cams, floating inserts, custom air-poppet valves, etc.
About the Author: Jim Fattori is a third-generation molder with more than 40 years of experience in engineering and project management for custom and captive molders. He is the founder of Injection Mold Consulting LLC in Pennsylvania. Contact: jim@injectionmoldconsulting.com;
injectionmoldconsulting.com


Related Content

Cooling Geometry and the Reynolds Calculation
The original Turbulent Flow Rate Calculator worked well with a round circuit diameter, such as a drilled passage, but not as well using hydraulic diameters. Here’s how the problem was fixed.
Read More
Why Shoulder Bolts Are Too Important to Ignore (Part 1)
These humble but essential fasteners used in injection molds are known by various names and used for a number of purposes.
Read More
Back to Basics on Mold Venting (Part 1)
Here’s what you need to know to improve the quality of your parts and to protect your molds.
Read More
Tunnel Gates for Mold Designers, Part 1
Of all the gate types, tunnel gates are the most misunderstood. Here’s what you need to know to choose the best design for your application.
Read MoreRead Next

Tooling: Back to Basics on Die Springs Part 1
Some molding shops insist that all of their molds have springs to return the ejector plates. And there are lots from which to choose. Here we’ll focus on compression die springs for injection molds.
Read More
Lead the Conversation, Change the Conversation
Coverage of single-use plastics can be both misleading and demoralizing. Here are 10 tips for changing the perception of the plastics industry at your company and in your community.
Read More
How Polymer Melts in Single-Screw Extruders
Understanding how polymer melts in a single-screw extruder could help you optimize your screw design to eliminate defect-causing solid polymer fragments.
Read More