Injection Molding: The Basics of Machine Evaluation, Part III
In the last two issues, we started defining some basic tests to ensure your injection molding machine is working properly.
.jpg;width=70;height=70;mode=crop;format=webp)


In the last two issues, we started defining some basic tests to ensure your injection molding machine is working properly. Parts I and II
covered the first eight of the nine suggested machine checks. This column covers just the ninth—switchover response, perhaps the most subtle and complicated, yet one of the most critical of the nine.
Switchover response is the phase of the cycle where the first stage of filling the part to 90+% full ends and the second stage (pack and hold) begins. It is hard to believe that 0.1 sec of a cycle can foul up your part, but this switchover or transfer from first to second stage is critical. Often, switchover response is the cause of flash, shorts, and other intermittent part problems.


Let’s start with the strategy for switchover. What should happen and how? With Scientific Injection Molding (SIM), you want to take the plastic’s point of view: What does it need to make an acceptable part? It needs to develop cavity pressure to properly replicate the mold cavity and provide for the right amount of shrinkage to meet dimensional specifications. The goal is not to be kind to the molding machine—most presses are able to do what is needed. Also, processing should not work around a machine problem, especially not this one.
Now, from the machine’s point of view, as the screw reaches the position of switchover, the controller, in something like 0.010 sec or less, switches from velocity to pressure control. Since the cavity is more than 90% full, not much more plastic is needed. Except for large parts, you are usually dealing with only a few extra grams. What is a gram? Pull out a bill from your wallet—that’s 0.98 g. How should we squeeze this little bit of plastic into the mold? We have four possibilities:
- Allow the flow front to hesitate and then apply second-stage pressure.
- Slow transfer.
- Rapid transfer.
- Slow, velocity-controlled packing, followed by hold pressure.
LETTING THE FLOW FRONT HESITATE
While most of us would agree this is not a good idea, many machines, old and new, have problems of flow-front hesitation at transfer. If pressure at transfer is 21,000 psi and you are asking for 15,000 psi for the second stage, there may and often should be some bounce-back of the screw. A small amount of bounce-back does not mean the flow front hesitates, since the screw still has pressure on the melt to keep it moving.
But if the melt pressure in front of the screw drops too much, you will have too much bounce-back and consequent flow-front hesitation. If the flow front hesitates, viscosity builds, and the material gets stiffer. We’re talking about viscosity increases of 10 times or more. If viscosity builds that much, whatever pressure you have for pack and hold in front of the screw will not be transferred through to the cavity. Figure 1 provides a pressure-vs.-time curve typical of a machine that may provide flow-front hesitation in the cavity or too much bounce-back. Note that all this occurs in 0.1 sec. This will provide significant problems for parts with intricate geometries or weld lines near the last area to fill.
SLOW TRANSFER
Slowly transferring from first to second stage to provide a gradual transfer may sound good, but remember how much plastic we have to move. These last few grams of plastic will develop the cavity pressure. How do we want to develop cavity pressure—slowly or suddenly? What happens if you do it slowly is shown in Fig. 2. Those last few grams of plastic provide for a sharp pressure build in the cavity. This is not only hard on the mold’s parting line but also is problematic for part consistency. The peak cavity pressure may vary. It is difficult to duplicate and tends to provide a less robust process.
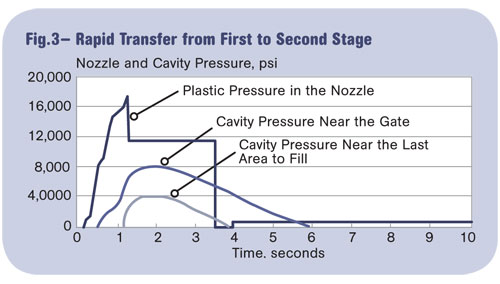
RAPID TRANSFER
A sharp or rapid transfer from first to second stage provides a nearly ideal situation for developing the cavity pressure. Again, since there is very little plastic that has to be delivered to the cavity, the rapid drop of plastic pressure in the nozzle does not overpack or accentuate the rapid development of cavity pressure. Note that the curves in Fig. 3 are more rounded and peak cavity pressure occurs during the constant second-stage pressure. This often provides a robust process, making consistent parts. In addition, this process is easily transferable to other machines. However, this method does require good performance of the screw’s check ring, which is too often not the case.
SLOW, VELOCITY-CONTROLLED PACK
This last method of switchover is the most accurate and requires a three-stage molding process, also known as RJG’s Decoupled Three (RJG, Inc., rjginc.com). The filling or first stage gets the part 90+% full. Packing (second stage) is velocity controlled to slow the cavity-pressure development and ends when the cavity pressure reaches a level previously found to produce an acceptable part. Once this cavity pressure is achieved, the machine transfers to holding (third stage) to keep all the plastic in the cavity and hold the part to specified dimensions. The benefit of this technique is that it compensates for viscosity variations and any leakage of the check ring.
About the Author
John Bozzelli is the founder of Injection Molding Solutions (Scientific Molding) in Midland, Mich., a provider of training and consulting services to injection molders, including LIMS, and other specialties. E-mail john@scientificmolding.com or visit scientificmolding.com.
Related Content

How to Set Barrel Zone Temps in Injection Molding
Start by picking a target melt temperature, and double-check data sheets for the resin supplier’s recommendations. Now for the rest...
Read More
How to Stop Flash
Flashing of a part can occur for several reasons—from variations in the process or material to tooling trouble.
Read More
Are Your Sprue or Parts Sticking? Here Are Some Solutions
When a sprue or part sticks, the result of trying to unstick it is often more scratches or undercuts, making the problem worse and the fix more costly. Here’s how to set up a proper procedure for this sticky wicket.
Read More
How to Reduce Sinks in Injection Molding
Modifications to the common core pin can be a simple solution, but don’t expect all resins to behave the same. Gas assist is also worth a try.
Read MoreRead Next

The Basics of Machine Evaluation, Part II
Last month we started defining some basic tests to ensure your injection molding machine is working properly.
Read More
Why (and What) You Need to Dry
Other than polyolefins, almost every other polymer exhibits some level of polarity and therefore can absorb a certain amount of moisture from the atmosphere. Here’s a look at some of these materials, and what needs to be done to dry them.
Read More