
Minimizing Black Specks
Injection Molding Know How
Black specks in molded parts are one of the most infuriating problems to resolve on the shop floor. Here's how to fix them.
.jpg;width=70;height=70;mode=crop;format=webp)

FIG 1: Molded yellow plaque above shows severe black specks.
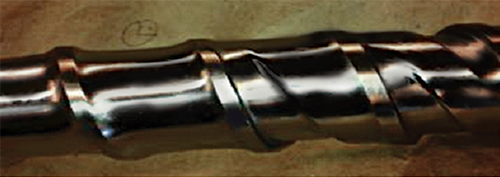
FIG 2: To minimize black specks, go with a screw design that reduces dead space and provides melt uniformity, as shown here.


Black specks in molded parts are one of the most infuriating problems to resolve on the shop floor (see Fig. 1). They come and go, causing rejects, wasted resin, and downtime; and they are difficult to resolve quickly. Sometimes purging compounds help, but often it is a toss-up whether to purge or just stop and pull the screw so it and the barrel can be cleaned. What should you do to stop the black specks from appearing in your parts?
Ideally you identify the source or cause of the specks and eliminate it. This is easier said than done, as there are several possible sources. They include:


•The incoming resin.
•Degradation of the resin in the screw.
•Degradation of the resin in the hot runner.
•Broken or poorly designed check valves and screw tips.
•Poorly designed nozzle body, mismatched junctions, poor thermocouple placement, or poor temperature control.
•Fines.
•Contamination.
•Long residence time from using less than 25% of the barrel.
•Excessive melt temperature.
How do you find out which is/are the culprit(s)? Start at the beginning with the resin. Is the incoming material clean, with no black specks or fines? Inspect it, especially if you are dealing with a clear polymer. Sample the bag, gaylord, or hopper with a sampling wand that takes samples at different depths. Place about 2 lb in a white, 16 in. x 24 in. tray, with good lighting.
Spend five minutes looking for black specks and fines and the uniformity of the granules. Note if the black specks or contamination is on the surface or embedded in the granules. If it’s the latter, call the resin supplier. If the specks are on the outside and can be rubbed off, check your handling procedures. If they are in the bags or gaylord, again talk to the resin folks. If there are excessive fines, use a deduster or fines separator. In fact, especially for clear materials, always use a deduster. Fines can cause both black and white specks in your parts.
The high surface-to-volume ratio of fines brings in a lot of air, which in turn causes the fine dust particles to degrade to carbon. This inspection procedure applies to regrind too. It is my experience that regrind problems are due more often to contamination than degradation.
If you are molding with a hot runner, you have to determine whether the black specks are coming from the barrel/screw or the hot runner. Break the cycle and purge one shot. It is important to check a shot that was developed with appropriate backpressure. Unless you are using a resin sensitive to degradation, use about 800-1000 psi of plastic (not hydraulic) backpressure. Backpressure is critical to fill the flights of the screw to minimize dead space. In fact, if increasing backpressure increases black specks or starts a “carbon shower,” that’s a good indication that you have a screw-design problem. Check that the melt temperature is in the proper range and look for specks in the purge patty. If the purge is clean and you are getting black specks, the hot-runner system is likely the culprit.
Another trick to help determine if the problem is emanating from the runner or the barrel is to put a few granules of a different color into the hot sprue bushing, then make a shot. If the black specks occur before the area of where the color comes out, it is the hot runner, if they occur after that it is the screw and barrel. If the problem is the hot runner, you are facing a complete tear-down and a review of the hot-runner design. Check for proper temperature control, burnt-out heating elements, open thermocouples, and incorrect placement of thermocouples.
Check the depth of the hot tip relative to gate surface, and account for thermal expansion.
Redesign the hot runner if necessary. Many have dead spots due to cross gun-drilling; resin will degrade in the dead-space corners. Check watt-density and location of the hot-drop heaters. Infrared thermal imaging of the open hot runner is one method of finding temperature-control problems. Location of the heater bands and thermocouple can be a nightmare to resolve.
If you suspect the barrel and screw, which are often the culprits, clean the screw and barrel. Pull the screw and check for carbon buildup behind the flights in the metering and transition zones of the screw. Cleaning should be done with dry ice or a high-pressure water jet, not by scraping, wire-wheeling, or burning. Most general-purpose screws produce black specks due to dead space behind the flights. And do not be surprised if you see a color that you molded days or weeks ago on the screw flights. Buildup of both carbon and week-old color are proof that the new material coming in is not pushing out all of the previous material in those flights.
Molding a clear resin for a lens application with a general-purpose screw is a recipe for disaster. Specify a screw with no dead spots in the flights—that is, put as large a radius as possible on the flights, starting with the last flight of the feed section. It should look something like a farmer’s plow. Do not use a barrier screw or high-intensity mixing device. A screw design that reduces dead space and provides melt uniformity is shown in Fig. 2. Avoid vented barrels: Often the screw and vent design are prone to dead spots, with resulting resin degradation to carbon.
The screw should be highly polished with no sanding marks or scratches from wire wheels. The flights should be sharp, scratch-free, with no nicks. For clear resins, it is especially important that the screw has better chemical resistance than standard equipment. Also, make sure you are using at least 25% of the barrel capacity. Long residence time can cause degradation, the source of most black specks. Close inspection of the screw when pulled for cleaning may aid in finding hot spots. Color of the metal can be correlated to the highest temperature the metal has seen.
Check the non-return valve, nozzle end-cap, and screw tip for design flaws and abrupt changes in flow path. Look for sharp corners, restrictions, and dead spots that can lead to polymer hangup and subsequent degradation. If there are broken or chipped flights or nicks in the nonreturn valve or screw tip, these are sources of black streaks and must be replaced.
The nozzle body and screw tip are also notorious for causing degradation. Both their design and temperature control are suspect. The flow path should be smooth, free-flowing, and cone-shaped from the end cap all the way through to the nozzle tip. Standard nozzle tips have a straight bore and a significant dead space; I do not recommend them for cold-runner applications. Keep the nozzle body as short as possible with a free-flow (cone) design.
Temperature should be PID controlled—no variac or percentages. The thermocouple on the nozzle body is critical and often in the wrong place. If the nozzle and tip are 3 in. or less in length it is okay if the thermocouple is placed in the hex of the nozzle body. For longer nozzles, place the thermocouple one-third the length of the nozzle body back from the tip. A spade- or butterfly-type thermocouple should be placed directly on the nozzle body, covered with three layers of glass tape, and the heater band placed on top. Thermocouple placement on the hex of a long nozzle or on the screw holding the heater band onto the nozzle is not acceptable and a sure source of incorrect temperature control of the nozzle body and tip.
Finally, check the actual melt temperature using the hot-probe technique or an appropriate infrared (IR) device. Target the midpoint of the resin manufacturer’s recommended temperature range. A temperature too high or low can lead to mixing problems. Temperature control of the barrel is also important. Look for hot spots or zones overriding temperature setpoints with the heater bands constantly on or constantly off. If constantly on, it is not controlling and you need to find out why—such as because of a burned-out heater band. If the zone is constantly off, the zone is overriding, and you should do one of the following: Raise the temperature in the zone before it; reduce backpressure; lower screw rpm; or remove the barrel blanket.
About the Author
John Bozzelli is the founder of Injection Molding Solutions (Scientific Molding) in Midland, Mich., a provider of training and consulting services to injection molders, including LIMS and other specialties. Email john@scientificmolding.com or visit scientificmolding.com


Related Content

A Simpler Way to Calculate Shot Size vs. Barrel Capacity
Let’s take another look at this seemingly dull but oh-so-crucial topic.
Read More
How to Set Barrel Zone Temps in Injection Molding
Start by picking a target melt temperature, and double-check data sheets for the resin supplier’s recommendations. Now for the rest...
Read More
The Importance of Melt & Mold Temperature
Molders should realize how significantly process conditions can influence the final properties of the part.
Read More
Why (and What) You Need to Dry
Other than polyolefins, almost every other polymer exhibits some level of polarity and therefore can absorb a certain amount of moisture from the atmosphere. Here’s a look at some of these materials, and what needs to be done to dry them.
Read MoreRead Next

Lead the Conversation, Change the Conversation
Coverage of single-use plastics can be both misleading and demoralizing. Here are 10 tips for changing the perception of the plastics industry at your company and in your community.
Read More
People 4.0 – How to Get Buy-In from Your Staff for Industry 4.0 Systems
Implementing a production monitoring system as the foundation of a ‘smart factory’ is about integrating people with new technology as much as it is about integrating machines and computers. Here are tips from a company that has gone through the process.
Read More
Processor Turns to AI to Help Keep Machines Humming
At captive processor McConkey, a new generation of artificial intelligence models, highlighted by ChatGPT, is helping it wade through the shortage of skilled labor and keep its production lines churning out good parts.
Read More