The Impact of Hydraulics on Tool Design -- Part 1 of 2
Get a better understanding of their use, proper sizing, and how the tool design and setup in the machine can impact failures in manufacturing.
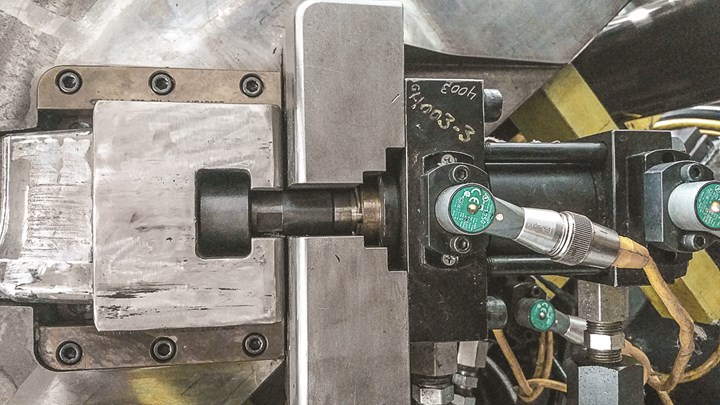
Hydraulic cylinders are used for a variety of purposes in injection molding tooling: slides, core pulls, ejection, reverse ejection, gas-assist overflows, gas-assist valve pins, valve gates, locks, unscrewing molds, etc. If you’ve worked with them, you know all about oil leaks and the headaches they create. So my preference is to avoid hydraulics whenever possible. That said, I will recommend hydraulic cylinders in situations where I feel they will perform better than mechanical features.
In any situation where hydraulic cylinders are used, it’s important to have a better understanding of set/pull pressures and speeds. The set/pull pressure and speed can directly affect downtime with leaks and repairs. Pressure and speed can be both friend and foe. Time is money, so speed is your friend from that perspective. But it’s your foe if it causes an impact with a mechanical feature that you can hear when it is set or pulled. This will result in stress, wear, and at some point broken components in T-slot couplers or threaded rod ends.
Pressure and speed can be both friend and foe.
There are a few options to protect your components from the negative impacts of speed. Cushions can be added in the cylinder. On the pull direction, it’s better to have your cylinder bottom out instead of your component. On set position your component needs to be home, so you typically do not want your cylinder bottoming out, but there’s a solution to this that I’ll get to later. So you need to determine how speed will impact your component and potential failures.
Hydraulic Pressure
Hydraulic pressures can also have a negative impact on your components. On the set position, if your component is relying on hydraulic pressure to overcome plastic/cavity pressure, you’ll typically need to set your pressures high. If your component is locked in place with a lock angle on the stationary half, you don’t need to use excessive hydraulic pressures—just enough to move your component. And for the pull position you’ll only need enough hydraulic pressure to pull it back.
Over the years I have seen hundreds of failures caused by excess hydraulic pressures. In most cases this occurs with the pull position; the attachment point of the cylinder rod and component gets stretched/stressed (whereas in the set position they are compressed). One other thing to consider when using T-slot couplers: No sharp corners on the T or the slot, as they will increase your chance of failure from stress. You need to understand what hydraulic pressures are required both for movement or to overcome cavity/plastic pressure, the latter being the case where pressures are needed.
T-slot couplers are used to attach the cylinder to the slide. There should be no sharp corners on the T or the slot, as they will increase your chance of failure from stress.
In my experience, many setup technicians do not understand this, and set pressures much higher than necessary. The opposite can also occur, as hydraulic pressure set too low can cause issues as well. This is not necessarily the technician’s fault; in most cases it’s the result of a lack of understanding of the tool. Sometimes even the tool shops do not fully understand these issues. Until I moved to the molding side of the plant and got exposed to hundreds of these issues, I had limited understanding of these problems when I was building what I thought was a robust tool.
Cylinder Size
There is a knowledge gap between tool shops and molding operations. The material being used, flow lengths, and wall stock can have a huge impact on the plastic pressures, facts that are not understood in depth by most tool shops. This is not a knock against designers or engineers, it’s just reflective of their lack of knowledge about the processing side. Both parties have valuable information that is not always shared in depth.
The material being used, flow lengths, and wall stock can have a huge impact on the plastic pressures, facts that are not understood in depth by most tool shops.
With that being said, one area I feel needs to be examined more closely is cylinder sizing vs. cavity pressure. This is relevant in situations where the cylinder is being used to resist plastic pressure. (As stated above, if the component is using a locking angle with the stationary half, this does not need to be a consideration.) When the hydraulics need to withstand plastic pressure, the math is very simple and does not require a textbook to determine cylinder size.
In order to correctly size a hydraulic cylinder on a mold, follow these steps:
First, make sure the mold designers understand what the potential maximum plastic pressures are so they can accurately calculate the peak pressures (not just pack/hold) the cavity surface area will have on the component. You cannot just base this on the material being used; as I mentioned earlier, there are a few things that can drastically impact the pressures. If you are unsure round it up, but never round it down if you want a robust tool and process. Once you have determined the maximum plastics pressures, the rest is easy.
You’ll need to calculate the cavity surface that is on the surface area of the component. Once you have determined the cavity surface area you multiply that by the maximum plastic pressure discussed. This result will be the pressure that you’ll need to design your cylinder around.
At that point you can determine what bore size the cylinder should be. I typically will design the bore size so it exceeds the cavity-pressure force by 1.5 times to make sure it is robust. For example, if the expected cavity pressure is 10,000 psi and the cavity surface area of the component is 1 in.², you know that there will be 10,000 lb of force acting on the component. (10,000 lb per in.² × 1 in.²). If you multiply the 10,000 × 1.5 you’ll need approximately 15,000 lb of force to counteract the cavity pressure.
To determine the hydraulic cylinder bore size required you need the surface area of the cylinder bore size and the hydraulic pressure being used on the machine or hydraulic pump cart. Let’s say you will have 2000 psi of hydraulic pressure. Calculate the surface area of the bore diameter, which is 3.14 × R². If you use a 3-in. bore cylinder, take the radius: 1.5 × 1.5 × 3.14, which equals 7.065 in.² of surface area. Then multiply this by the 2000 hydraulic psi being used. This equates to 14,130 psi of holding force (7.065 in.² × 2000 hydraulic psi). So in this scenario a 3-in. bore cylinder should provide a robust condition.
Just like with cavity pressure, it is crucial to know exactly what hydraulic psi is going to be used. This is often overlooked or assumed. Keep in mind that on some machines the core pressure can be set up as pressure-limited with a pressure-relief valve. So even though you are changing the pressure on the controller, the actual pressure is not going up if the relief valve is set lower. So what your controller says may not be actual.
The only way to accurately tell is to install an inline pressure gauge to measure the pressure. In the example above, if the pressure was limited to 1000 psi, you would blow back the cylinder since you would only be applying 7065 lb of force to counteract the 10,000 lb the cavity is applying to the core surface. I have witnessed this many times and have had to upsize cylinders. In one case, upsizing was not an option, so I had to add a second set of cylinders to activate a lock to hold the component in place, which made the tool more complex with a suicide condition.
One other thing that needs to be considered is the psi rating of the cylinder itself. If the cylinder is only rated for 1500 hydraulic psi and you are using 2000 hydraulic psi you will run into cylinder failures with leaks and blown seals.
In my next column I will get into various reasons hydraulics are used, self-locking cylinders, sensors/switches, and some things to consider when designing the mold.
Related Content
Why Shoulder Bolts Are Too Important to Ignore (Part 2)
Follow these tips and tricks for a better design.
Read MoreHot Runners: How to Maintain Heaters, Thermocouples, and Controls
I conclude this three-part examination of real-world problems and solutions involving hot runners by focusing on heaters, thermocouples, and controls. Part 3 of 3.
Read MoreHow to Start a Hot-Runner Mold That Has No Tip Insulators
Here's a method to assist with efficient dark-to-light color changes on hot-runner systems that are hot-tipped.
Read MoreHow Do You Estimate Cycle Time?
Molders price jobs based on estimated press time, and that is where you can either be very profitable or lose your shirt. But there’s a new, free resource to help you out.
Read MoreRead Next
Troubleshooting Screw and Barrel Wear in Extrusion
Extruder screws and barrels will wear over time. If you are seeing a reduction in specific rate and higher discharge temperatures, wear is the likely culprit.
Read MoreAdvanced Recycling: Beyond Pyrolysis
Consumer-product brand owners increasingly see advanced chemical recycling as a necessary complement to mechanical recycling if they are to meet ambitious goals for a circular economy in the next decade. Dozens of technology providers are developing new technologies to overcome the limitations of existing pyrolysis methods and to commercialize various alternative approaches to chemical recycling of plastics.
Read MorePeople 4.0 – How to Get Buy-In from Your Staff for Industry 4.0 Systems
Implementing a production monitoring system as the foundation of a ‘smart factory’ is about integrating people with new technology as much as it is about integrating machines and computers. Here are tips from a company that has gone through the process.
Read More