Injection Molding: Fill Based on Volume, Not Weight
Most parts should be 90-99% full after first-stage—by volume not weight. Here’s why that’s important and how to make a first-stage-only part.
.jpg;width=70;height=70;mode=crop;format=webp)
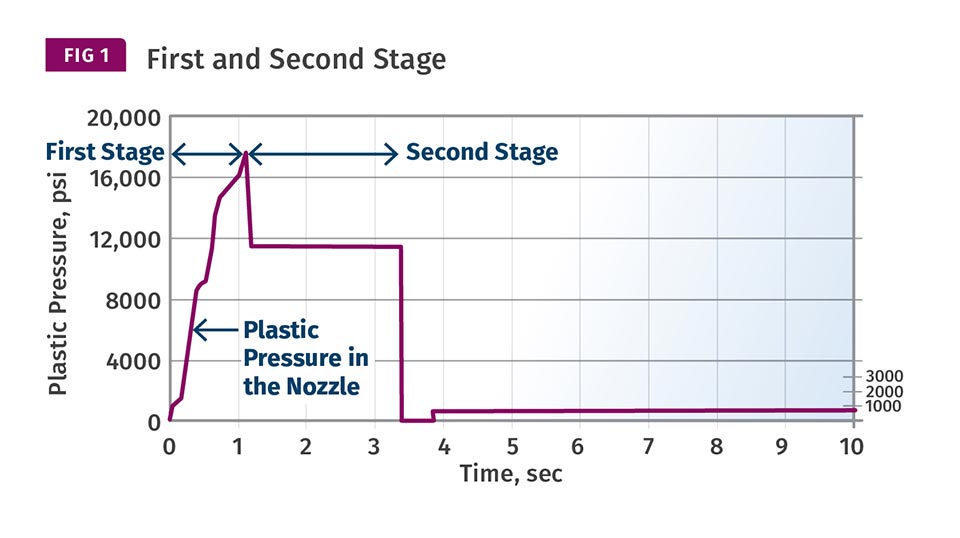
As shown here, first stage fills the part to greater than 90% full, and second stage packs out the part with the remaining amount of plastic needed to finish filling the part, remove sinks, and provide the appropriate part dimensions.
In first stage, if you fill parts by weight you’ll get a rapid, near- vertical instant rise on cavity pressure. This creates a significant force on the parting line of the mold and will likely prematurely wear it, leading to flash.
Note the rounded end-of-fill cavity-pressure curve you get when filling parts by volume and not weight. It suggests less stress is being generated on the parting line, allowing it to withstand significantly more shots before wear and subsequent development of flash.

When processing via “Scientific Molding,” injecting plastic into the mold or cavity is separated into two stages: filling (or “first stage”) and pack-and-hold (“second stage”). During the last few weeks I’ve been getting lots of emails and have had several discussions focusing on just how full the part should be at the end of first stage. And since we call for a greater than 90% full part at the end of first stage, does this mean by weight or by volume? Good questions. Where do we find the answers?
To start let’s define the terms, since there are host of different names, labels, or expressions for first and second stages. Terms such as fill, pack, hold, high-pressure, low-pressure, V-to-P, etc. have been used. Do they all mean the same thing or are there differences? Having numerous terms that are not clearly defined drives me to near insanity. It makes communications difficult, breeds misunderstanding, and confusion, and makes training especially difficult. So, to be clear on what I mean by first and second stage, see Fig. 1, which is an Injection Pressure (plastic pressure) vs. Time graph depicting first and second stage. This graph is typical for most but not all injection molding processes. (It would not apply, for example, to micro-molding, where the parts are too small to separate first stage from second stage.)


In short, first stage fills the part to greater than 90% full, and second stage packs out the part with the remaining amount of plastic needed to finish filling the part, remove sinks, and provide the appropriate part dimensions.
Next let’s cover the procedure to make a first-stage-only part.
The goal is to make a short shot that is greater than 90% full. Seems simple enough; after all, the instructions to make a first-stage-only part is to take off second stage. Problem is, there are three different ways to take off second stage:
- Take the second-stage timer to zero.
- Take second-stage pressure to a very low value. I suggest 5 to 50 psi (0.5-3.5 bar) and leave at least 0.50 sec or longer on the second-stage timer.
- Take second-stage timer to zero and reduce pressure to a low value.
Try each one … my bet is you will not produce the same first-stage-only part. So, which one is best? I suggest the second approach, and let me explain why. There is the issue of momentum or over-travel on most molding machines. That is, the screw does not stop at the set cutoff position. It is critical that the processor sees, understands and deals with this over-travel in developing first stage.
Also, it is critical that the processor ensures that this first-stage only part is done under conditions where injection or first stage is not pressure limited. Many go with 10% higher set or available pressure vs. actual peak pressure during injection. I find this common rule of thumb to be inadequate.
So now that we know the procedure for making a first stage part, how full should it be? No easy answer here. Somewhere between 90 to 99.9% full—based on volume, not weight. Factors that influence this are the type of part, number of cavities, balance of filling, a weld line at the end of fill, a living hinge, etc. Bottom line for 99% of parts being molded: The first-stage part(s) should be visibly short, not full with sink. But why by volume and not weight?
The emails and blogs I’ve received and read covered a variety of rationales for volume or weight, dealing with melt density vs solid density, sinks, bounce back, and other factors. For me ,the answer—volume—comes from studying cavity-pressure curves and witnessing the wear on parting lines along with the resulting development of flash on parts.
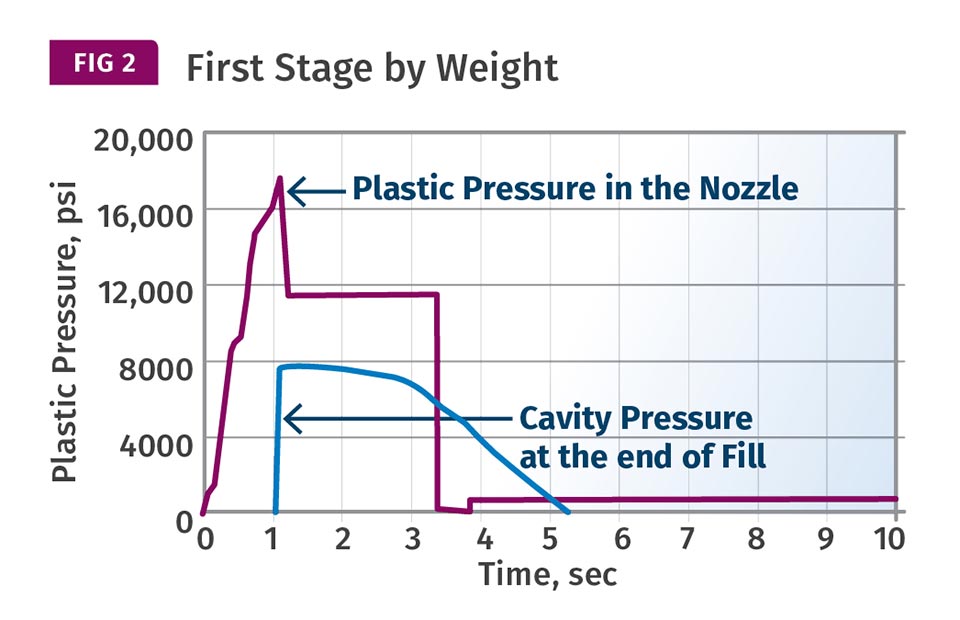
Figure 2 provides the injection-pressure curve in first and second stage, along with an end-of-cavity pressure curve for a first stage developed by weight. Note the rapid, near-vertical instant rise of cavity pressure. This is a significant force on the mold’s parting line and will likely prematurely wear it, leading to flash at some point.
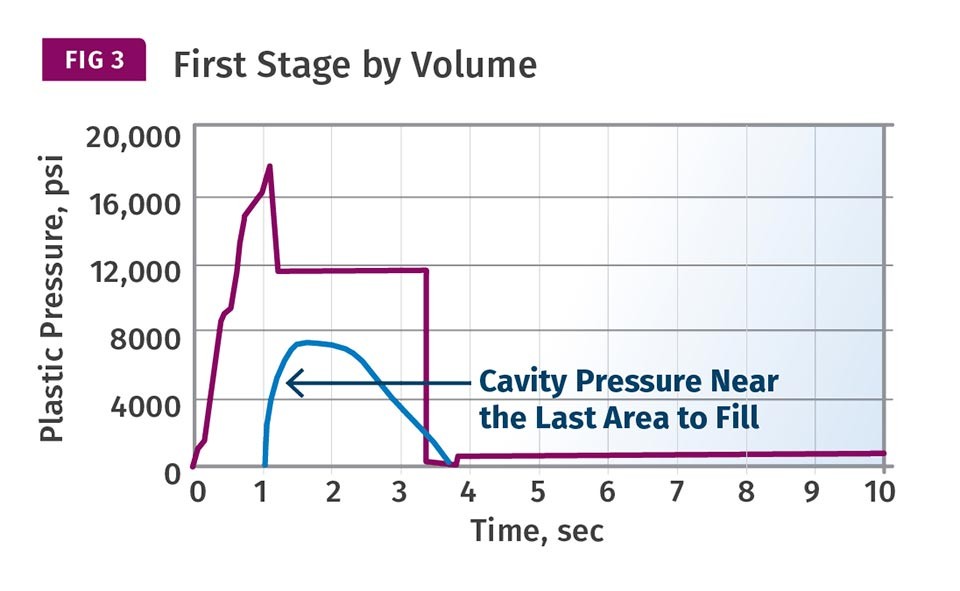
Figure 3 provides the injection-pressure curve for first and second stage, along with an end-of-cavity pressure curve for a first stage developed by volume. Note the rounded end-of-fill cavity-pressure curve. It suggests less stress is being generated on the parting line allowing it to withstand significantly more shots before wear and subsequent development of flash. Please understand there are a number of factors that influence parting line wear; this is only one of several. Also, the shape of an end-of-fill cavity-pressure curve is part-dependent.
In short, develop first stage with time on the second-stage timer and based on volume. It should provide less wear on the parting line.
ABOUT THE AUTHOR: John Bozzelli is the founder of Injection Molding Solutions (Scientific Molding) in Midland, Mich., a provider of training and consulting services to injection molders, including LIMS, and other specialties. Contact john@scientificmolding.com; scientificmolding.com.
Related Content

Tunnel Gates for Mold Designers, Part 1
Of all the gate types, tunnel gates are the most misunderstood. Here’s what you need to know to choose the best design for your application.
Read More
Understanding Strain-Rate Sensitivity In Polymers
Material behavior is fundamentally determined by the equivalence of time and temperature. But that principle tends to be lost on processors and designers. Here’s some guidance.
Read More
Why (and What) You Need to Dry
Other than polyolefins, almost every other polymer exhibits some level of polarity and therefore can absorb a certain amount of moisture from the atmosphere. Here’s a look at some of these materials, and what needs to be done to dry them.
Read More
How to Stop Flash
Flashing of a part can occur for several reasons—from variations in the process or material to tooling trouble.
Read MoreRead Next
Why (and What) You Need to Dry
Other than polyolefins, almost every other polymer exhibits some level of polarity and therefore can absorb a certain amount of moisture from the atmosphere. Here’s a look at some of these materials, and what needs to be done to dry them.
Read More
Understanding Melting in Single-Screw Extruders
You can better visualize the melting process by “flipping” the observation point so that the barrel appears to be turning clockwise around a stationary screw.
Read More