
A simple Excel spread sheet can be used to track ohm readings at each PM and can be set up to flag the user when a reading crosses a “critical” threshold. This sheet is a proactive tool to better determine heater and thermocouple life.
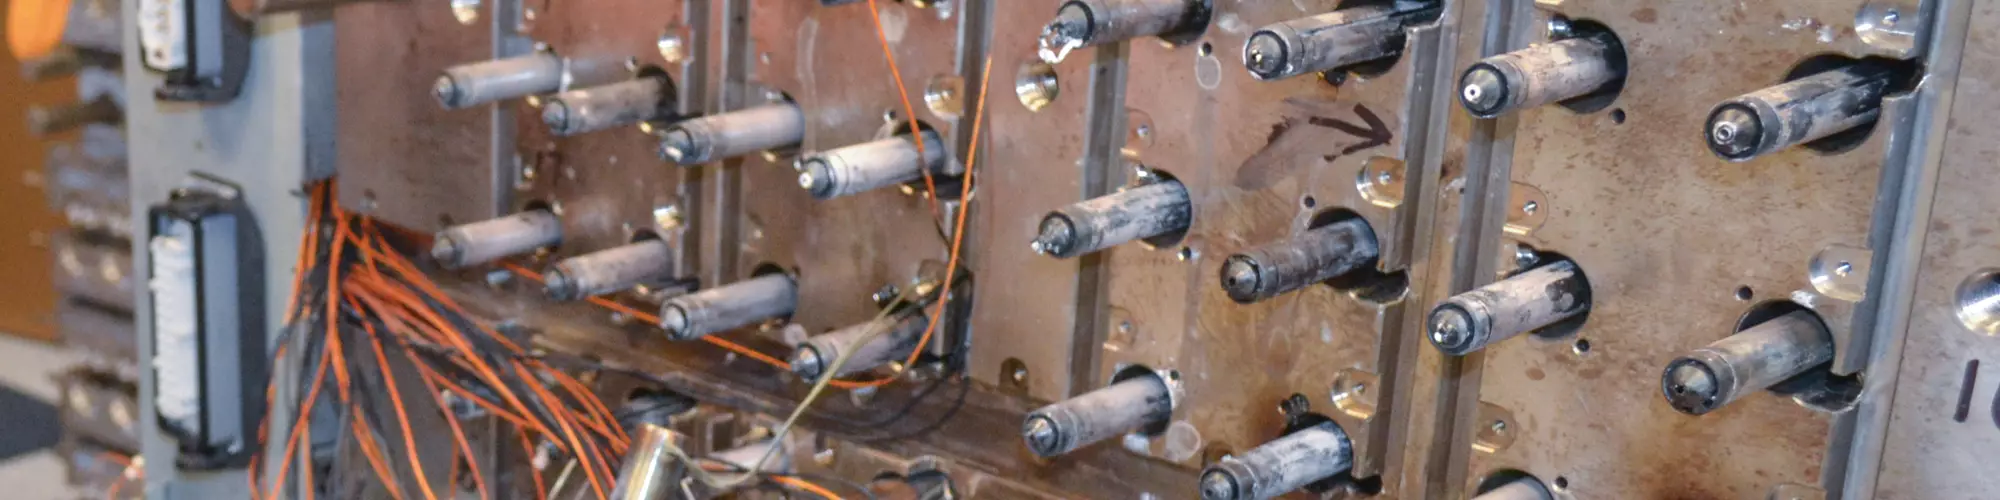
After the ohm reading is concluded, matching ohms to the pin number on the connector, use a heat gun to verify that the positions match the pin numbers.
An attendee at a Moldtrax training seminar records his readings into the Moldtrax documentation system that has a special section dedicated to hot-manifold components and work instructions.
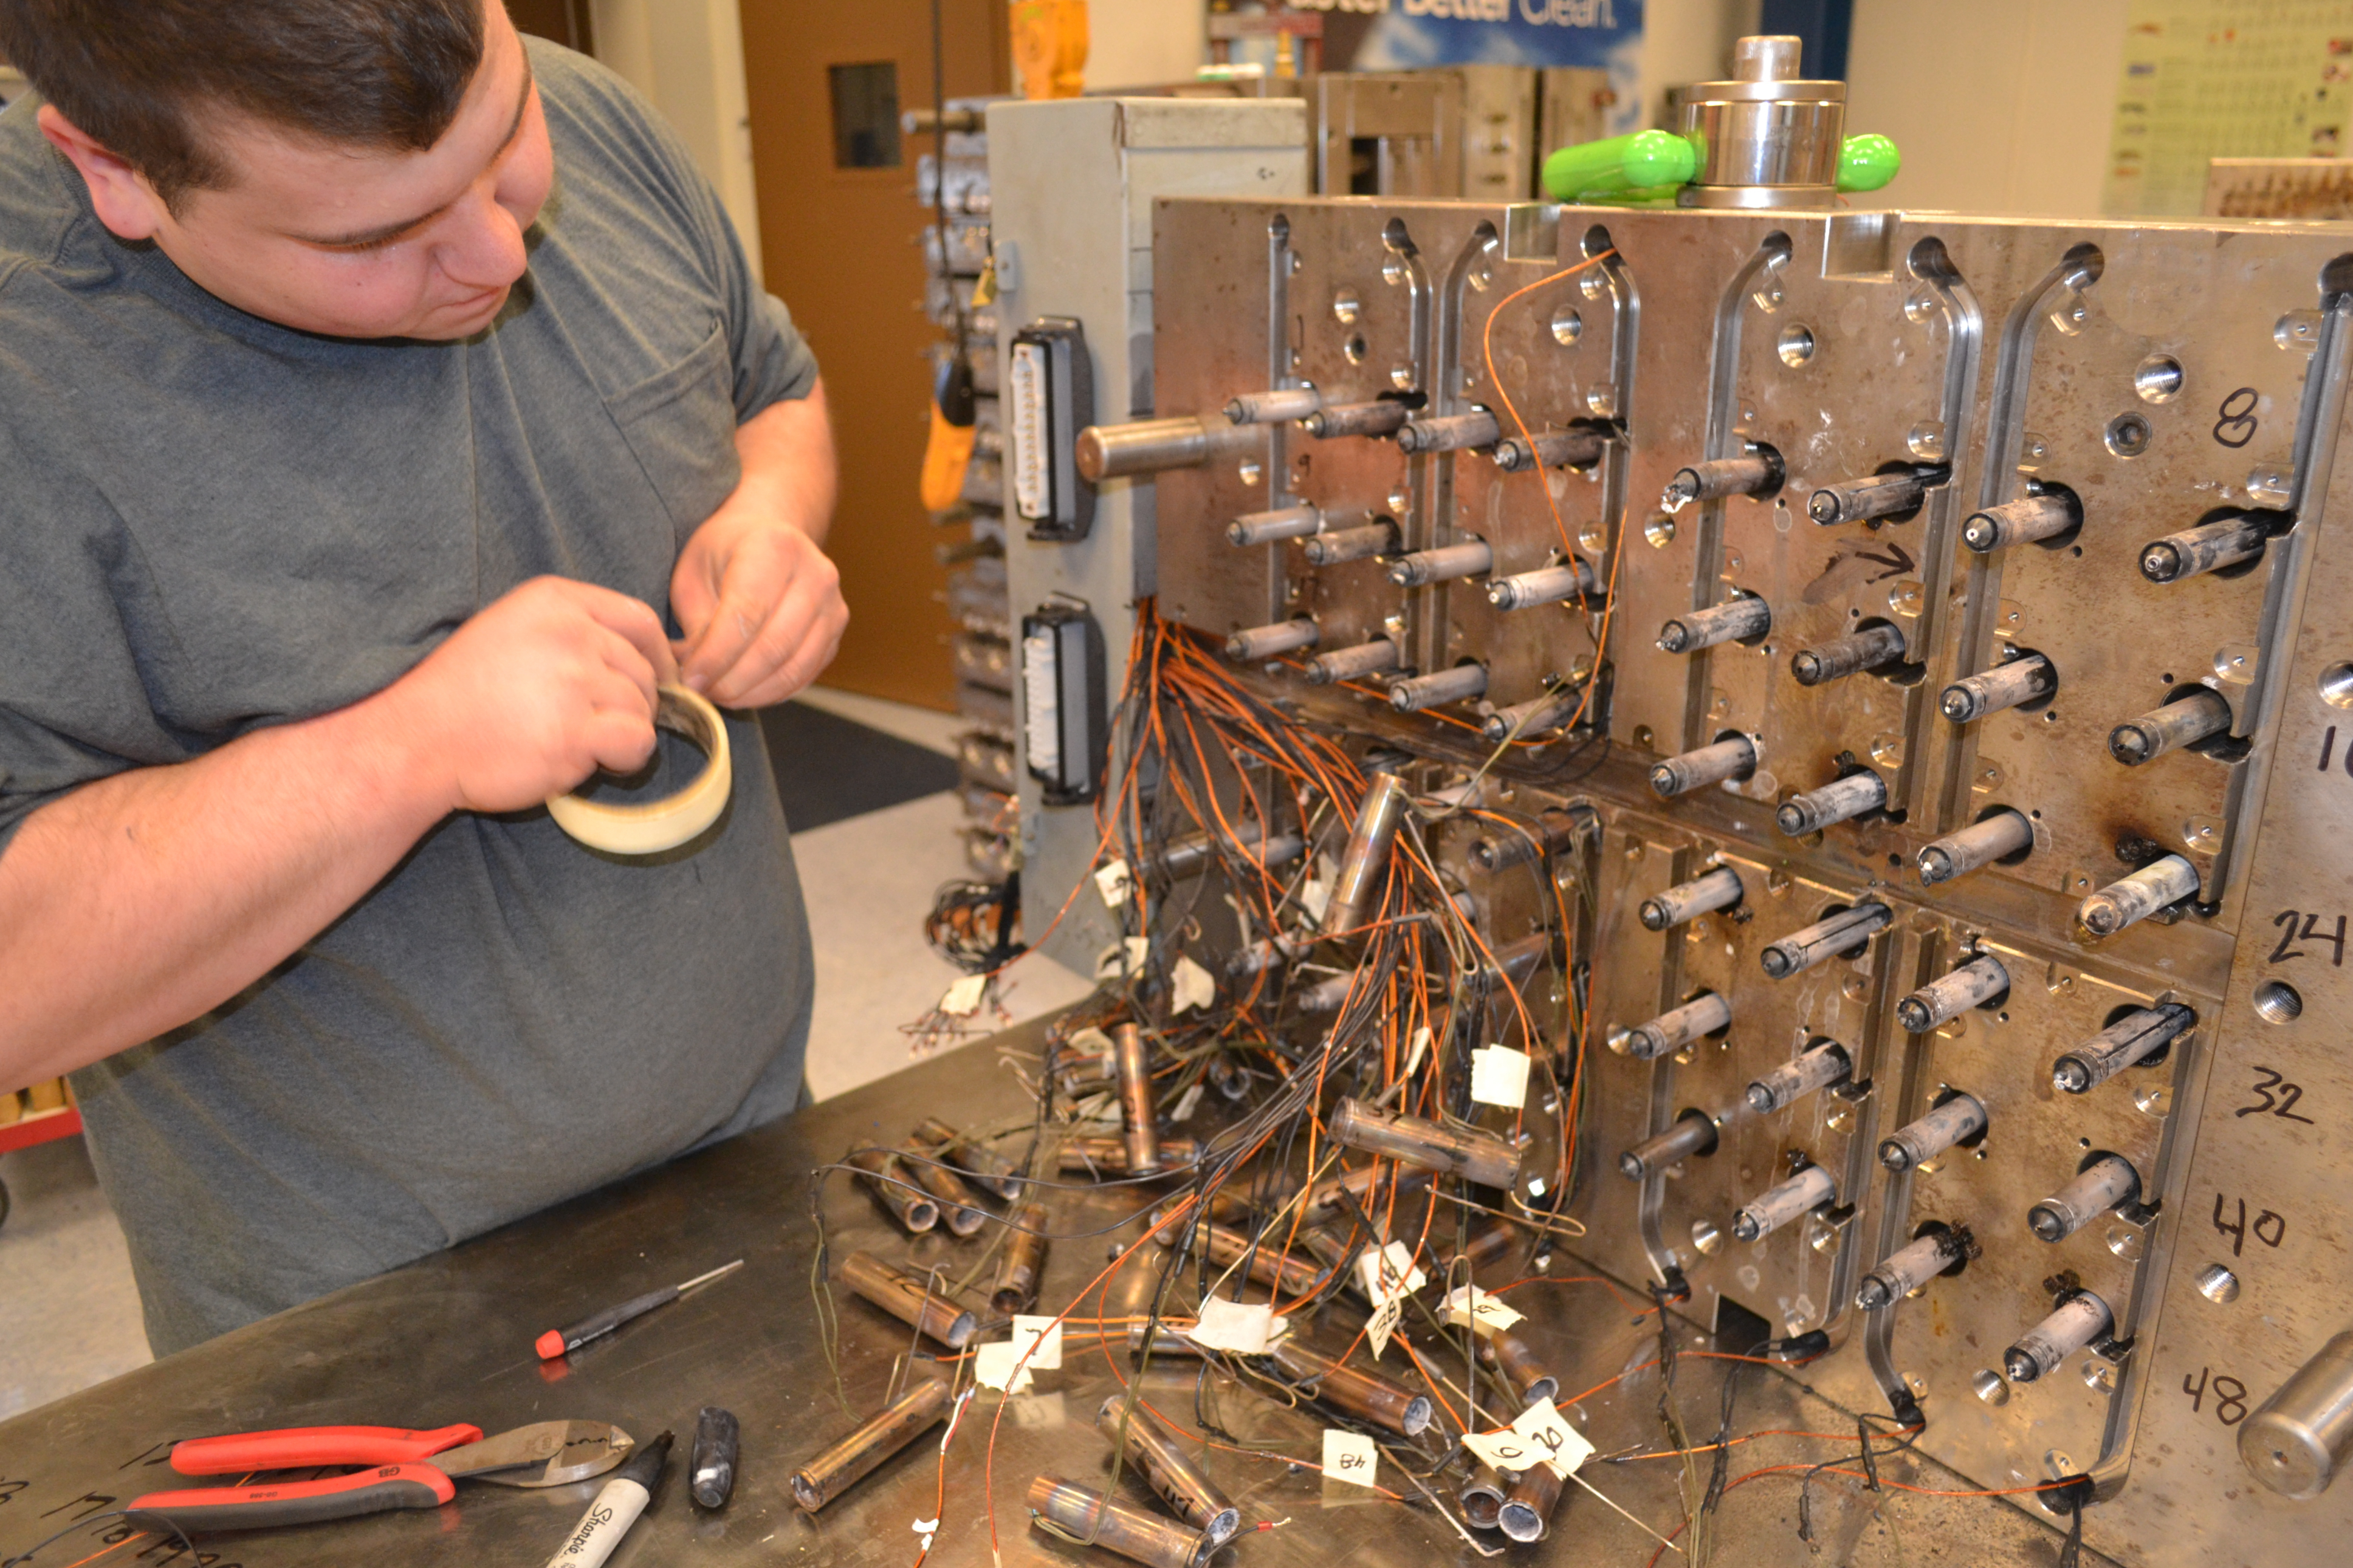
An attendee at a training seminar labels heaters and thermocouples with their home positions, ensuring delicate wires don’t need to be re-bent and possibly broken during installation.

The Fast Heat MoldXChecker provides a quick and accurate method to verify all is good with a mold’s electrical system by checking for shorts and ohms.
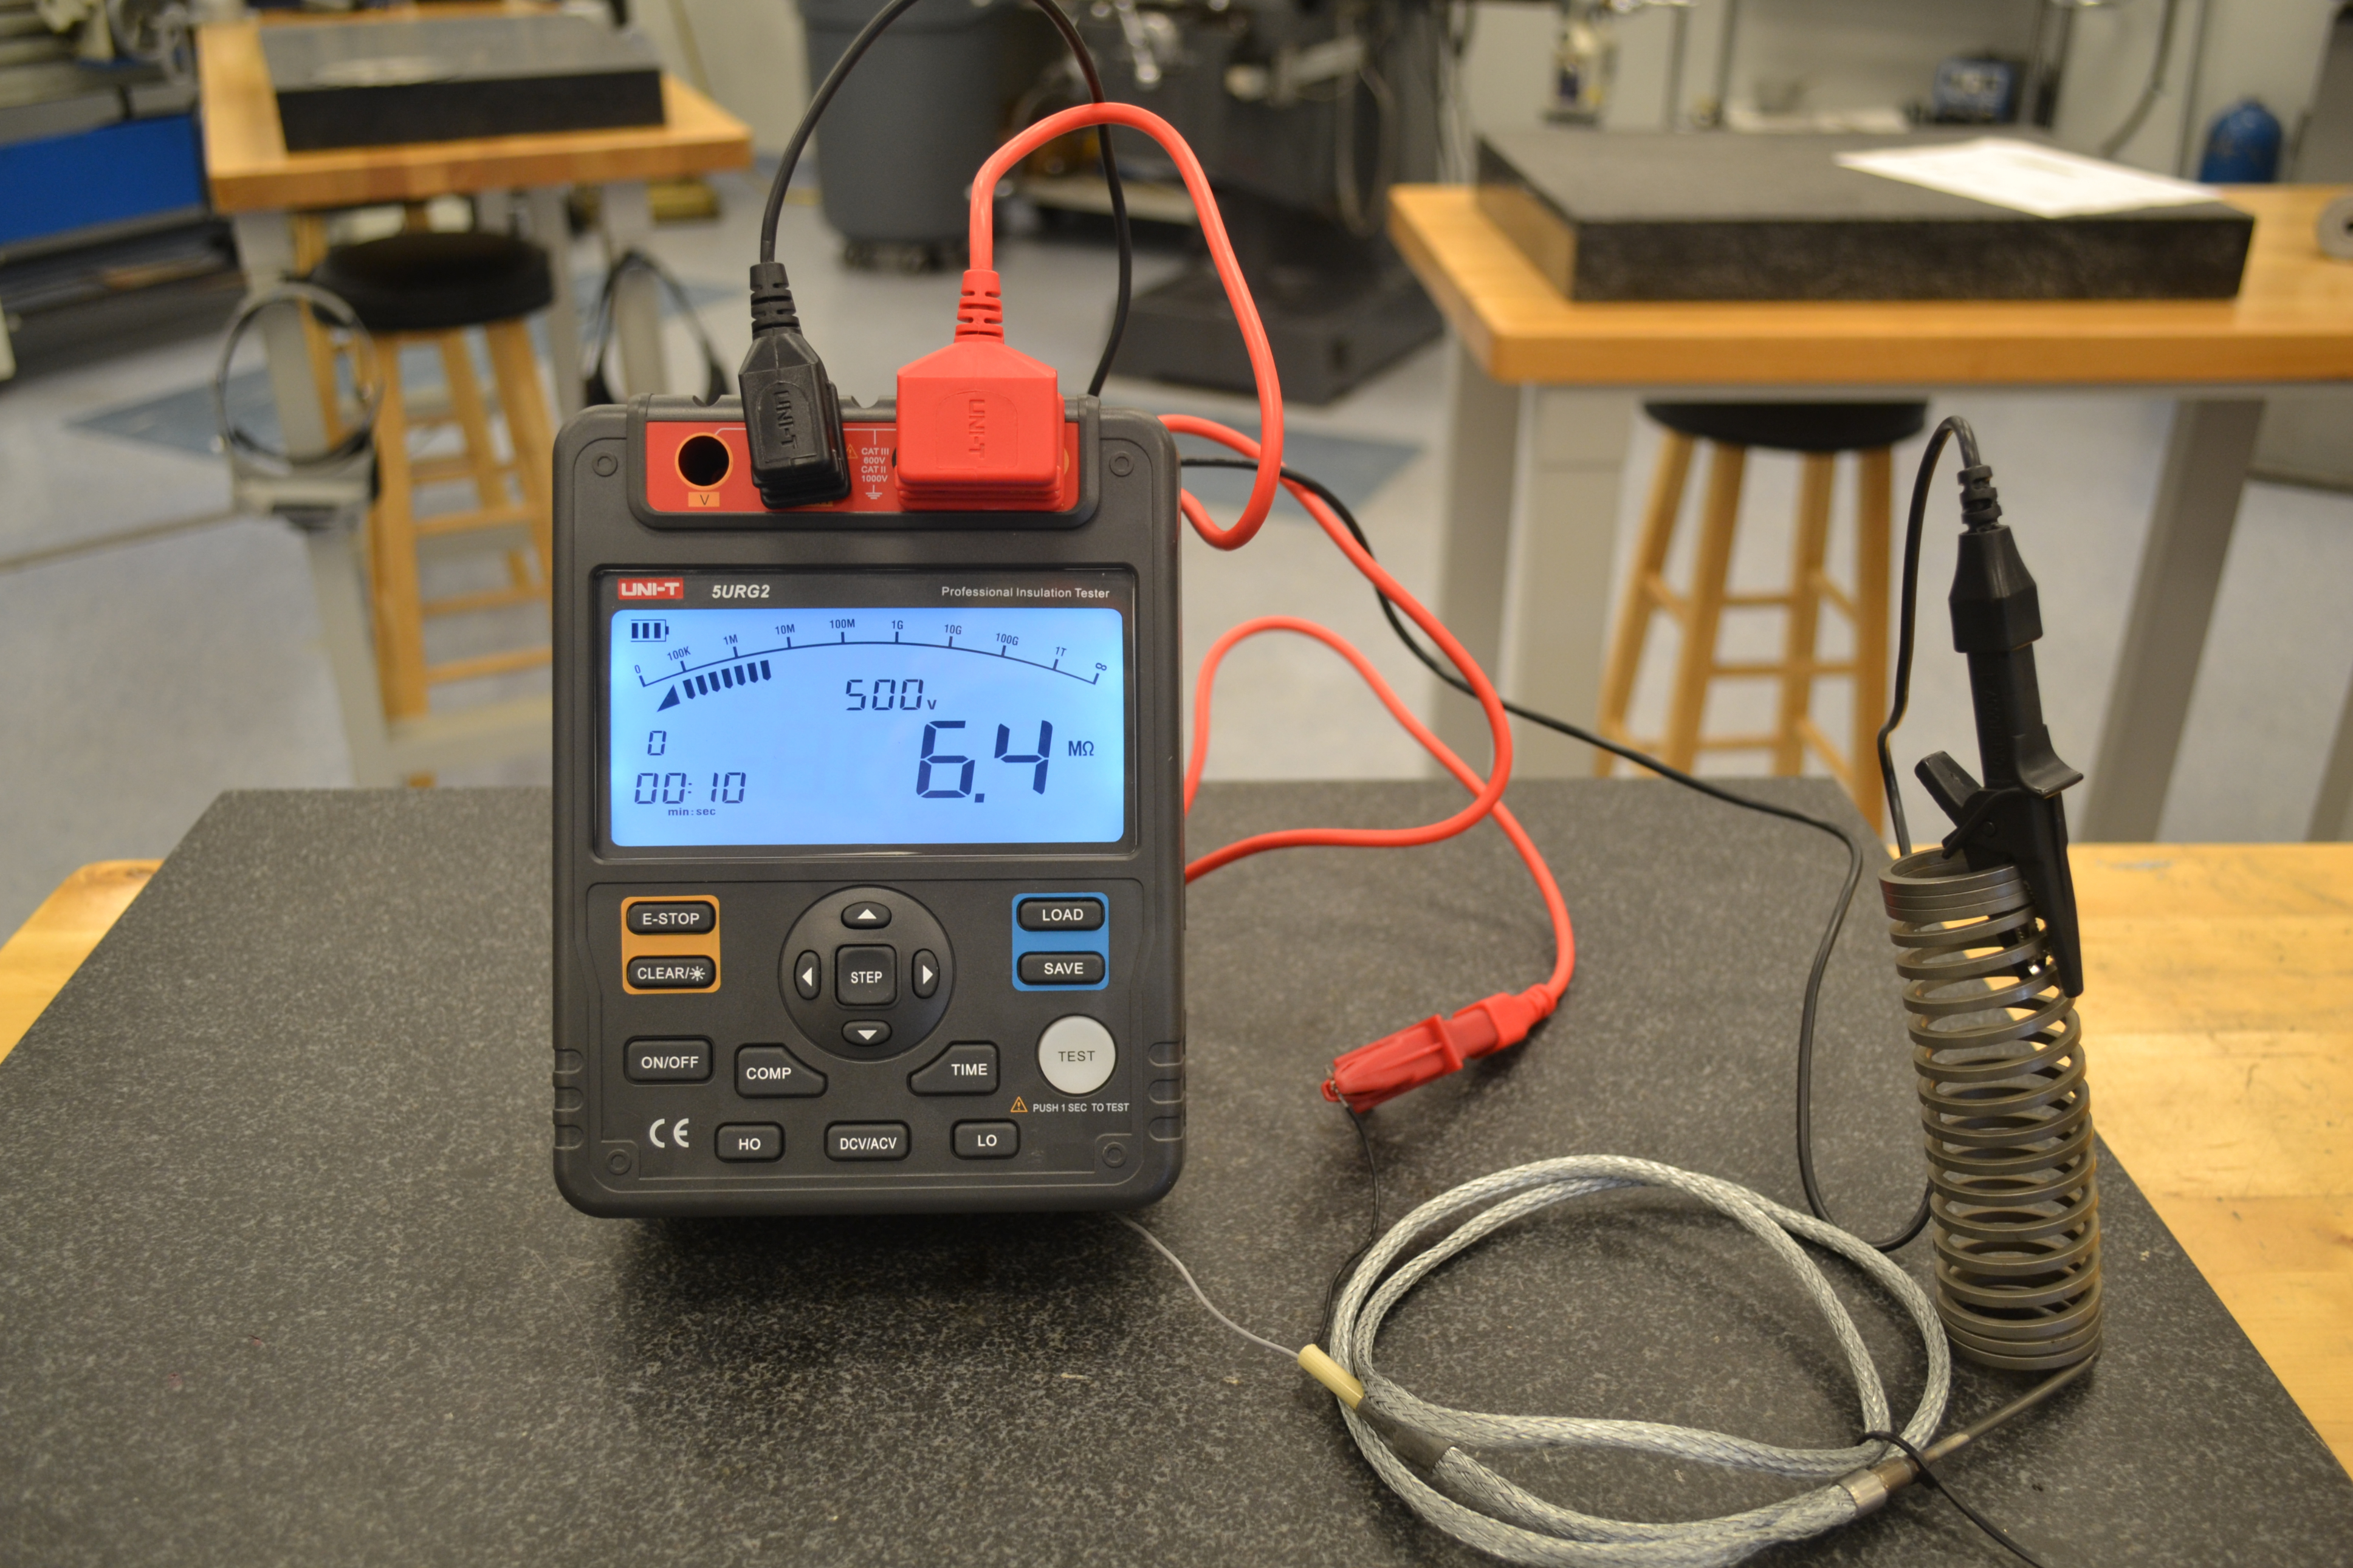
The IR tester shows a heater being tested at 500 Volts DC with an outcome of a perfectly acceptable 6.4 Mega-ohms.


More and more injection molders are specifying hot runner molds these days. And due to the advantages this technology offers vs. their cold-runner counterparts, suppliers expect hot-manifold systems will be found in 60% to 80% of new tools in upcoming years.
But as great as they are in reducing molding costs and improving design capabilities, they come with a truckload of potential production and maintenance issues. Problem is, someone must keep them in good shape, then repair them when they wear out or break, and they will—they all will, regardless of the manufacturer or cost of the system. The reason is that people have the final say in how they are run, maintained and repaired. Too often it is an element of the molding and shop environment that is the root cause of many of the problems manifolds suffer.


Not to say that there aren’t some systems that are just a pain to work on because “maintenance-friendly features” were not included in the design process. Manifold “performance” always gets prioritized over “maintenance efficiency,” so the repair technicians must learn the nuances of each system based on its own production and maintenance requirements. Things like skinny wire channels with bolted wire clips, wires routed through plates instead of between them, control boxes with small access holes, thermocouples requiring multiple, tight bends to fit properly and/or are jammed under tight-fitting nozzle heaters with built-in elements topped off with potted manifold heaters are just a few bad design ideas that frustrate techs and raise the stress levels along with labor costs—causing some to grab the big hammer just to help “git’r done.”
Bench skills, or the physical side of maintenance, is always important to a professional job. But one of the most necessary “soft skills” that repair technicians need possess is the virtue of patience. The difference between working on a two-cavity manifold system vs. a 48-cavity system is the level of personal organization at the bench, the methodology used, and the patience of Job. Our ability as repair technicians to not rush through a preventative maintenance (PM) for the sake of getting a mold back into the press to appease production is paramount to success. Granted, it’s a fine line to negotiate, but necessary when you consider the alternative where repairs are short-cut and the mold returns to the shop after a few days worse that when it left.
BAD RAP
In mold repair shops around the world, hot-runner systems have the reputation of being “something we don’t mess with” when it comes time for in-house repair technicians to disassemble, troubleshoot, clean, inspect and reassemble it like it should be. One little mistake like a loose bolt, pinched wire, brass shrapnel (from hammers, punches and other “soft” tools), residual plastic, and other collateral damage inflicted by using the wrong tool the wrong way—and a failure to comprehend how much force should be applied with a tool—can lead to catastrophic results. And that is just on the maintenance side. Failure to use proper startup and shutdown procedures can also have disastrous effects. Such effects are also hard to pinpoint or determine a root cause for, leading processors to exclaim, “It’s a tool issue,” when in fact it might have something to do with shutting off the water and leaving the heats on over the weekend or shooting a tool without the proper heat “soak time” to allow for full expansion of critical components. All that is just part of the environment in which manifolds are expected to perform.
The fact is, manifolds and related components are not that difficult to work on when considering the level of maintenance performed by the average repair technicians who work on close-tolerance ejector systems, cores, cavities, spring-loaded slides, cams and other dynamic tooling configurations. Obviously, one can’t go brain-dead with any type of close-tolerance mold work without creating more issues than get repaired. The difference between a cold runner and a hot runner is making a mistake on a cold runner that causes a water or oil leak is usually not as disastrous as encapsulating a manifold plate full of expensive wires, heaters, nozzles, thermocouples and other delicate components, creating a plastic armadillo. The moral is the skill required isn’t necessarily always more demanding, but the consequences of mistakes can be less forgiving.
Whenever hot-runner manifolds are disassembled for PM’s or to repair issues that affect production or part quality, a few basic bench principles should be applied. After reading the recommendations below, determine whether these basic rules of hot-runner bench practices are being utilized in your shop. If not, training is in order.
SKILL UP ... OR SEND IT OUT?
I took a call today from a large closure company that typically sent out manifold work for even simple issues like seal replacement. They made the decision to PM their systems in-house, and the first manifold they opened up was completely encapsulated with plastic—so now what? Next step for them is to get training on not only how to deal with it, but how to prevent major leaks.
Training to perform in-house manifold PMs and keep hot-runner systems healthy is also gaining steam from custom molders who want to grow their business by taking on more difficult products, and thus molds. Any time a molder skills-up to take on delicate and critical work usually results in faster and more cost-efficient repairs vs. crating it up, shipping it out, and waiting for the work to be completed and return to the plant. You will be able to react much faster and not have your hands tied in getting your critical production needs to fit a vendor’s schedule. We have trained molders who literally saved millions of dollars per year in maintenance costs by keeping hot-runner and other mold work such as welding and polishing in-house. Also, your maintenance team will appreciate not having a “ceiling” attached to their skills and development potential, which brings a whole boatload of personnel advantages relating to bench confidence, motivation, professionalism and pay grade.
HOT-RUNNER WEAK LINK
There are many areas in manifold work that deserve more space than this article will allow, so let’s focus on the area of greatest need for most shops. Typically, 90% of the attendees at our hot-runner training seminars—experienced or not—are weakest in their electrical skills and understanding how thermocouples and heaters actually work, and what to test for. So here is an overview of some of the work involved when dealing with electrical testing of manifold components in a typical hot-runner system and an explanation of how monitoring this data allows shops to be more proactive.
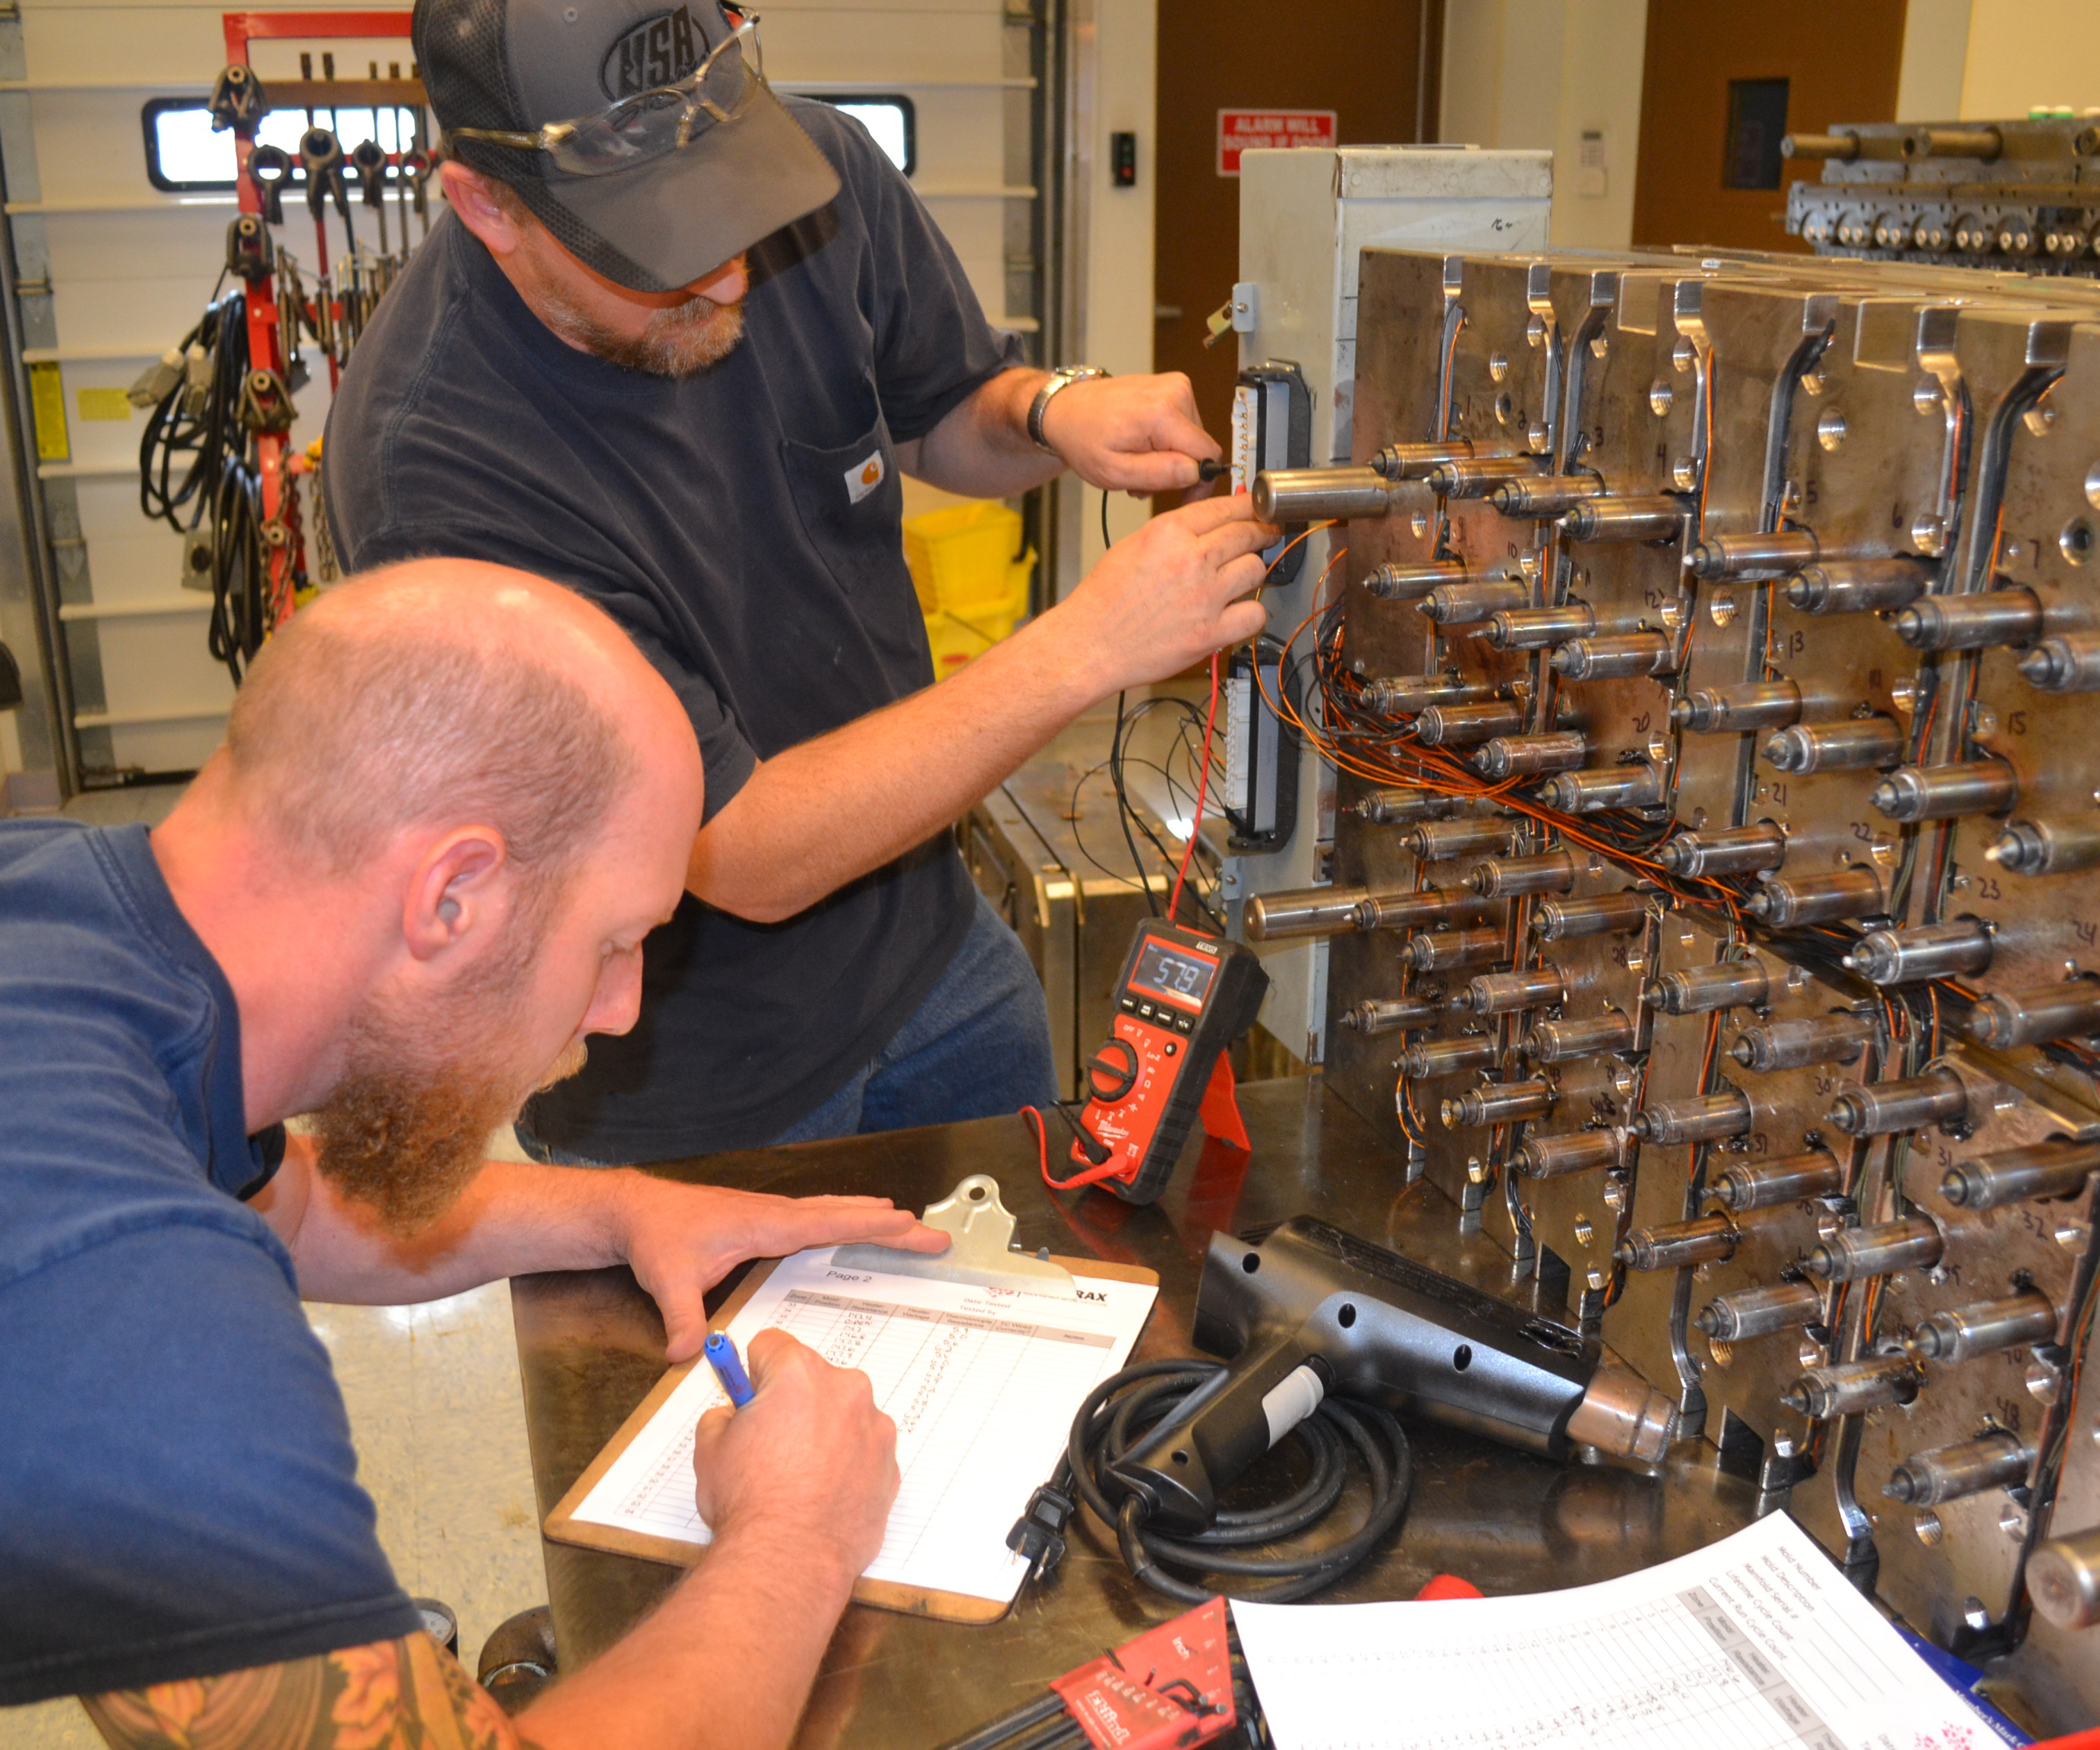
Electrical/Positional Mapping: Mapping out systems for position verification of thermocouples and heaters is a procedure that should be completed at every PM. It is extremely frustrating for processing techs to attempt to troubleshoot and control a specific cavity position if the heaters or thermocouples are not labeled properly in relation to the connectors and the mold cavity position. This procedure does not take long and does not require a controller, as a standard heat gun and ohmmeter will suffice.
Testing Heaters and Thermocouples: Mold performance and part quality depend on the ability to control precisely the temperature of nozzles, bridges and manifolds. This means the right heater size (diameter and wattage) and appropriate thermocouple style must be used and installed properly. It is critical that this information is documented in a location readily available to technicians.
Thermocouples read only at the tip, so it is imperative that they be installed at the correct depth and the tip not insulated from the nozzle by an air gap or excess plastic. Thermocouple resistance should read between 2 and 9 ohms using a 3-ft or less lead wire. It is not recommended to “splice” thermocouples, as the splice may alter the resistance reading, which makes monitoring and troubleshooting more difficult.
If thermocouples are “kinked” during replacement or cleaning it will read at the kinked area—or not at all—so great care needs to be taken when bending and forming a new thermocouple to fit. Many thermocouples in multi-cavity molds are formed into “left- and right-hand” positions, so it is necessary to re-install them into their home positions, so they do not require “re-bending” that risks breakage.
All heaters (sprue, bridge, manifold, nozzles) should be tested before and after every PM for connectivity—i.e., dead shorts or grounding from pinches, cuts or loose connections. A typical ohmmeter may be used, but we really like the Fast Heat MoldXChecker.
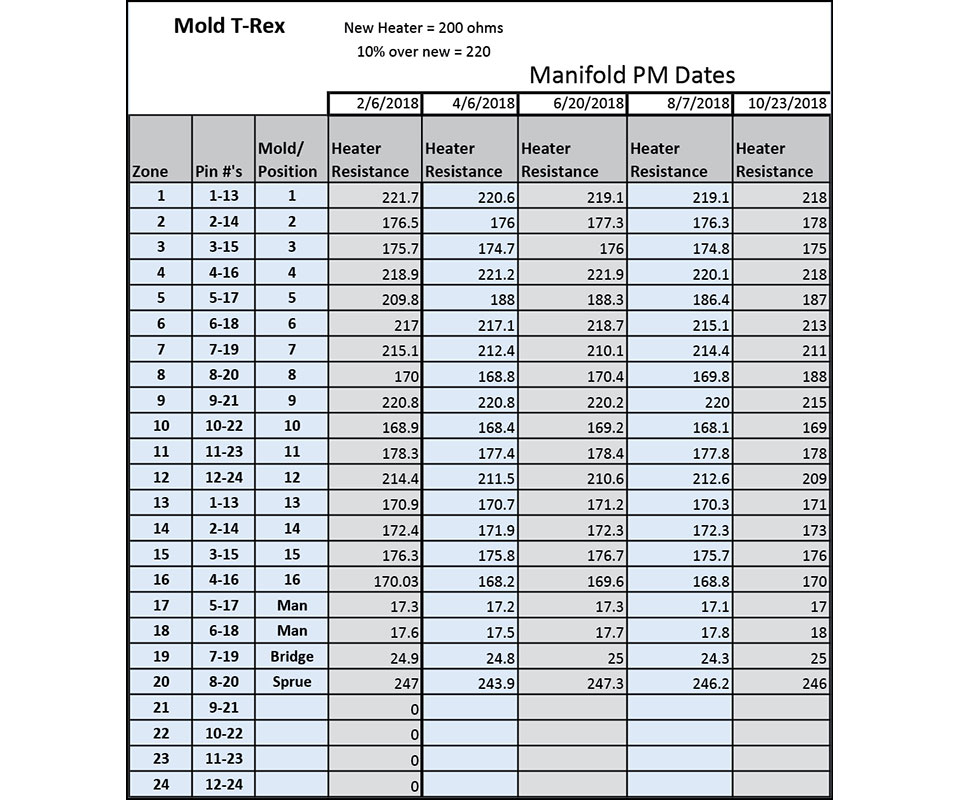
We also recommend that a resistance test (measured in ohms) be performed and documented whenever the mold is out of the press, to verify it’s in good working order based on historical resistance readings over time. A resistance test verifies the condition of the nichrome element inside the heater
When creating this data sheet, document the resistance of a similar new heater to establish a baseline to compare other heaters with. Over time, as the nichrome heater element degrades, the resistance or ohms reading will slowly rise and can be monitored to get a better idea of when a heater should be replaced. If a heater fails during production, you can go back the last ohm reading to get an idea of a top “threshold” to use that would signal it’s time to replace other heaters approaching this number, helping to fine-tune the threshold and maximize heater life.
It is important to standardize the testing procedure (ohmmeter used and temperature of the heater when tested), as the rise in ohms should be a gradual change but will vary if the heater or room temperature changes. Heaters should only be tested at room temperature—or “cold”—since a warmer heater will have a higher ohm reading than a cold one. As you see in the chart, the ohm readings vary slightly but nothing too alarming.
Monitoring resistance is a great proactive tool that becomes more important with long-running molds to ensure cavitation is not lost or production interrupted.
Insulation Resistance Testing (IR): A secondary test we like to perform on heaters is an Insulation Resistance (IR) test that uses a shot of high voltage (typically 500 VDC) to ensure the insulation material (most commonly magnesium oxide, MgO) is not compromised and allowing the electrical current from the element to bleed out to the sheath, which could lead to an early heater failure. MgO has a good combination of dielectric strength and very good thermal conductivity, so it does a great job of insulating the inner heating element electrically, but still allows heat to be conducted out and away to the sheath and into the nozzle or manifold. The temperature limit for MgO is usually around 2000 F, so it can handle internal temperatures in the range of 1600 F typically generated by inner nichrome wire elements. Once again, these readings should be taken cold, as the IR (typically measured in mega-ohms) can drop significantly once the heater is warmed up.
General coil-heater specifications from heater manufacturers list IR thresholds in their literature as low as 5 mega-ohms (cold) for unsealed, square-coil or tubular heaters, up to over 100 mega-ohms (cold) in some cases for sealed heaters. Others can have measurements that go into the giga-ohms (1 billion ohms), indicating a very strong dielectric insulation. In theory, a 1 mega-ohm (1 million ohms) IR reading is sufficient for 240V systems, as that would only be about 0.2mA of leakage current. (V = IR; I = 240V/1,000,000 ohms = 0.0002 amps)
Regardless, all heaters need to be tested and compared with an “as-new” reading to monitor for degradation. When performing an IR test, remember also that safety is of paramount concern since high voltage is used—so don’t touch the metal sheath, bare wires or connectors during the test, or let them contact a steel bench top, which could be enlightening.
Keep it Clean and Dry: Contamination of the MgO is often more of a problem than degradation. MgO is hygroscopic, so it readily attracts moisture—not a good thing. Many high-performance/high-watt-density, hot-runner nozzle heaters are fully sealed to prevent contamination by moisture, oil, etc. but may still be contaminated if the seal is damaged during removal, cleaning or installation. So it is critical to handle these components carefully and never immerse them in any type of solvent or liquid cleaning solution. That said, some tubular elements for manifolds are not fully sealed, and are considered less critical because of the larger internal clearances. These can provide many months of service if handled and cleaned properly. If moisture contamination is suspected in the MgO, “baking out” the heaters at a high temp can boil out the contaminants and regenerate the insulation value.
Baking out unsealed heaters that have absorbed moisture can be done any of several ways:
- Using the “soft-start” function on a controller. Here, the heaters are brought up to temperature very slowly, without using full line voltage. By bringing the temperature up gradually, any trapped moisture or contaminants can be slowly boiled out of the MgO insulation. It’s important to understand that even if the thermocouple for the zone might be reading only 150 F, the internal nichrome wire (even with soft-start) may be glowing inside the element at 500-1000 F. So, just like good barbeque, “low and slow” is a good rule to follow here.
- Unsealed heaters can also be placed inside an oven to dry out the internal MgO insulation. An oven temperature in the 250 F range for an overnight cycle can sometimes work a “miracle” and doesn’t damage or melt most lead-wire insulation.
Other types of manifold heaters can be left in the manifold and placed in an oven at 850–900 F without damage to the insulation or sheath. This can “refresh” the insulation while the heater remains installed in the hot-runner manifold, without damage. However, the lead wires need to be removed beforehand, since they are not rated to 900 F and would just burn away otherwise. You can sometimes see a big difference in IR readings before and after “cooking” these manifold heaters in the cleaning furnace as the MgO is renewed.
IS IT REALLY THAT BAD?
Hot-runner work requires a higher level of mechanical and electrical skills to be successful. Mistakes made, and procedures not followed, overlooked or simply ignored can have catastrophic consequences for man and mold. All the economic efficiency that a hot runner brings to the table is lost when it goes down for extended amounts of time while new heaters, thermocouples and other expensive components are ordered and replaced.


Related Content

The Strain Rate Effect
The rate of loading for a plastic material is a key component of how we perceive its performance.
Read More
How to Set Barrel Zone Temps in Injection Molding
Start by picking a target melt temperature, and double-check data sheets for the resin supplier’s recommendations. Now for the rest...
Read More
A Simpler Way to Calculate Shot Size vs. Barrel Capacity
Let’s take another look at this seemingly dull but oh-so-crucial topic.
Read More
The Effects of Temperature
The polymers we work with follow the same principles as the body: the hotter the environment becomes, the less performance we can expect.
Read MoreRead Next

Hot Runners: How to Maintain Heaters, Thermocouples, and Controls
I conclude this three-part examination of real-world problems and solutions involving hot runners by focusing on heaters, thermocouples, and controls. Part 3 of 3.
Read More
Reduce Hot-Runner Downtime With Proper Troubleshooting
Solve your problem faster by adopting a systematic approach. Here’s how to get going.
Read More
Breaking Down Hot Runner Maintenance
Improving a manifold’s maintenance plan requires specific skills and knowledge of its functioning areas.
Read More