
Injection Molding: Understanding Pressure Loss In Injection Molding
One of the more prominent trends in processing is the need for higher plastic pressures to mold parts.
.jpg;width=70;height=70;mode=crop;format=webp)
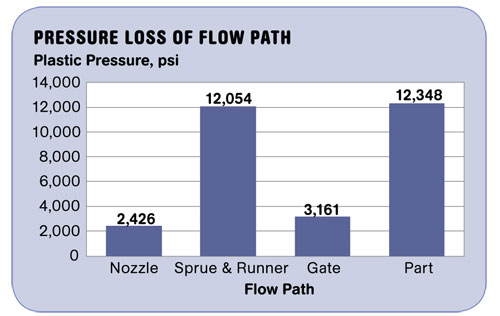
You can figure out where you lost pressure—and how to reduce this loss—by making short shots. In this scenario, the sprue and runner were responsible for too much pressure loss (see graph below). But simply opening up the runner to reduce pressure loss will lead to other issues. Best to do a mold flow analysis to find a compromise solution.


One of the more prominent trends in processing is the need for higher plastic pressures to mold parts. There are lots of reasons to go this way: longer flow paths, more complex geometries to achieve greater functionality, thinner walls to save weight, higher cavitation, stiffer polymers, and filled compounds. While these trends do cut costs, they also keep narrowing the molder’s processing window. What can the molder do to cope with this trend, regarding machines and processing strategy?
Understanding the pressure requirements to fill and pack a part is a key to developing a reasonable processing window and higher quality and profits. The processor’s first step is to understand how machines develop plastic pressure, and make sure to buy the right press for the parts to be molded. Electric machines provide all pressures in “plastic” psi—there is no hydraulic pressure. Hybrids and full-hydraulic machines may report actual plastic pressure on the monitoring screen, or they may report hydraulic pressures.


If your press reports hydraulic pressure, you must determine the intensification ratio for that screw size, in order to convert hydraulic pressure to “plastic” pressure. (For the calculation, see scientificmolding.com/articles/Intensification_ratio.pdf.) To duplicate processing conditions between machines you must duplicate “plastic” pressures, not hydraulic pressures. You can calibrate a hydraulic machine for accurate hydraulic pressure readings with a certified transducer, but I have yet to see a way to ensure the calibration of the machine pressure sensor on electric machines. It is important that any machine tells you the accurate pressure: If a machine tells you the injection pressure is 21,500 psi, you need to know that it is truly 21,500 psi.
WHERE HAS ALL THE Pressure GONE?
In Scientific Molding procedure, parts are filled 90% to 99% in the first injection stage: That is, we make a short shot. If the part is short we know the plastic pressure at the end of flow is zero. We also know the pressure in the nozzle from the reported or calculated plastic pressure. Nearly all machines report the pressure at transfer, or at the end of first-stage injection. This transfer pressure is not always peak pressure during injection.
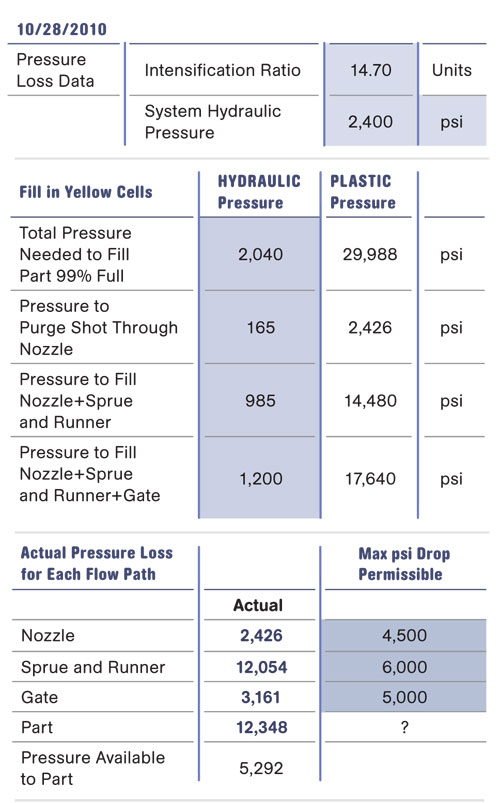
Let’s take an example: We are making a small 1-in.² insulator from PC with some thin walls in a 4-cavity mold. The machine reports a hydraulic pressure at transfer of 2040 psi (hydraulic), and the part is 96% full and short. To find the plastic pressure in the nozzle, you need to multiply 2040 psi × the intensification ratio of the machine, which in this case is 14.7:1. So the pressure in the nozzle is 29,988 psi. If we have a short shot, the “pressure loss” for filling the part to 96% full is the entire 29,988 psi.
Where did all this pressure go? Is there anything we can do to reduce the pressure loss? The process window will open up and quality will be higher if lower pressures are required.
The flow path is known: Plastic traveled through the nozzle, sprue, runner, gate, and finally filled the part. How much “plastic” pressure did each of these components eat up? To find out the pressure loss for each component of the flow path, we need to make a few short shots and maybe dig out a part or two. (Every mold will make a short shot in its life, so when you are building it make sure it has the ability to push out a short.)
Adjust the cutoff or transfer position to make just a nub beyond the gate. Then adjust transfer position again to make only the sprue and runner; and finally take a full shot as a purge. If we record the pressure at transfer for these shots, we now have the data we need (see chart) and can make it look pretty by setting up a spreadsheet with a bar chart or graph (above).
So where did all the pressure go—all 29,988 psi? The data shows that flow through the nozzle absorbed about 2400 psi; the sprue and runner consumed 12,036 psi; the gate about 3000 psi; and the part took about 12,000 psi. You can’t do anything about the part without your client’s permission, and the gate is well within normal limits; but the sprue and runner are ripe for alteration.
But don’t simply open up the runner: The pressure loss will be less, but a larger runner also provides less shear, which will actually increase the viscosity of the polymer and wastes resin. You need a mold flow analysis to find the best compromise.
About the Author
John Bozzelli is the founder of Injection Molding Solutions (Scientific Molding) in Midland, Mich., a provider of training and consulting services to injection molders, including LIMS, and other specialties. E-mail john@scientificmolding.com or visit scientificmolding.com.


Related Content

Three Key Decisions for an Optimal Ejection System
When determining the best ejection option for a tool, molders must consider the ejector’s surface area, location and style.
Read More
Understanding Melting in Single-Screw Extruders
You can better visualize the melting process by “flipping” the observation point so the barrel appears to be turning clockwise around a stationary screw.
Read More
Fundamentals of Polyethylene – Part 6: PE Performance
Don’t assume you know everything there is to know about PE because it’s been around so long. Here is yet another example of how the performance of PE is influenced by molecular weight and density.
Read More
A Systematic Approach to Process Development
The path to a no-baby-sitting injection molding process is paved with data and can be found by following certain steps.
Read MoreRead Next

Lead the Conversation, Change the Conversation
Coverage of single-use plastics can be both misleading and demoralizing. Here are 10 tips for changing the perception of the plastics industry at your company and in your community.
Read More
People 4.0 – How to Get Buy-In from Your Staff for Industry 4.0 Systems
Implementing a production monitoring system as the foundation of a ‘smart factory’ is about integrating people with new technology as much as it is about integrating machines and computers. Here are tips from a company that has gone through the process.
Read More
For PLASTICS' CEO Seaholm, NPE to Shine Light on Sustainability Successes
With advocacy, communication and sustainability as three main pillars, Seaholm leads a trade association to NPE that ‘is more active today than we have ever been.’
Read More