
Ensuring Repeatability: The Key to Effective Injection Molding Automation
One of automation’s key promises is repeatability: the same movement to the same location, time and time again. But to achieve that, all elements involved — robot, machine, EOAT, mold — must be in and stay in alignment.

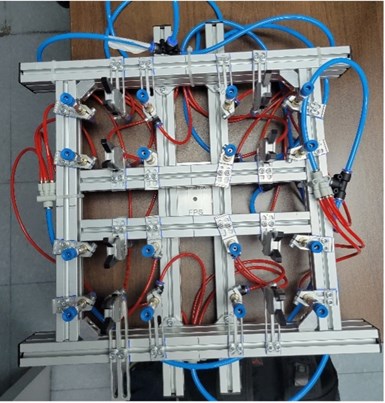
Various airlines can create a tangles mess in some end-of-arm-tools.
Photo Credit: Savage Automation
As finding and training talented staff becomes ever more difficult, injection molders across the country are looking to improve their current automation and add more. While automation is a perfect fit for molding, it can come with some growing pains and at times feel like a step backwards.
If your robot is alarming every 5 minutes, leaving parts in the mold, damaging the parts or dropping them on the floor, it may feel like the automation you installed to take the place of the operator now requires a technician to stand by and babysit it. All automation is reliant on repeatability — the same thing needs to happen, the same way, on every cycle. When everything is repeatable, automation works great — that is what it is good at. The more variation you add, the more problems you will see; so let’s look at some of the sources of variation and how to deal with them.


Variation from Robot Alignment
A largely overlooked source of variation in molding automation is the alignment of the robot to the machine. If the robot wrist is not parallel to the platen, it will be difficult to get the end of arm tool to line up with the mold properly. Adding an alignment check to the robot preventive-maintenance plan will allow you to correct any misalignment before it affects your production. This can be as simple as bringing the wrist plate up to the platen and visually checking for misalignment; or you can be more precise, mounting a dial indicator to the robot and checking alignment across the platen. Misalignment can be corrected in two places: at the point where the robot base is mounted to the machine (usually the stationary platen) and at the wrist itself.
Variation from Mold Alignment
Not having a level mold can cause problems in automation as well. Just 1 degree off level causes a 0.2-in. position shift across 12 in. That will be the difference between cleanly picking the part and running into it with the gripper fingers. Most molders have their techs level the mold before clamping it in. The tech sets his bullet level on the mold; eyeballs it to see that the bubble is on center; and clamps it in. For a two- to four-cavity mold with easy-to-grip parts, that may work fine. For large molds with small parts and delicate features, consider adding alignment pins to the back plates of the molds and sockets to the movable platen. This is a one-time expense that will ensure correct mold alignment on every setup.
Variation from EOAT Alignment
When the end-of-arm tool (EOAT) is attached to the robot wrist you have potential for misalignment to the robot wrist and to the mold. I highly recommend using a quick-disconnect system for the EOAT. This ensures correct alignment to the robot wrist every time with minimal effort. For large, multicavity tools, I also recommend including alignment points for the EOAT in the mold design. For those, I usually use two small taper-lock fittings. The female fitting gets installed on the mold, and the male fitting mounted to the end-of-arm. Then when you set up the end-of-arm, you can use the taper locks to align the EOAT to the mold before tightening down the mounting bolts.
Other Variation from EOAT
Each different mold you run will have its own EOAT. Many end-of-arms are built using aluminum extrusions commonly know by the trade name 80/20. Many manufacturers offer EOAT build kits that mount to the aluminum extrusion and allow you to build custom EOAT by attaching suction cups, grippers, fingers, etc. to the extrusion in the correct position. The shortfall of this method is that adjustable EOAT can, and will be, adjusted. It can also come out of adjustment over time due to rough handling and storage, or movement and vibration during production. Also common with these types of EOAT is a large number of air/vacuum tubes zip-tied onto the end-of-arm. This makes it more difficult to set up repeatably, as the hoses get tangled, and if they’re not properly traced they can cause the end-of-arm to not function properly.
All automation is reliant on repeatability — the same thing needs to happen, the same way, every cycle.
Many of these sources of variability can be addressed through a proper preventive-maintenance schedule and setup procedures. The EOAT, however, needs a little bit more thought. Designing the EOAT to minimize variability from the start will save hours of headache, adjustment and alarms. Consider a 3D-printed EOAT as a solution to those design problems. 3D printing provides three advantages that reduce variability and increase automation uptime:
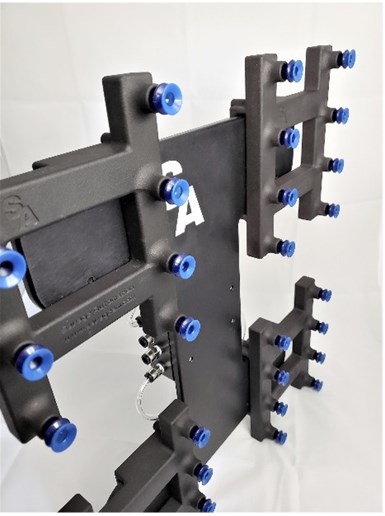
By 3D printing end-of-arm-tool, channels to manage and conceal airlines can be printed in.
Photo Credit: Savage Automation
No More Air Lines Mess:
3D printing end-of-arm tooling allows molders to eliminate the tangle of air and vacuum lines and provide clean cable management for part-detection sensor wires. Everything can be run through the body of the EOAT with printed internal channels. Now the end-of-arm is simple to set up because there are fewer connection points with no tangle of wires and tubing.
Purposeful Design
3D printing allows the EOAT to be designed to match the part exactly. Instead of installing a suction cup on an adjustable-angle bracket, the mounting port is just printed on an angle so that the suction cup is permanently fixed in the correct position. Nests can be printed into the tool for parts with a complex geometry or delicate features. Part-detection mounting becomes simple and intuitive because you can print the exact features you need as part of the end-of-arm body.

By printing the suction cups at an angle, this EOAT is able to more effectively and consistently grab parts.
Lighter Weight:
It may not be as obvious, but heavy EOAT contributes significantly to variation in automation. A lightweight end-of-arm has less inertia when moving and thus takes less time to stabilize after a high-speed traverse. It is also less likely to wander out of alignment as it runs. A lighter end-of-arm puts less stress on robot servomotors and belts, extending time between PMs and preserving accuracy of the robot axis.
If your shop is looking to add your first robot, or your 50th, eliminating variability will help you get the most out of your molding automation. Add items to your PM schedule that ensure proper alignment of the robot. Document your mold setting and leveling procedures, and consider adding positive alignment features to your molds, machines and EOAT. Remember that EOAT is as important to your successful automation, if not more so, than the robot itself. A solid initial investment using the latest 3D-printing technology will pay dividends in repeatability and uptime.
ABOUT THE AUTHOR: Richard Savage has 15 years of experience in injection molding thermoplastic and silicone medical devices. In 2017, he founded Savage Automation to design and build end-of-arm tooling for injection molding that is lighter, stronger and faster. Contact 801-513-6834; rsavage@savageam.com; savageam.com.


Related Content

An Automation 'First' for Non-Servo-Eject Trim Presses
Compact, flexible and configurable robotic system is said to be the first to enable thermoformers to fully automate product handling after a non-servo trim press.
Read More
50 Years of Headlines … Almost
I was lucky to get an early look at many of the past half-century’s exciting developments in plastics. Here’s a selection.
Read More
Five Ways to Increase Productivity for Injection Molders
Faster setups, automation tools and proper training and support can go a long way.
Read More
Real-Time Production Monitoring as Automation
As an injection molder, Windmill Plastics sought an economical production monitoring system that could help it keep tabs on its shop floor. It’s now selling the “very focused” digital supervisor it created, automating many formerly manual tasks.
Read MoreRead Next

How COVID-19 Did (and Didn’t) Change Automation in Plastics
The global pandemic invigorated longstanding trends and new market forces to push broad-based adoption of automation and robotics from the incremental to the inexorable.
Read More