Unraveling the Science and Myth Associated With Moisture Analysis — Part 2
Once you’ve selected the right moisture analyzer, the task of method development begins. Don’t skip this step or you’ll run into problems. Here’s what happened in my lab decades ago.
.jpg;width=70;height=70;mode=crop;format=webp)


Let us assume that you have selected an appropriate moisture analyzer, one that is capable of distinguishing between moisture and all the other volatile compounds that can be evolved from your material samples. The instrument has arrived and has been unpacked and set up. Now the task of method development begins. Often this step is neglected. A sheet of paper has probably been supplied that lists various materials and the recommended test temperatures, and the people responsible for using the device start running tests in accordance with those instructions. This was essentially the scenario that we went through when we acquired our Karl Fischer titrator in 1986.
But as we began to run tests at the prescribed temperatures, we began to question how we could be certain that we were removing all the moisture from the samples. There is a protocol for making such a determination and a good example of this approach is captured in ASTM D 789, which deals specifically with nylon materials.


The pertinent graph appears in Figure 1. It is a plot of moisture content as a function of test temperature. Samples of the same material are tested at increasing temperatures until the obtained values reach a plateau. This occurs between 200-240oC for most nylon materials, and an appropriate test temperature can be selected anywhere on this plateau. For optimal results, it is advisable to select the midpoint, 220oC. It is interesting to note this graph shows a new rise in moisture content values if the temperature continues to increase. In the case of nylons, this is caused by a process known as solid-state polymerization.
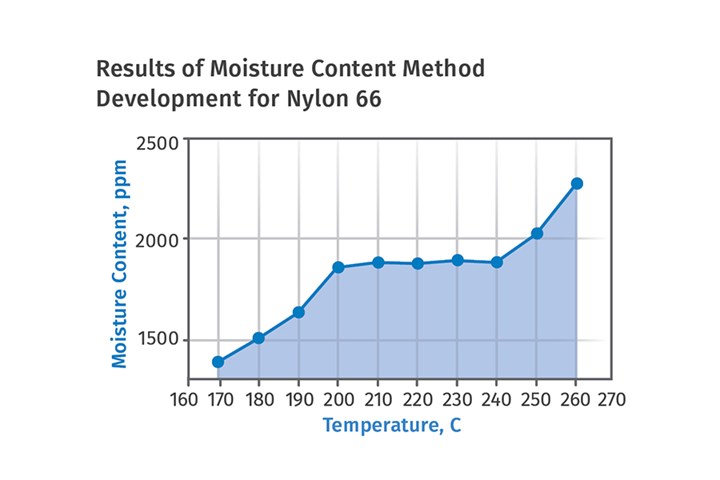
In condensation polymers like nylons, it is possible to extend the length of the polymer chains by exposing the material to an elevated temperature. This is done all the time in the process of reclaiming nylon materials from the environment, where a variety of molecular weights may be present in the recyclate and the molecular weight of the polymer needs to be brought up to a particular level. For nylon, the process is performed either under vacuum or in nitrogen because exposure of the polymer to these high temperatures can result in oxidation if air is present. Solid-state polymerization produces water as a byproduct, so this new increase in measured moisture is not related to the actual moisture content of the sample. This shows that it is possible to use too high of a temperature during testing and fool the instrument, even if it is a moisture-specific device.
We also discovered that using temperatures that were too high, especially if air was used as the carrier gas, could produce degradation byproducts that the instrument could interpret as moisture. While not all materials are susceptible to this behavior, it can be difficult to predict ahead of time which materials can be a problem. To avoid this potential issue, it is best to use nitrogen or an inert gas like argon as the carrier gas. Once we performed this exercise on our various materials we found that most of the temperatures that we were advised to use were incorrect.
Question Digital Displays
Even before these exercises are undertaken, it is important to establish the correlation between the set temperature on the instrument and the actual temperature in the sample chamber. We tend to believe digital displays, so if the readout on the controller says 240oC we do not question it. But we should. This also applies to heater controllers on injection molding machine barrels and especially on hot runners. We learned early in our method development on our Karl-Fischer titrator that the sample chamber temperature was 20oC lower than set point for temperatures between 180-260oC. Therefore, all our test condition instructions reflected that offset.
It is important to establish the correlation between the set temperature on the instrument and the actual temperature in the sample chamber.
For some instruments, the offsets tend to become greater as the temperature increases. When we first qualified a sensor-based instrument that uses relative humidity as the detector, we set the controller for 225oC to test a nylon 6. This is the melting point of the polymer and the test ran for 12 minutes. When the sample came out of the chamber, the pellets showed no signs of softening. We found that we had to raise the set point to 250oC before any indications of melting were observed. This differential decreased slightly when the set point was reduced to 200oC, but became larger when the set temperature was increased to 275oC.
To complicate matters, this instrument has a temperature calibration routine that leads users to believe the setpoint temperature is actually the temperature in the sample chamber. Unfortunately, this calibration is performed to a circuit board in the instrument using an algorithm that equates an electrical signal to a temperature, but it has nothing to do with the actual sample temperature.
Some colleagues of mine at the American Injection Molding Institute in Erie, Pennsylvania, followed up on my observations about the temperature offset by taking the extraordinary step of drilling holes in sample vials and placing thermocouples in the vials. They then conducted tests at different temperatures and monitored the temperature as a function of test time. The result of one of these experiments is shown in Figure 2. Not only does it confirm the offset of approximately 25oC between set point and the actual maximum temperature achieved it also shows that it takes about seven minutes for the sample to reach that temperature. This means that if a test is set up to run for a fixed time of 5-6 minutes, it will likely end before all the moisture has been extracted from the sample.
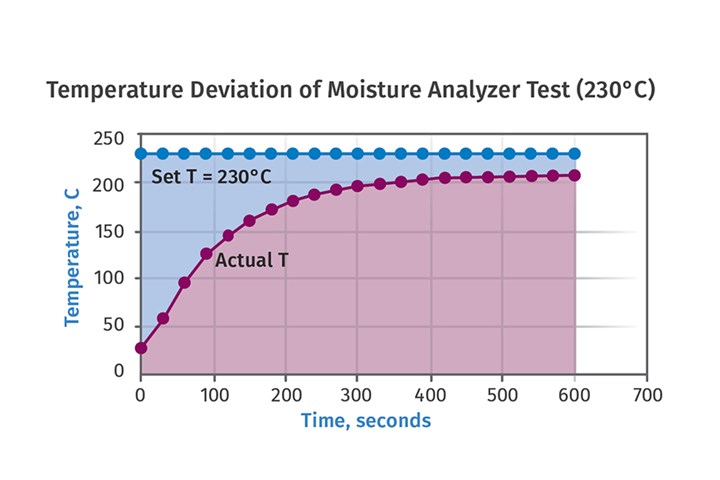
FIG 2 The American Injection Molding Institute conducted tests at different temperatures and monitored the temperature as a function of test time. Not only does it confirm the offset of approximately 25°C between setpoint and the actual maximum temperature achieved, it shows that it takes about seven minutes for the sample to reach that temperature.
Five Nylons Tested
We performed an experiment on five nylon samples of varying moisture contents using this instrument with two different methods. The first approach ran the samples for a fixed time of six minutes, but then monitored the rate of moisture evolution, enabling the tests to finish only when the moisture collection rate dropped to 0.75 µg (microgram)/sec. This parameter is called the ending criterion and if it is set too high the test will stop before all the moisture has been removed from the sample. The second method called for a minimum test time of seven minutes that would enable the samples to reach the desired temperature and then continued the tests until the moisture collection rate dropped to 0.10 µg/sec.
A good instrument set up improperly will only serve to give operators the illusion they are doing everything correctly when, in fact, they are generating bad data.
The accompanying table shows the difference between the results and underscores the importance of constructing methods that conform to the actual test conditions, not to some preloaded menu.

As we discussed in Part 1 last month, even the best instruments can be fooled into measuring created moisture as though it were contained in the sample or in identifying certain degradation byproducts as moisture. This should not discourage processors from taking the time to specify the correct pieces of equipment. But method development is critical. A good instrument set up improperly will only serve to give operators the illusion they are doing everything correctly when, in fact, they are generating bad data.
A correct actual sample temperature, a nonoxidizing carrier gas, and an appropriate gas flow rate and ending moisture collection rate must all be considered in developing the appropriate methods for making accurate measurements of moisture content.
ABOUT THE AUTHOR: Michael Sepe is an independent materials and processing consultant based in Sedona, Arizona, with clients throughout North America, Europe and Asia. He has more than 45 years of experience in the plastics industry and assists clients with material selection, designing for manufacturability, process optimization, troubleshooting and failure analysis. Contact: 928-203-0408 • mike@thematerialanalyst.com.
Related Content

Resin Prices Still Dropping
This downward trajectory is expected to continue, primarily due to slowed demand, lower feedstock costs and adequate-to-ample supplies.
Read More
The Strain Rate Effect
The rate of loading for a plastic material is a key component of how we perceive its performance.
Read More
Melt Flow Rate Testing–Part 1
Though often criticized, MFR is a very good gauge of the relative average molecular weight of the polymer. Since molecular weight (MW) is the driving force behind performance in polymers, it turns out to be a very useful number.
Read More
How to Optimize Injection Molding of PHA and PHA/PLA Blends
Here are processing guidelines aimed at both getting the PHA resin into the process without degrading it, and reducing residence time at melt temperatures.
Read MoreRead Next

People 4.0 – How to Get Buy-In from Your Staff for Industry 4.0 Systems
Implementing a production monitoring system as the foundation of a ‘smart factory’ is about integrating people with new technology as much as it is about integrating machines and computers. Here are tips from a company that has gone through the process.
Read More
How Polymer Melts in Single-Screw Extruders
Understanding how polymer melts in a single-screw extruder could help you optimize your screw design to eliminate defect-causing solid polymer fragments.
Read More