
Multi-Component Molding: Which Way Should You Go?
Moldmaker and injection molder MGS Mfg. Group details different technical options and how they mesh with various market opportunities.
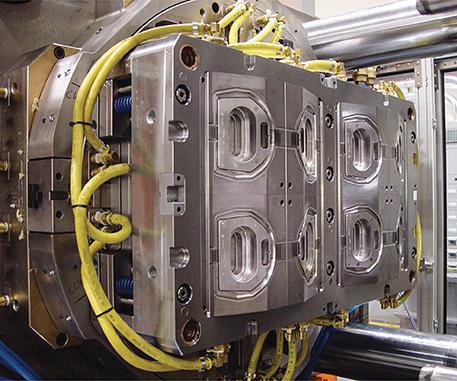
Fig. 1 The common-core method is one of the more conventional ways of multishot injection molding. When part design allows the use of common-core steel for both first and second-shot geometry, a tooling system is built with two distinct sets of cavity steel. This four-cavity mold is mounted onto a rotary platen to enable 180° rotation of one half of the mold. This rotation moves the first shot into a new and different set of cavity steel, allowing for second-shot injection.
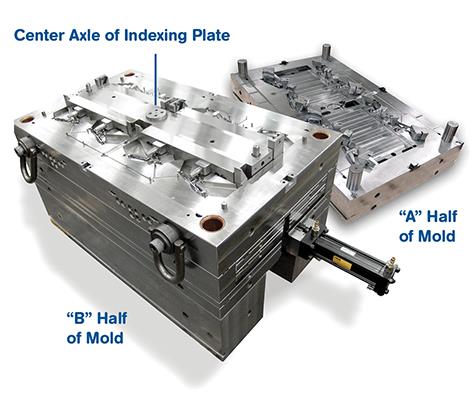
Fig. 2 Core and cavity change is a technique often used in multishot in-mold-assembly tooling systems. In order to create multishot part geometry where a second shot is injected onto and/or into multiple surfaces (exterior and interior surfaces, for example) of the first shot, a tooling technique referred to as Indexing Plate or Rotary Stripper Plate is used. In this style of mold, there are two distinct sets of first- and second-shot steel—for both cores and cavities. Resin #1 is injected in the first shot. The mold opens and the first shot is lifted off the core (“B” half of mould) by the stripper plate. The plate rotates and sets the first shot onto the second-shot core steel, which now faces second-shot cavity steel (“A” half of mold).
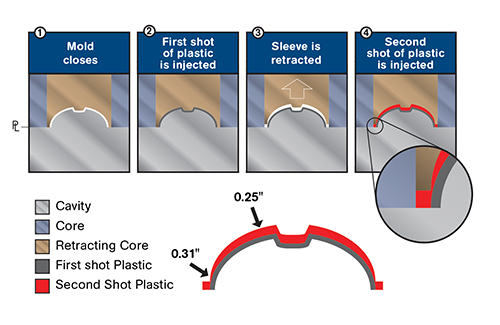
Fig. 3 The Core Toggle technique is often desirable for multishot molding because all core and cavity stacks are identical and eject the entire mold’s worth of parts every cycle, whereas multishot molds with rotary platens and indexing plates eject only half. There is also no rotational device used, which lowers the equipment cost. Core Toggle has a serious restriction on part geometry capabilities, as shown here. On any non-linear surface, when the steel pulls back, it does not leave behind a consistent or symmetric void. Process development in Core Toggle is also more challenging because the first shot does not have the “open mold” cooling phase afforded by rotary-platen and indexing-plate systems. In addition, the resin delivery system of core-back molds has constraints because the second shot needs the same access to the part as the first shot.

Fig.4 Integration of portable injection units can be accomplished in several different ways. In this photo, a standard 450-ton KraussMaffei hydraulic press is converted to a three-shot machine: One injection unit (36-mm screw) is mounted vertically on the stationary platen. A smaller unit (24 mm) is mounted directly on the mold and is supported by the press’s moveable platen.
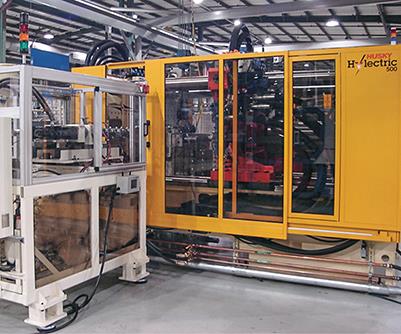
Fig.5 This photo depicts an application using a servo-driven add-on injector. The base machine is 500-ton Husky electric press. The decision to go vertical or horizontal is based on second-shot size, size of the base molding machine, and the molding facility’s ceiling-height and floorspace limitations. Second-shot volume mandated a 50-mm screw, which required a UMS Servo 42E injection unit, supplied by MGS Mfg. While this size unit is available as a vertical mount, it would have been too tall (on top of the press platen) and would interfere with the overhead material handling system. The same size screw and barrel is also available in the self-supporting, framed, horizontally mounted configuration, shown here.


Multishot molding adds significant value to plastic products: soft-touch enhancements (for hand tools, toothbrushes, razor handles, writing instruments); performance improvements via molded-in gaskets, o-rings, seals; permanent graphics through the use of additional colored resins; and part functionality with in-mold-assembly techniques. Consumers have demonstrated, through purchasing trends, the value of placing additional materials on common products. OEMs and brand owners appreciate the quality enhancements and overall production cost efficiencies of incorporating multishot molding techniques into their product lines.
Multishot or multi-component molding is certainly not a new technique. Methods of creating injection molded parts with more than one resin have been around for decades. Yet, the very nature of the process and the specialized molding equipment required preclude it from common use at the majority of both custom molders and OEMs’ captive molding facilities. That needs to change, because molders with the appropriate resources (multishot-enabled injection molding machines and trained personnel) realize significant opportunities with both existing and new customers.


There are many ways of referring to the multishot process and some of the names are actually misleading. Two-shot, twin-shot, dual-shot, 2K (from the German word “kunststoff” meaning plastics), two-color, double-shot, overmold, and bi-injection come to mind. Depending on who is doing the talking, you will hear several definitions of what “multishot” means. Related processes include:
•Machines with multiple barrels to facilitate color changes.
•Molding a base substrate in one mold in one press then transferring and inserting the first-shot part into a second mold in a different press to overmold the second shot.
•Reducing cycle time for an unusually thick-walled part by creating a multishot mold but using the same resin in all shots as built-up layers.
•Consecutively injecting two resins into the same injection point of the mold to create a two component part with a core and a surface layer—usually referred to as co-injection, bi-injection or sandwich molding
For this article, we will define multishot molding as using one injection molding machine and one injection mold to create a part with two or more plastic resins within one cycle. We will also take the perspective that this is the molder’s first multishot project. Let’s concentrate on a two-shot process producing one finished part each cycle. We will need a one-cavity, two-shot mold and a press that is able to inject a specific amount of one material into one injection point of the mold and simultaneously inject a specific amount of another material into another injection point of the same mold. That holds true for the majority of multishot molding applications.
There is also a style of part design that requires injection to be consecutive—first shot followed by second shot—we will examine that a bit later in this article. Regardless of technique, we’ll need a press with two injection units and the controls to regulate the process. But first, we’ll discuss the multishot mold.
MULTISHOT TOOLING
When it comes to the injection mold, its design and construction are determined by the relationship and shape of the two materials used to create the part. The multishot mold style will determine the specific kind of multishot press and any ancillary equipment required to mold the part.
In a single-shot mold, resin is injected into a cavity, and after the appropriate amount of cooling time, the two halves of the mold split open and the part is ejected. In multishot molding, two or more resins are injected into the mold to create a multi-material part. For each subsequent shot, space must be created in the mold to accommodate the additional resin. Put simply, steel must move after the first shot to make new space for the next resin.
There are three principal ways of creating space between first and second shots in a multishot mold:
1. Common core (using a rotary platen or turntable).
2. Core and cavity steel change (using a built in rotary indexing plate or robotic transfer).
3. Core toggle.
(Note that there are instances where a combination of the above can be used to create specific part geometry features.)
• Common core: In a common-core multishot mold, the two materials are injected simultaneously. This is achieved by having two different sets of cavity steel on the same mold face (often top and bottom, but right side/left side can be used as well), with one half for the first shot of material and the other for the second. The core side of the mold is mounted on a rotary platen or turntable, which is fastened to the moveable platen of the press.
Using our example of a one-cavity, two-shot mold, that means we’ll have two core-and-cavity stacks—while both cores are identical, there is a difference in the cavity steel.
Once injection and cooling of the first resin is complete and has produced a part in the first-shot half of the mold, the mold opens and the part remains on the core. The rotary platen rotates the core side of the injection mold 180° to align the parts with the opposite half of the cavity side of the mold, ready for the second shot. The mold closes and the second shot of resin is injected. After cooling, the mold opens and the completed two-material part is ejected.
•Core and cavity steel change: This technique enables molders to add second-shot features to both the cavity and the core side of the part—something not possible with the rotary-platen method.
This method uses a rotating indexing plate built into the mold to lift first-shot parts from the first-shot core steel after injection. The parts are not ejected, but are transported via the rotating indexing plate to the second-shot core position. The part design must have features that allow the stripper plate to hold, move, and accurately place the first shot onto second-shot core steel. The part component produced by the first shot can be nested into the second shot, allowing material to be injected in, around, and through the first shot.
•Core toggle/core pull: Indexing plates use simultaneous first and second injection just like the rotary-platen method. Note that in some cases, an end-of-arm fixture and robot can be used to manage the lift-and-replacement activity, depending on part design/geometry.
This method is unique in that it does not use any type of rotation. Instead, actions to move steel are designed and built into the mold itself. Rather than opening after the first shot, the mold generally stays closed and internal actions move elements of the core and/or the cavity steel, creating new geometry space between shots. It seems no matter which element, core or cavity, is moved, you hear this method called “core pull” or “core toggle.”
Injection is sequential, so cycle time is the total of the two shots plus additional cooling for first shot—which can be over twice as long as the two previous methods, where cycle time is determined by the resin with the longest cooling time. However, in the core toggle method, all cavity and core stacks are identical and create a finished multi-material product on every cycle.
RESIN BONDING TERMS & CONSIDERATIONS
All three tooling methods allow molders to combine two or more resins. They can be combined in two general ways—chemical or heat/melt bonding or through a mechanical or interlock bond. Chemical bonds are created when one material molecularly binds to another, in effect creating an adhesive resin skin between first-and second-shot materials. Heat and pressure can create a “melt” bond between some resins—distorting the two surface areas to the point where they adhere to each other. A mechanical or interlock bond uses designed geometry features of the first and second shots to lock resins together.
In the case of a “melt” bond, which is considerably less robust than true chemical bonding, mechanical bonding can be added to increase the life and performance of the mating areas. There are also cases where a permanent bond is not desirable. A weak melt bond can temporarily adhere one component to another, allowing the product’s end-user to tear off a tamper-evident seal and expose a protected surface or orifice. An interlock bond, with two or more non-bonding resins, is used to create in-mold assembled products with built-in functionality such as rotating or sliding actions.
The involvement of resin suppliers is critical during the initial stages of product design. Although largely anecdotal, a substantial amount of history exists with regard to what generally bonds to what and what does not. You certainly do not want to learn the hard way that glass-filled nylons can be challenging substrates or that certain colorants can dramatically impact bond strength.
EQUIPMENT SELECTION FOR MULTISHOT
For the first-time multishot molder, equipment selection is often a daunting task. Should the molder invest in a new or used two-shot press? Would it be best to use an existing press with open capacity and convert it to a two-shot machine? If this is the molder’s first multi-component project, the projected production hours and product life cycle should be the foundation of the decision. If a project will command more than 5000 press hours in a single year and anticipated product life is three years or more, a dedicated two-shot press should be considered.
A dedicated two-shot press, where all second-shot equipment is permanently integrated, does have a few potential downsides. The lead times for two-shot molding machines are much longer than for standard presses—usually much longer than mold-build lead times.
If the part life turns out to not meet projections and volumes dry up, you have a white elephant on your floor waiting for a project using a similar mold size and matching first- and second-shot volumes. If any part of the machine goes down, you have no options. One significant failure—for example, in either the injection unit or rotary platen—and you are at the mercy of the press OEM’s service team and the availability of replacement parts.
If portable injection units are used on a standard press, you can temporarily replace a faulty secondary unit or, if the primary unit malfunctions, you can move the secondary unit and platen to another press in your facility.
In our theoretical case study, we are building a single-cavity two-shot mold, which means that production volumes are relatively low. In this scenario, most molders are likely to purchase the appropriate ancillary equipment to convert an existing standard injection machine into a two-shot press. That means a rotary platen if it is a common-core mold. The thickness of the turntable will eat up daylight in the press: Is there enough real estate in the machine for both the rotary platen and the open mold? Do you have to get an end-of-arm robotic fixture in there to get the part out?
Obviously, a standard machine will also require a secondary injection unit. A small (hand-held size) part with a second-shot trim feature may only need a few grams of resin, so a mold-mounted portable injection unit will do. A large automotive or appliance part may require over a pound of second-shot resin calling for either a platen-mounted injection unit or a floor-mounted, horizontally positioned injection system.
Now the molder must consider the real-estate availability on the molding floor. A large vertically mounted unit can extend over 5 ft above the press, while a horizontal unit and its support frame can be the equivalent of attaching an 80-ton press to the base machine.
Regardless of the application, each system is portable and can be moved to other machines. The servo or hydraulic injection unit requires its own power supply, operator interface, and controller and is integrated into the base machine via standard SPI robotic or Euromap 67 interface. The secondary system may require an independent support system for cores and valve gates, along with a connection for a rotary-platen interface and other required operations (like a vision system, for example).
There are now quite a few sources available for secondary injection units, and a thorough understanding of your project and resource capabilities by the equipment provider is required. Which materials are you planning to use? What is your projected cycle time? This will help determine the capacity of the secondary barrel. If you are planning short cycle times, you’ll want an appropriate amount of plasticated second-shot material available. If you are molding large parts with long cycle times, you will need to avoid excess resin cooking in the barrel.
Which portable injection unit technology is best—servo or hydraulic? Electric systems are touted for their energy efficiencies and precision. Hydraulic units are smaller and lighter and are generally easier for a molder’s in-house maintenance team to maintain and repair. The answer depends on your intended immediate and long-term use and the molding machinery your personnel is familiar with.
At MGS, customers of our Universal Multishot Systems have opted for servo rotary platens for years, and now electrics make up the overwhelming majority of turntables we sell. While orders of servo portable injection units have grown, we still sell a good number of hydraulics, for the size and serviceability reasons cited previously.
The big question for molders is: Are you losing opportunities because you do not have multishot capabilities in-house? The entry price for new equipment and the learning curve associated with any new manufacturing technology may have caused you to hold back.
Consider, though, that this really isn’t new anymore. The technique is absolutely on solid ground and has been embraced by many leaders in our industry. Multi-component molding continues to evolve and many brand owners are designing new products that take advantage of it. Once you have a program or two under your belt, it is likely more opportunities will come your way.


Related Content

A Simpler Way to Calculate Shot Size vs. Barrel Capacity
Let’s take another look at this seemingly dull but oh-so-crucial topic.
Read More
Why (and What) You Need to Dry
Other than polyolefins, almost every other polymer exhibits some level of polarity and therefore can absorb a certain amount of moisture from the atmosphere. Here’s a look at some of these materials, and what needs to be done to dry them.
Read More
The Importance of Melt & Mold Temperature
Molders should realize how significantly process conditions can influence the final properties of the part.
Read More
Solve Four Common Problems in PET Stretch-Blow Molding
Here’s a quick guide to fixing four nettlesome problems in processing PET bottles.
Read MoreRead Next

Lead the Conversation, Change the Conversation
Coverage of single-use plastics can be both misleading and demoralizing. Here are 10 tips for changing the perception of the plastics industry at your company and in your community.
Read More
People 4.0 – How to Get Buy-In from Your Staff for Industry 4.0 Systems
Implementing a production monitoring system as the foundation of a ‘smart factory’ is about integrating people with new technology as much as it is about integrating machines and computers. Here are tips from a company that has gone through the process.
Read More