In-Depth Guide on How to Measure Color in Plastics
Sponsored ContentIn the plastics industry, standardizing the color process can be both difficult to understand and even harder to implement. Here are basic tips for improving color measurement and establishing color consistency.
Share

It is no secret that Standardizing the Color Process improves manufacturing operations, especially when it comes to plastics. From batch to batch (or plant to plant), it is imperative that the final product matches the design and each other. The only way to control your plastics color consistency is to measure it, accurately.
Before accurate color measurement can take place in your plastics, it must take hold in your team’s mind. It is critical for QA managers, manufacturers, engineers, chemists, and technicians alike to all understand the basics of all color measurement. Without knowledge of the fundamentals, it will be difficult to understand what is needed for precise measurement and will be very difficult to communicate those needs throughout your supply chain. Here are a few to consider first:
- Basic Industry Terms,
- Colorimetry Concepts,
- Elements that Affect the Appearance of Color,
- Object Source vs. Source Color,
- Color Temperature
- Or Specular Components (Included/Excluded)
For those interested in learning more about color measurement, Konica Minolta Sensing Americas, Inc. hosts free color measurement seminars around the country.
If you feel that you (and your team) have a solid understanding of the basics, then the next step in your standardization process is to choose your evaluation conditions. Starting with:
Color formulas using the CIE color chart can be applied to effectively detect color differences.
- Instrument model, type and geometry
- Standard illuminants
- Standard observer
- Color space
- Color difference formula
- Color tolerance values
- Sample preparation and presentation methods
- Light sources for visual evaluations
Remember, precise color measurement instrumentation and sophisticated formulation software are required to avoid expensive trial and error periods and get the color correct the first time.
Choosing the Right Instrument
For plastics manufacturing, plants use spectrophotometers for transmitted/reflected color, yellowness, and haze measurement. Spectrophotometers are quality control devices that provide numerical values for color.
Benchtop spectrophotometers are the tool of choice for blown, extruded and molded plastic products. Ensure consistent plastic color by measuring points across the entire range of R&D and manufacturing processes. Use a spectrophotometer to store the product color code. If changes in production at a future time alter the color, the original color can be re-instituted.
Now that you have established your test equipment, it’s time to standardize how you visually observe them, which brings us to two important questions, how will you illuminate your sample?
Moreover, Which Illumination Angle is Ideal for Evaluating the Color of Your Plastic Samples?
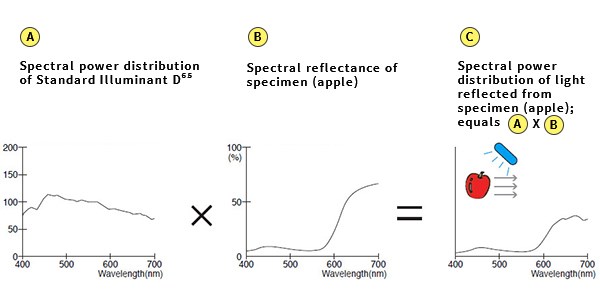
Unlike a light source, an illuminant can be represented by the light's spectral power distribution curve in graph or numerical form as depicted here.
Without light, we cannot see color. With light, color appearance changes from one type of light than another. An apple, for example, could appear redder under incandescent lighting than it does under natural daylight. This often leads to inconsistencies in evaluating or communicating the color of a sample. Standardizing lighting conditions maintains consistent results for each evaluation.
Standard Illuminant D65: Average daylight (including ultraviolet wavelength region) with a correlated color temperature of 6504K
Fluorescent Illuminant F2: Average fluorescent light that is a cool white
Standard Illuminant A: Incandescent light with a correlated color temperature of 2856K
Once you know how to illuminate your plastic, you need to standardize your perspective. An object may appear brighter, duller, lighter, or darker due to light reflection. It all depends on the observer's angle relative to the object. Test and control an object's color using a standardized method. Remember, light must reflect off the object at the same angles during each assessment.
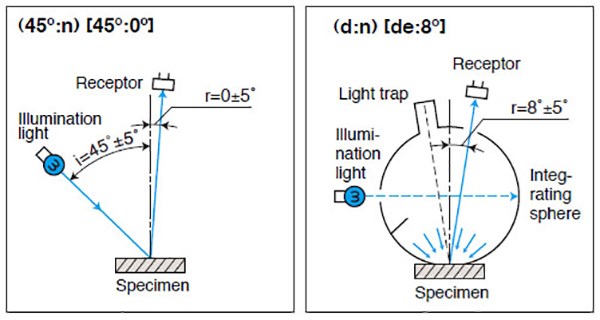
Color measurement instruments, including spectrophotometers and colorimeters, illuminate an object at certain angles to detect its color.
Color measurement instruments (including spectrophotometers and colorimeters) illuminate objects to detect their color. The instrument's optical system geometry detects an object's illumination angle and reflection angle. That geometry effects where an object's color falls in the defined color space. Different measurements can result from instruments with other geometries.
Identify ideal geometries for plastic color evaluation and control by reading common geometries built within color measurement instruments.
Find Your Space
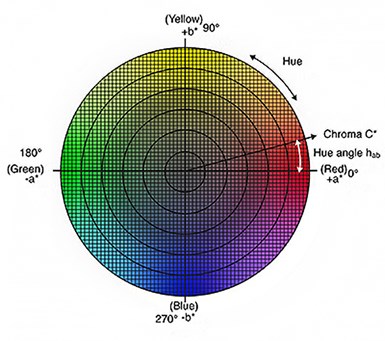
Hue angle starts at the +a* axis and is expressed in degrees (e.g., 0° is +a*, or red, and 90° is +b, or yellow).
A "color space" is a method for expressing the color of an object using some kind of notation (such as numbers). A non-profit organization, Commission Internationale de l’Eclairage (CIE), is the authority in the science of light and color. CIE's defined color spaces for communicating and expressing an object's color include: CIE XYZ, CIE L*a*b*, and CIE L*C*h.
Use defined color spaces for evaluating color attributes, identifying inconsistencies, and expressing findings. The L*C*h color space system (like CIELAB) correlates well with human eye color perception. L*C*h uses the same diagram as L*a*b* but with cylindrical coordinates instead of rectangular coordinates.
In this color space, L* indicates lightness, C* represents chroma, and h is the hue angle. The value of chroma C* is the distance from the lightness axis (L*) and starts at 0 in the center. Hue angle starts at the +a* axis and is expressed in degrees (e.g., 0° is +a*, or red, and 90° is +b, or yellow).
Color measurement instruments make quantifying these color attributes easy. They determine the object’s color within the color space and display its values for each coordinate L*, C*, and h.
Know the Difference
Even if two colors look the same to you, color measurement instruments could show slight differences. Slight differences can also be the difference between a happy and unhappy customer or client. Color samples that deviate from the standard compromise customer satisfaction. These non-uniform samples also increase the amount of rework and costs.
Determine Your Tolerances
Achieving the desired product color with an efficient and streamlined process is the goal of every color quality process. Ensure consistency and accuracy throughout your quality process by establishing color tolerances. A color tolerance is the acceptable difference in color between a sample and the standard. For color to be acceptable, your color tolerance values should always correlate to the human eye.
Use either the CMC tolerance system or DE00 color difference formula. The CMC tolerance system uses ellipsoids based on the color discrimination threshold of the human eye. The DE00 color difference formula (recommended for plastics) incorporates ellipsoids plus the hue angle.
Prepare Your Samples
Measurement of color samples requires standardized procedures. Standardize the preparation and presentation of your samples for each reading. Errors and inconsistencies between samples and standards occur without standardized methods. Listed below are preparation and presentation best practices to achieve more accurate and consistent results when measuring the color of your samples.
Conduct Visual Evaluations
The method for evaluating the color and appearance of a sample is unique to each application. Many applications (including plastics) need visual assessments along with instrument measurements.
Conduct visual assessments for inconsistencies between the sample color and the standard color. Before commencing a visual assessment, condition the samples, if needed, prepare and present the same each time. That means grinding, mixing, or slicing samples the same way. Place the samples in the same container, and use the same sample quantity or size for each assessment. To maintain consistency and accuracy requires standard conditions. This includes standards for lighting, observer, and viewing conditions.
Perform visual assessments early in the color process to help cut rework and additional costs.
Color Measurement and Evaluation Best Practices
Try to use the same color recipe as your standard when formulating the color of your plastic product. If this is not possible (which is often the case), then define a color formulation process and create a recipe that matches the original's standard.
- Define a color standard. Use color measurement instrumentation specific to your application needs. Measure the color you would like to match for the finished product and record its color values.
- Upload the standard’s color values to your color formulation software.
- Calculate the recipe that best matches the standard.
- Create a small batch of the color recipe calculated in the software.
- Prepare and condition your sample then measure with a spectrophotometer.
- Compare the color values and reflectance curve of the sample to the standard.
- Use a controlled environment of a light booth to see if there are any noticeable inconsistencies. To identify metamerism make comparisons under at least three different light. This will also result in the most accurate results.
- Save the ideal recipe in the color formulation software to recall and reproduce in future batches.
To learn more about Konica Minolta and resources for color consistency, click here.