
TOOLING: Repairing Molds in the Press: Part 3
This is the final part of a series on tooling in the press. This column will cover repairs that can be accomplished in the press.
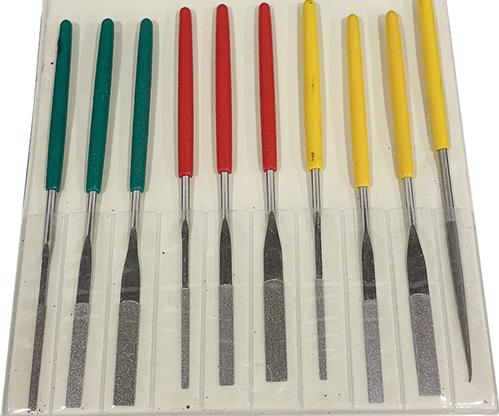
Diamond files are among the go-to tools for in-press mold repairs.
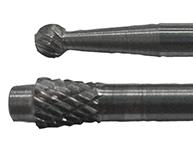
To solve part sticking problems, a dovetail burr with a positive stop ground on it is a safer method for grinding undercuts than a round burr.
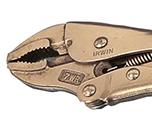
A slide hammer is a common tool for removing stuck plastic from mold cavities in the press. But it requires caution to avoid hitting the opposite side of the mold being worked on


When there’s a problem, my focus has always been: What can I do to fix the tool to address the issue, versus processing around it? When you process around issues, many times you make the process window smaller and put yourself at risk for other part-quality issues. If you can make a physical change to the tool to correct the problem, that is always a more robust solution than processing around it.

WHAT TO DO ABOUT PART STICKING
Now let’s consider some mold repairs that be addressed in the press rather than by pulling the tool. One very common problem is with parts sticking to the cavity or components such as lifters. There are numerous root causes that can contribute to this. Let’s start by looking at the cavities. In most cases the part stays with the ejector or moving half of the mold unless the stationary half has reverse ejection. So if the part is sticking to the wrong half of the mold, some things need to be investigated before trying to adjust the process or water temperatures.
First, the cavity should be looked at for burrs, cutter marks, EDM, and the surface finish. I have seen many cases where the polish was too shiny for that specific material, which caused the sticking, and simple 320-paper draw polish addressed the issue. If the cavity is polished correctly for the plastic being used, we then need to look at the opposite half and see what we can do to help the part stick to it. Typically, undercuts can be added to help with this issue. They are a good option but in some cases are not allowed by the part design.
When adding undercuts with a grinder, I prefer to use a dovetail bit that has been ground with a positive stop to prevent going too deep (see photo). You need to be careful not to go too deep and cause flaking, sink marks, or read-through on the part.
One other trick I have found very effective at solving part sticking problems, and that often performs better than undercuts, is adding a very fine stipple texture to side walls to retain the part. I use a Dremel engraver with a fine carbide tip to add the fine texture to side walls. This is a $40 tool that has many uses with various tip configurations. It can also be used for some texture repair, but not unless you are experienced with the details of texture. (For more on texture, see my column on the Mysteries of Mold texture last April.)
If the part is sticking to the proper mold half but is sticking too hard—causing pin push, hanging up on lifters or slides, or other problems—you need to look again at whether the surface finish is appropriate for the material. If the surface finish is in order, you typically are now facing issues of mold design that cannot be fixed in the press, such as insufficient ejection, lifter travel, etc.
When removing plastic that is stuck in the cavity, you need to be very careful about which tools are used. Brass is the most common alloy that is used, but it can still cause damage if you’re not careful. Brass screws can be heated up and melted into the plastic, and then cooled. Then you can use a slide hammer to pull the plastic out. The brass screws can also be hammered flat to insert into thin details or ribs. Brass blades can be heated to melt through the plastic in the cavity and divide it into smaller sections to assist with removal. Bronze pliers are the safer choice over steel pliers but can still cause damage.
Anytime you use hand tools in the press, exercise extreme caution to prevent cavity damage. That’s especially true when using slide hammers to avoid hitting the opposite side of the mold being worked on.
EXPERT ADVICE ON TOOLING
Click here for more articles on Tooling from expert Randy Kerkstra.
SCUFFS & DRAG MARKS
Scuffing or drag marks on the part are also a common problem that at times can be resolved in the press. One common cause is parting-line burrs from damage or the parting lines getting coined-in over time. Many people will use polishing stones to remove the burr, but I prefer to use diamond files with various widths and flat or round, depending on the contour of the cavity edge. These files will not break down like a stone and will maintain their shape. You just need to be careful with the angle of the file or stone when removing the burr. You do not want to roll the edge or scratch the cavity and create another defect.
Scuffing or drag marks on textured surfaces are not easily resolved in the press without the help of someone experienced with textured surfaces. In most cases the grain is too deep for the draft angle of the side wall. Gloss is usually a concern with textured surfaces, which also limits what can be done in the press. But if you have access to a pencil blaster and are very careful to protect the machine and mold components from the blast media, this will allow more options.
Typically the texture will need to be lightened up by removing the peaks of the texture and reducing the depth. The least aggressive method is to start with a fine wire brush by hand. This will polish the texture surface and will increase the gloss. Polishing compounds can be used along with the wire brush and will polish the texture on a micro level. If the grain needs to be reduced in depth, you can use papers or polishing stones. Again, this should only be performed by an expert and in most cases will require the area to be hit with blast media to achieve the required gloss. If the drag mark is on a highly polished surface free of defects, there is a coating that can be applied in the press made by NanoPlas Inc., Grandville, Mich.
GATES, LIFTERS, COOLING & VENTING
Plastic flakes or debris in the cavity or parting line can cause part defects and parting-line damage. First you need to identify where the flakes are coming from. I have seen cases where the top edge of a sub-gate at the parting line is left sharp, which can create plastic flakes when the sub-gate drags on this sharp edge during ejection. The sharp edge can easily have a radius added to it in the press.
Lifters also can drag on the part and create plastic flakes. This typically also can be addressed in the press. In cases where the solution cannot be achieved on press, you can consider using air blow-off until the problem can be fixed.
Lock angles and shutoffs can also create debris that can fall into the cavity and cause defects in the part. This is usually the result of the shutoffs or lock angles hitting too hard or running different water temps between the halves. These can be cleaned up by a tool maker, and at times a light layer of grease can reduce this issue.
Water leaks can cause tool damage and quality issues. Most water issues with hoses or fittings are usually taken care of in the press. For a more severe issue such as a cracked cavity or other tooling component, there is an option if you don’t have time to repair the mold. A negative-pressure or reverse-flow temperature-control unit (TCU) pulls the water through the mold rather than pushing it, which can allow you to run the mold temporarily until you can repair it.
Venting issues are common problems that can contribute to burns, splay, and gloss issues. Repair outside the press is the best option, where machining, surface grinding, or hand work can be done more accurately. But I still open vents in the press when the situation is urgent and time is not available to remove the mold. This should be done by an experienced tool maker to prevent causing flash issues. Some people will back off on the clamp tonnage to assist venting, but that can contribute to other issues such as flash. If the vent is properly opened, this is not necessary. If you do struggle with venting issues, refer to my columns on venting.
Buildup issues on the cavity from lack of venting or plate-out from volatiles in the material can cause issues with gloss or sticking in the mold. Most of these can be taken care of in the press with polishing by a tool maker or some solvents. Textured surfaces typically require blasting with media to maintain the proper gloss. But there is a non-toxic cleaner, called Zap-Ox that will remove rust and buildup.
ABOUT THE AUTHOR
Randy Kerkstra has been in the plastics industry for more than 26 years, occupied frequently with troubleshooting injection molding. He is currently a tooling manager for a large, multi-plant molding and manufacturing company. Contact:kbmoldingsolutions@gmail.com.


Related Content

Optimizing Pack & Hold Times for Hot-Runner & Valve-Gated Molds
Using scientific procedures will help you put an end to all that time-consuming trial and error. Part 1 of 2.
Read More
Get Better at Using Foam for Your Molded Parts
Machine performance and process speeds are critical when using foam to reduce part weight while retaining part integrity.
Read More
What You Need to Know About Leader Pins and Bushings
There’s a lot more to these humble but essential mold components than you might suspect. Following the author’s tips could save much time, money and frustration.
Read More
How to Design Three-Plate Molds: Part 5
There are many things to consider, and paying attention to the details can help avoid machine downtime and higher maintenance costs. In this installment, the focus is on design and placement of sucker/puller pins.
Read MoreRead Next

TOOLING: Designing Molds for Easy Cleaning & Maintenance in the Press
Pay attention to water leaks and rust, proper grease selection, vent buildup, and checks for wear.
Read More
TOOLING: Designing Molds for Easy Maintenance in the Press, Part 1
Attention to design of cooling, ejection, and slides can save downtime and maintenance headaches.
Read More
Beyond Prototypes: 8 Ways the Plastics Industry Is Using 3D Printing
Plastics processors are finding applications for 3D printing around the plant and across the supply chain. Here are 8 examples to look for at NPE2024.
Read More