
Why Ultrasonic Cleaning Systems Fail— And How to Prevent It
Getting the longest life out of your system depends on proper use and maintenance.


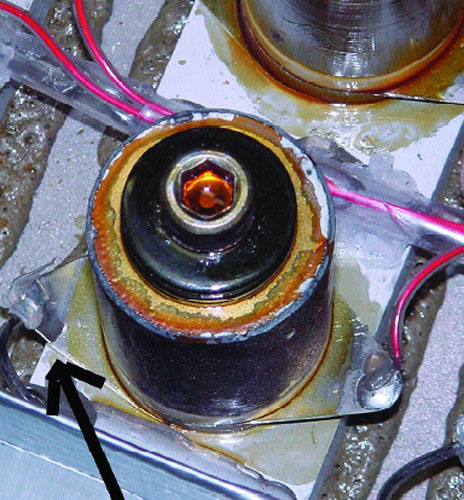
Figure 1: This transducer was damaged by a loose plumbing connection.

A shop vacuum cleaner could have saved hundreds of dollars in repair costs.

Figure 2: This kind of sloppy use can cause expensive repairs.
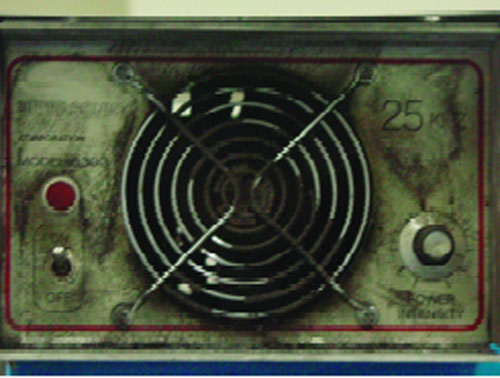
Poor maintenance can cause overheating in a computer or an ultrasonic generator.
Achieving optimum system performance is based on the assumption that the process has been established and the proper ultrasonic cleaning equipment has been purchased for the application. For example, ultrasonic jewelry cleaners are generally not designed for continuous use. The most common reason they fail is overheating—the device is designed for intermittent use but is run continuously. When the system is left running and the water is either drained or evaporates and the unit runs dry, the transducers can overheat beyond repair. Another reason for a complete failure is thermal shock, where the operator changes the water, replacing hot water with cold. The transducer is very hot from running continuously and the thermal shock breaks the bond between the PZT (piezoelectric element) and the tank bottom.
It is also imperative to use chemistry that is suited for the job and compatible with the equipment, with proper process times, temperatures, ultrasonic power and frequency being established by a qualified process engineer. The items being cleaned must be the same items that the process was designed toclean, and the system or basket cannot
be overloaded.
Categories of Failure
Understanding why ultrasonic cleaning equipment failures occur can help prevent them from happening.Ultrasonic Generator or Generator Circuits
Input voltage that is too high or too low can cause an ultrasonic generator to not operate as it was designed—for example, low voltage can cause the cooling fan to run too slowly, or not at all. Be sure the generator is connected to the correct input voltage and that it is electrically grounded.Also remember that today’s ultrasonic generator circuits are as sophisticated as typical desktop computer circuits, and they require cooling to ensure that ambient temperatures are not extreme. Most ultrasonic generators have fans to cool the power transistor circuitry and the output transformer. The fan is designed to move a specific number of cubic feet of air per minute across the transistor circuitry. Adding filter material to catch debris cuts down on air flow, which can cause the generator circuitry to “cook” and eventually fail. Installing an ultrasonic generator in a confined area where the ambient temperature continues to rise can also lead to generator failure. Be sure to place the generator where it does not block the fan’s airflow, either on the intake or on the cooling airflow exit, to help prevent overheating damage.
Another recipe for failure is operating the equipment in an atmosphere that is corrosive or in an area where there is excessive buffing lint from a manufacturing process. In both these cases, it is usually necessary to move the equipment to a new location that is free of the contaminant, such as an airconditioned office or a similar ventilated enclosure.
Failures in the transducers and/or the cabling to transducers can damage ultrasonic cleaning systems. Steam and other moisture sources must be prevented from entering the connecting cables and or the transducer compartment (see Figure 1).
Finally, connecting generators to the wrong (i.e., another brand) tank or immersible with the wrong frequency or power transducer load usually will not work at all, and if it does, it is unlikely to be compatible over the long haul.
Ultrasonic Transducers
Cavatation erosion due to the intense ultrasonic action at the radiation surface ultimately causes the radiating surface of an ultrasonic cleaning system to wear out. Beware of manufacturers that claim that they warranty the reradiating surface for the “life of the system.” The radiating surface of all heavy-duty industrial ultrasonic cleaning systems will show some erosion over time, and many years of experience tells us that that plating, coating and thin film depositions are rarely cost- effective ways to minimize cavatation erosion.Some of the most aggressive cavatation erosion occurs in tanks using high-purity 18 meg ohm DI water with no detergents or wetting agents of any kind. The high- purity, high-resistivity DI water is very aggressive (ion craving) and has the ability to cause excessive cavatation erosion.
Baskets and components that have large areas of reflective surfaces located in close proximity to the radiating surface can also cause excessive cavatation erosion. Transducers can become unbonded due to thermal shock, bad bonding design or technique, or water damage.
Avoid using baskets and fixtures that can cause scratches on the radiating surface of an ultrasonic cleaning tank or immersible transducers.
Plumbing
Atypical plumbing failure can go like this: When a tank is initially installed, the drain nipple from the tank is sealed with Teflon tape or another sealant. The installer unscrews the fitting, installs the tank and then reinstalls the nipple without replacing the sealant or using Teflon tape. Over time, the pipe fitting begins an almost imperceivable leak that has the potential to cause a catastrophicsystem failure as the result of moisture contamination (see Figure 2). Ultrasonics have a nasty way of loosening pipe fittings.Electrical Failures— Catastrophic and Repairable
When a plumbing connection leaks and the water or detergent atomizes and sprays all over the transducers, it is likely that, due to the high voltage present, there will be arcing and electrical short circuits. When gaskets that seal the tank to a countertop or a transducer shield or cover fail, moisture collects on the transducers and the resulting arcing and shorts can cause the system to go belly up. The most common type of tank heater failure— and one that usually causes irreversible heater failure—is when the heaters are turned on, or left on, and there is no liquid in the tank. The same is true for the transducers. If the ultrasonics are powered up and there is no liquid in the tank, there is no place for the heat to be dissipated, which can lead transducers to overheat and fail.Improper Use of the Equipment
To prevent scratches that can reduce the life expectancy of the system, avoid placing baskets or items to be cleaned directly on radiating surfaces of the ultrasonics. Some basket and fixtures are designed to minimize the contact with the radiating surface.When using ultrasonic cleaning equipment, be aware that most equipment is not designed to be washed off with a hose. Use common sense when filling and draining the ultrasonic tanks. Be careful not to cause excessive splashing and spilling of liquids.
Do not use strong acids in ultrasonic tanks, because acids have the potential to cause hydrogenation embitterment of the tank welds that can result in unrepairable weld failure. Also avoid using flammable or combustible chemistries unless the equipment is specifically designed for them.
Baskets and fixtures should be as “invisible” as possible to the ultrasonic cleaning sound waves. Sound-reflective and or absorbing surfaces should not be used, or used as little as possible. Baskets and/or fixtures should be made of stainless steel rod whenever possible rather than stainless steel flat stock that can reflect sound waves. Coated basket and fixtures should only be used when this compromise is fully understood and unavoidable. Expanded metal baskets are inexpensive, but using them often represents a major compromise in the effectiveness of ultrasonic cleaning.
Proper Maintenance
Periodic maintenance on the system to clean debris and contamination is essential. Maintenance required is in some degree dependent on the type of ultrasonic cleaning system being operated, but the following tasks should be completed on a regular basis:• Clean and/or replace filters and strainers as required or recommended by the manufacturer. When the tanks are drained, be sure the drained liquid content is disposed of in accordance with local regulations.
• Periodically check the screens that protect cooling fans.
• Clean out dust and debris to allow full air flow.
• Clean out drains and remove any lint and other items that clog the drain.
• Inspect the system for plumbing leaks, or electrical wiring failures.
Protect Your Investment
Users can take a few simple steps to help prevent the failure of ultrasonic cleaning equipment and optimize its service life. Read and understand the manual. Call the manufacturer if there are any questions. Remember to put safety first, and be surethat equipment is grounded in accordance with the manufacturer’s specifications and local electrical codes, and that it is properly maintained. Inspect the electrical and plumbing connections on a routine basis, and repair leaks or other problems quickly. Operating your ultrasonic cleaning system properly, performing necessary repairs and keeping up with maintenance will pay off in the long run.
David A rata is Director of Engineering at Ultrasonic Power Corporation (Freeport, IL). He can be reached at (815) 235-6020, or visit www.upcorp.com.


Read Next

For PLASTICS' CEO Seaholm, NPE to Shine Light on Sustainability Successes
With advocacy, communication and sustainability as three main pillars, Seaholm leads a trade association to NPE that ‘is more active today than we have ever been.’
Read More
Lead the Conversation, Change the Conversation
Coverage of single-use plastics can be both misleading and demoralizing. Here are 10 tips for changing the perception of the plastics industry at your company and in your community.
Read More
People 4.0 – How to Get Buy-In from Your Staff for Industry 4.0 Systems
Implementing a production monitoring system as the foundation of a ‘smart factory’ is about integrating people with new technology as much as it is about integrating machines and computers. Here are tips from a company that has gone through the process.
Read More