


Color changing in extrusion blow molding (EBM) is an important and complex subject. At the least, it disrupts production; at worst, it can be a frustrating obstacle when the color won’t change as quickly as you want it to. Color changing can take anywhere from 20 minutes to 2 ½ hours, depending on factors such as monolayer or coextrusion, the number of parisons, the resin used, and the type of colorant and its manufacturer.
The issues presented by color changes include:


• Lost production
• Lost resin, masterbatch and energy consumption
• Increased regrind generation
• Required supervision
• Risk of unstable production afterward
With regard to the last point, many of you have experienced situations when you thought everything was fine after a color change, and then after 10 minutes, some traces of the old color appear again.
So, how do you minimize the disruption and cost burdens of color changes? This a complex subject and best results will be obtained with good cooperation between the molder, resin supplier and machinery OEM. Key success factors are:
• Appropriate design and dimensions of equipment
• Thorough cleaning of equipment
• Use of the right resin for purging
We will present some useful general tips on these and other topics. We’ll start by examining the entire process of color changing and then focus in more detail on the extrusion unit of the blow molding machine. Note that this discussion is focused on continuous-extrusion blow molding. Discontinuous processes tend to mean longer material residence times and therefore could require lengthier color changeovers.
Will you switch directly from Color A to Color B, or purge Color A with natural resin before switching to Color B? And will you continue making bottles during the color change, or just extrude parisons continuously?
Basic Approaches: Four Choices
There are two basic ways to change colors in EBM: Either you switch directly from Color A to Color B or you use the “detour” approach of switching first from Color A to an uncolored or natural resin and then from natural resin to Color B. The choice can depend on the type of color, resin and masterbatch used. In our lab trials, and for the purposes of this discussion, we used the “detour” approach.
A second choice to be made for color change is to continue molding bottles throughout the changeover or to open the safety gate and just extrude parisons. The latter requires more manpower to dispose of the waste parisons and more effort to recycle and regrind that material. You also need to have regrinding equipment capable of handling big clumps of cold material. With the other approach, you have a continuing flow of production with no changes, except for some stoppages during certain stages of color cleanout and changeover. Consequently, we decided to continue producing bottles for our lab trials and for the guidelines presented here.

FIG 1 Every element of the EBM production system must be considered in color changing — from material blending and feeding through the extruder, adapter and head, to flash conveying, regrinding and refeeding. Photo Credit: W. Müller GmbH
Cleaning Out the Whole System
The first major task in changing colors is to flush out all the old color from every part of the processing system (see Figure 1). These are the basic steps in the cleaning procedure:
• Stop material feeding
• Discharge the piping system until it is completely empty
• Close all related hoppers and empty the extruder(s)
• Empty all related hoppers
• Vacuum clean hoppers, if needed
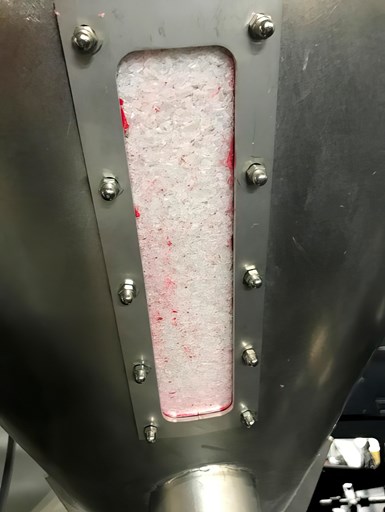
FIG 2 Material feed hoppers are sometimes underestimated in importance to color change. Use a vacuum wand to clean, if possible. And don’t forget also to clean the feed zone of the extruder screw below the hopper. Photo Credit: W. Müller GmbH
Hoppers are an area whose importance to color changes is sometimes underestimated, but it is very important that these components be thoroughly cleaned. If you can spot any residual color in the hopper sight glass (as in Figure 2), those bits sooner or later will end up in your bottles.
To clean hoppers, drain out the old color and, if possible, use a vacuum wand to manually clean out all regions of the hopper. Make sure the feeding area of the extruder screw below the hopper is also clean.
Next, open up and clean all material preparation units, such as mixers and blenders. These can be a bit difficult to clean and are a frequent cause of extended color change times. There are a lot of places for the old material or color to hide and enter the system later on.
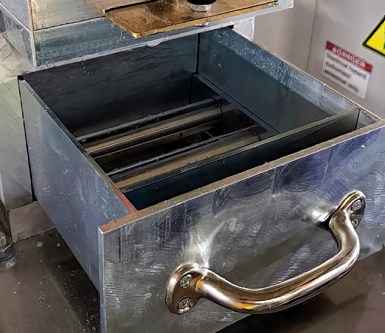
FIG 3 Don’t forget to clean this often overlooked source of possible color contamination – the metal detector/magnet drawer. Photo Credit: W. Müller GmbH
Don’t forget to clean hopper metal detectors (for example, magnet drawers), and use vacuum, if possible. Often overlooked, these units can cause headaches later on (Figure 3).
Purging the System
After performing these steps to clean out the material handling system, it’s time to start the purging process:
- Switch material feeding and handling to natural resin without masterbatch
- Turn off regrind feeding or switch it to feeding natural resin
- Start up the complete system with just natural resin. Note here that extrusion heads are designed to run a particular sort of material. So, for example, if you buy a head designed to run HDPE jerrycans, you may run into problems if you try to purge with a soft PP or a copolyester. Not saying it’s impossible — just not ideal.
At this point it’s appropriate to consider another critical machine component — the screen changer. You don’t want to replace or clean the screen at the beginning of the color change process because you will have too much of the old colored material passing through the screen, with some of it tending to hang around and delay complete purging. So, replace or clean the screen only after you have visual evidence of significant progress in purging out the old color.
Hoppers, blenders, metal detectors, screen changers and granulators — don’t forget to thoroughly clean out any of these possible sources of color contamination.
Here’s the procedure:
- Retract the screen pack and breaker plate
- Push out the molten material in the screen area
- Remove the screens contaminated with the old color
- Don’t forget to clean the screen bore thoroughly — a wire brush is strongly recommended
- Insert the breaker or carrier plate and fresh screens — making sure you do so in the correct sequence
- Return the screen pack to its operating position in the extruder.
Now, continue purging with natural resin. As soon as the final product is free of the old color, the process is complete. Follow the same basic procedure used to switch from the old color to natural purge resin to switch now from natural purge resin to the new color:
- Stop feeding the natural purge material and keep running until the material feeding and discharge piping are empty;
- Close all related hoppers and run the extruder(s) until empty;
- Switch material feeding to the new color and restart the extrusion process;
- Start up the blow molding process with the new color;
- Repeat the purging process if the old color shows up again.
Molders sometimes ask about using commercial purging agents rather than just natural resin. In our experience, they don’t ultimately reduce the overall purge time in EBM because they require extra steps and additional manpower. If you purge with just virgin natural resin, the operator only cleans the filters once. With a purging agent, the procedure we recommend involves changing to virgin for a short time (until the old color becomes much lighter) and then changing to the purging agent, and then back to virgin resin until the purging agent is out of the system. So, instead of using manpower for one material change, you would need at least two and often three.
Another question sometimes arises about the use of liquid color vs. solid masterbatch, though liquids appear to be more popular in areas other than EBM. We have conducted laboratory trials with liquid colors and found the overall color change time was about the same as with solid masterbatch, though liquid color does tend to stick more to extruder adapters and inside the head. Liquid colors can be less expensive to use but trickier to handle. There can be significant housekeeping challenges, especially in the hands of workers inexperienced with liquid colors.
There have been concerns that liquid colorants can act as a lubricant and cause screw slippage, reducing throughput. We have found that with some colors the throughput would be almost the same as with pure virgin resin, and with other colors from the same supplier the throughput dropped by more than 20%. This may not hold true for other suppliers.
With regard to equipment for liquid colors, dosing these colorants is far more sensitive and prone to variation than with solid masterbatch. Most molders have already set up blending systems for masterbatch, which may not be applicable with liquids. And, once you buy a pump, you may be limited to that same supplier for colorants — or vice versa.
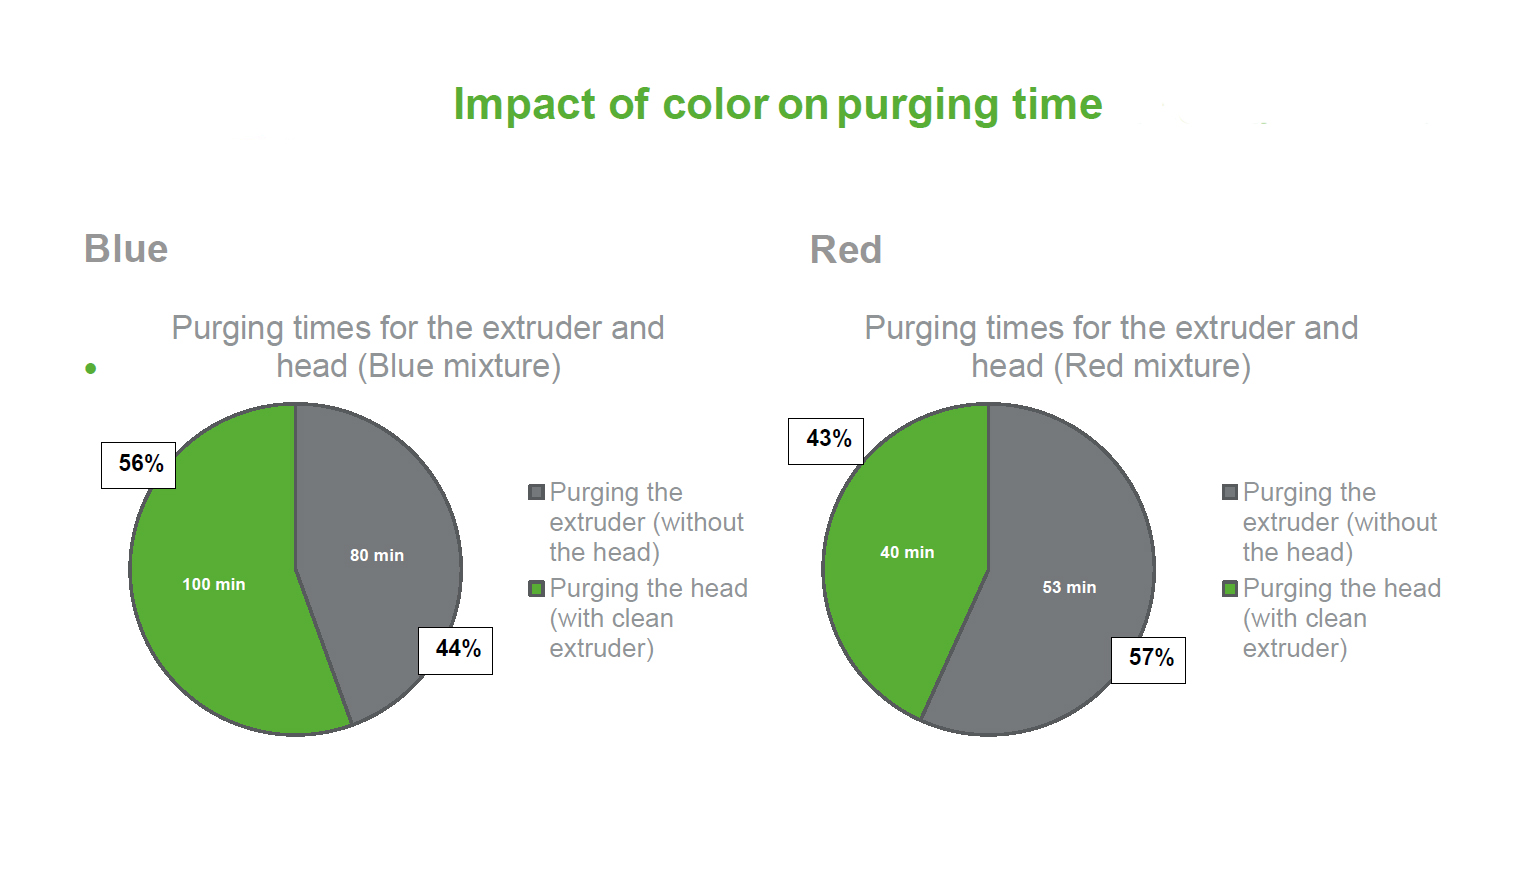
FIG 4 Lab trials shown how a particular color can affect purging time. In this case, a mix of virgin with a blue masterbatch took significantly longer (180 min total) to purge than a red masterbatch mix (93 min). And with the red colorant, purging just the extruder without the head took longer than purging the head with the “clean” (already purged) extruder. But, with the blue colorant, just the reverse was true, using the same extruder and head. Photo Credit: W. Müller GmbH
Figure 4 shows two interesting phenomena: Lab trials demonstrated that the type of color pigment can make a difference in purging times, regardless of whether solid or liquid color is used. In this case, solid blue masterbatch required longer purge times than a red masterbatch. The graphs also show that in these trials with an eight-parison head, purging the extruder without the head took longer than purging the head alone after the extruder was already “clean” (purged) of the red color — while just the opposite was true with the blue color.
Don’t Forget About the Flash Grinder
Now, we’ve come to an important point: cleaning the grinder and flash conveyors. The right moment for this is when you have performed the above steps and are ready to begin running the new color. Clean out the grinder thoroughly and use a vacuum wand, if possible. Also, clean all transport belts, including areas inside the safety gates of the blow molder.
When this has been accomplished, you are ready to start up production with the new color — including the regrind system. When production is stable, perform comprehensive quality checks of the finished product. And, after quality release, start final production.
What Happens in the Extrusion System
To understand better how materials behave during the color-change process, we’ll now take a closer look at the extruder screw and barrel, the adapter between the extruder and the head, and the die head itself.
Extruder design is one key factor. For example, a grooved barrel in the feed zone results in longer color change times than smooth-barrel feed sections. Design of the compression zone can also impact color changes, especially if liquid colors are involved. A mixing tip is often necessary for overall processing but might have a negative impact on color changes. And, of course, a worn screw or barrel won’t help achieve efficient color changes — rather, the opposite.
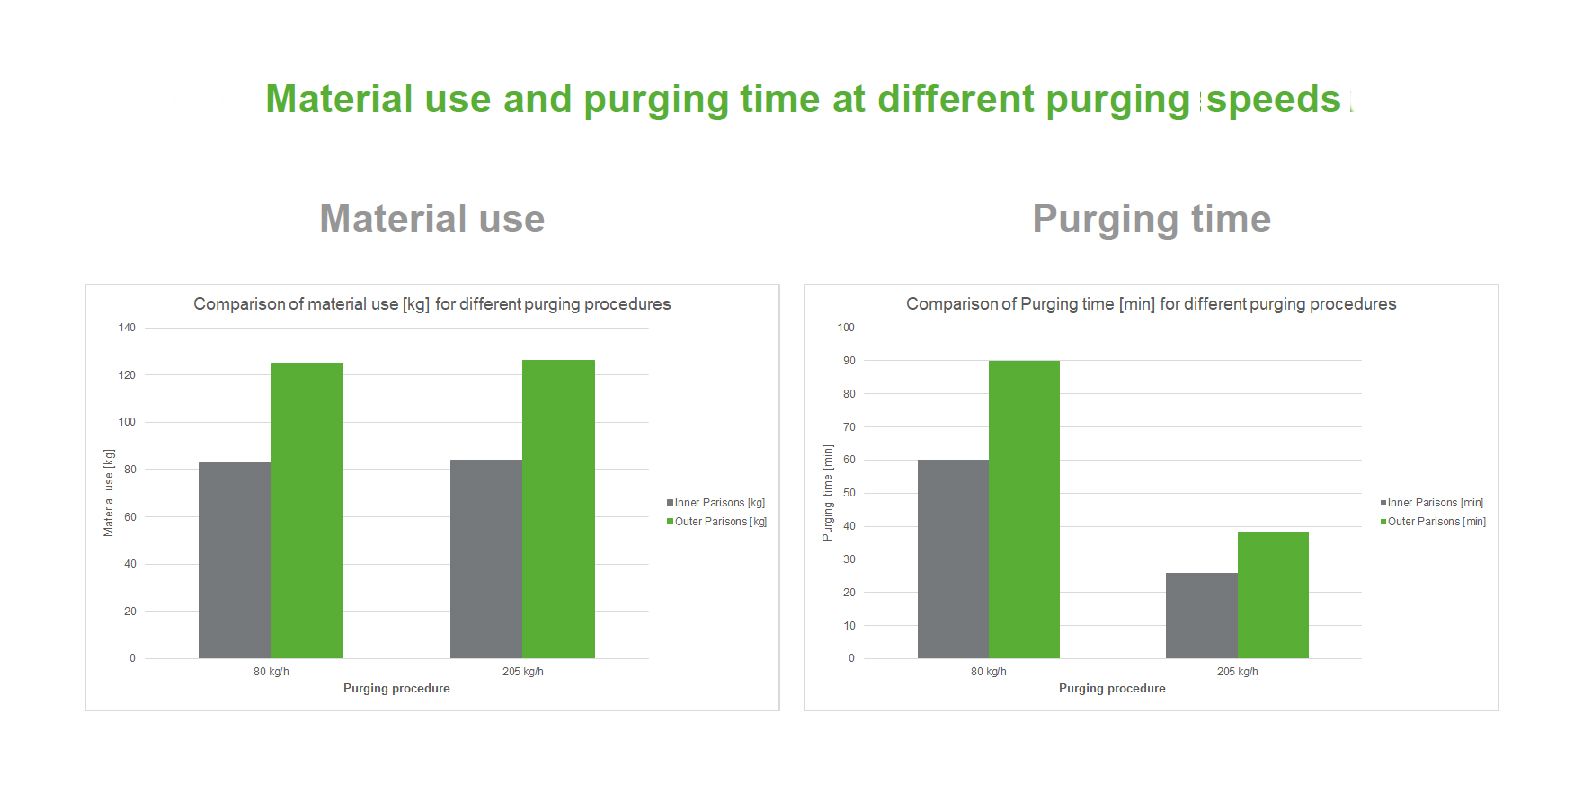
FIG 5 Trials with an eight-parison head showed that running the extruder rpm faster reduces purging time but has no effect on the total amount of purging resin required. Note that outer parisons took longer to purge and used more purge resin than inner parisons. Photo Credit: W. Müller GmbH
A basic principle is that removal of a certain amount of a color requires a certain amount of purge material passing through the system. So a higher throughput rate — highly dependent on screw design — leads to a faster color change. This was validated in lab trials, as shown in Figure 5. Experiments showed that purging an eight-parison head with high or low extruder speed used the same amount of purge resin overall, but the time to accomplish purging was less with faster extrusion.
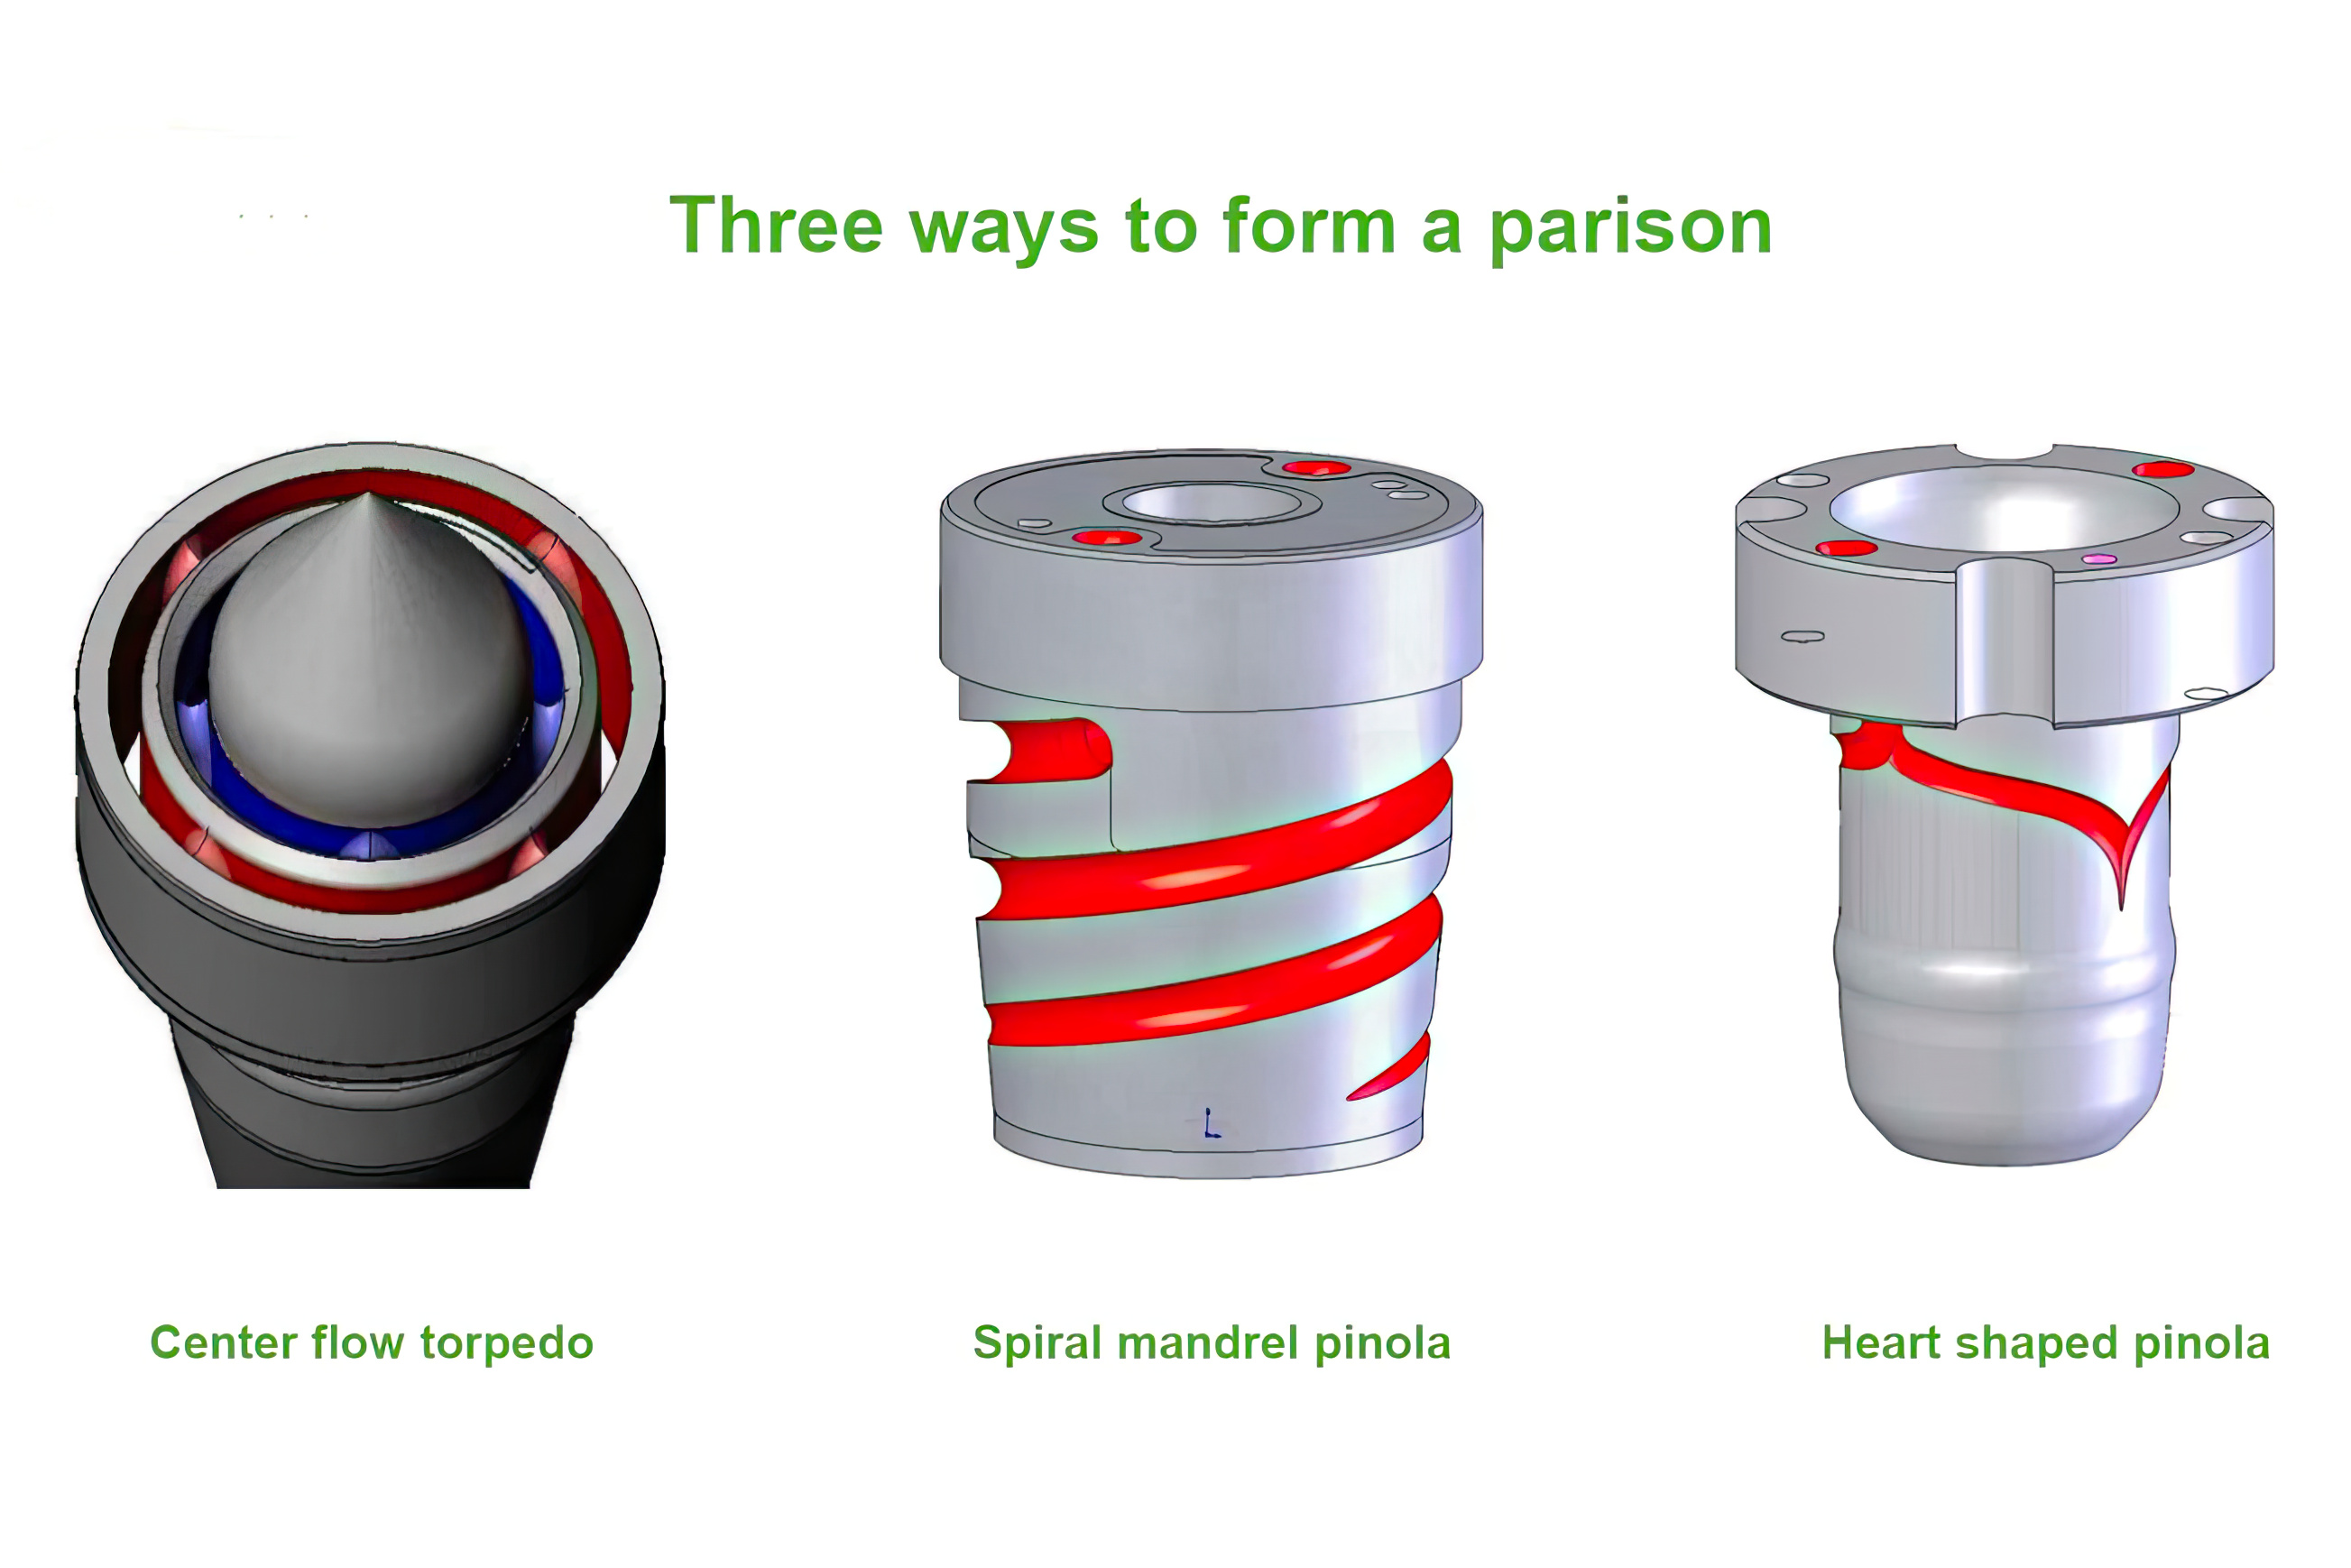
FIG 6 These three main ways to form a parison each have their pros and cons. The spiral-mandrel type probably offers the best balance of color-change speed, wall-thickness distribution and multilayer capability. Photo Credit: W. Müller GmbH
As for head designs, there are three main ways to form a parison (Figure 6):
• Center-flow torpedo. The key advantage of this design is there is no buildup of color residue, which generally makes this head type suited to the fastest color changes. Its disadvantages are the possibility of forming spider stripes with certain materials or temperature profiles. It is also less precise than other designs in terms of wall-thickness distribution, and it does not allow for multilayer capability.
• Heart-shaped pinola. This head design offers the widest range of throughput, as well as suitability to a wide range of resins, and it does offer multilayer capability. On the negative side, there is the risk of residual color remaining in the heart-shaped end of the head, which can extend color-change times.
• Spiral-mandrel pinola. This design provides a good distribution of color concentrate over the entire circumference of the pinola (mandrel), which is helpful in changing colors. It also provides excellent wall-thickness distribution and excellent performance in multilayer configurations. On the other hand, it is limited in throughput range and it imparts an orientation or twisting of the parison, which requires combining a spiral in one direction with a spiral in the other direction to compensate.
These differences emphasize the importance of discussing with your equipment supplier what is most important to your production goals in order to achieve the optimum balance of output rate, quality (wall-thickness distribution) and versatility or flexibility for different resins and applications.
In multiparison systems, the outer parisons may take longer than inner parisons to switch over cleanly to the new color.
Next, let’s look at what happens to the melt in the adapter and die head. A fundamental fact of plastic flow in a channel is that flow is faster and shear rates are higher in the center of the channel than at the edges near the channel wall. That has implications for purging the adapter between the screw and die head as well as the head itself, because colored material on the outer edges of the flow will take longer to purge because it moves slower and shear rates — which promote mixing — are lower in that region (see Figure 7).
FIG 7 Colored resin tends to stick to the outsides of flow channels, where the flow speed and shear rate are lowest. That means that color takes longer to purge from the outer edges of flow channels. This laminar flow segregation persists when distributors split to feed multiple parisons in the die head, causing the outer parisons to purge residual color more slowly than the inner parisons. Photo credit: W. Müller GmbH
Another consequence, in multiparison applications, is that flow rates and shear rates to the outer parisons are lower than to the inner parisons, so the overall color change time tends to be limited by the time to thoroughly purge the flow channels to the outer parisons. Lab trials used an eight-parison head, in which greater amounts of purge material and longer purging time were required for outer parisons than inner parisons (see Figure 5). This effect was visually evident during the trials, when the original color faded away faster in the inner parisons than in the outer ones.
This tendency of colored melt to “stick” to the outside of flow channels (such as in the adapter) means that the adapter must have a geometry that fits perfectly to the tip of the screw in order to achieve the desired self-cleaning effect (Figure 8).
FIG 8 Geometry of the adapter between extruder and die head must be designed for a perfect fit against the screw tip in order to maximize the self-cleaning effect and speed color changes. Photo Credit: W. Müller GmbH
What About Coex Systems?
Let’s take a typical three-layer coextrusion system with one extruder providing a thin inside layer of natural virgin resin; another extruder creating a thin outer layer of colored virgin resin; and a main extruder producing a thicker middle layer of recycled resin and perhaps reground trim scrap. The only layer that necessarily needs to be purged is the outer colored layer, so one option is to stop the other two extruders during the color change or to let those two extruders run slowly while purging the outer layer.
If regrind — which includes color — is included in the center layer, it may or may not require purging, depending on the customer, shape of the bottle, center-layer thickness and the colors being switched.
Close Cooperation Yields Best Results
It’s essential to discuss up front with the machinery OEM what is most important to your production, in order to achieve the optimum balance of fast color change and product quality — wall thickness distribution, for example.
What can the machinery supplier do to help you achieve this goal? For one thing, the flow-channel geometry must be right for the material. We conducted years of R&D in this area. The surface of the flow channels is also important — both the surface finish and the optimum coating on the metal. W. Müller, for example, uses a plasma spray coating of amorphous metal that penetrates the surface of the steel and reduces the tendency of plastic to stick to the metal. The coating can help make color changes up to 50% faster while adding modestly to the cost of the head. Figure 9 shows four trials of color change with and without the surface coating.
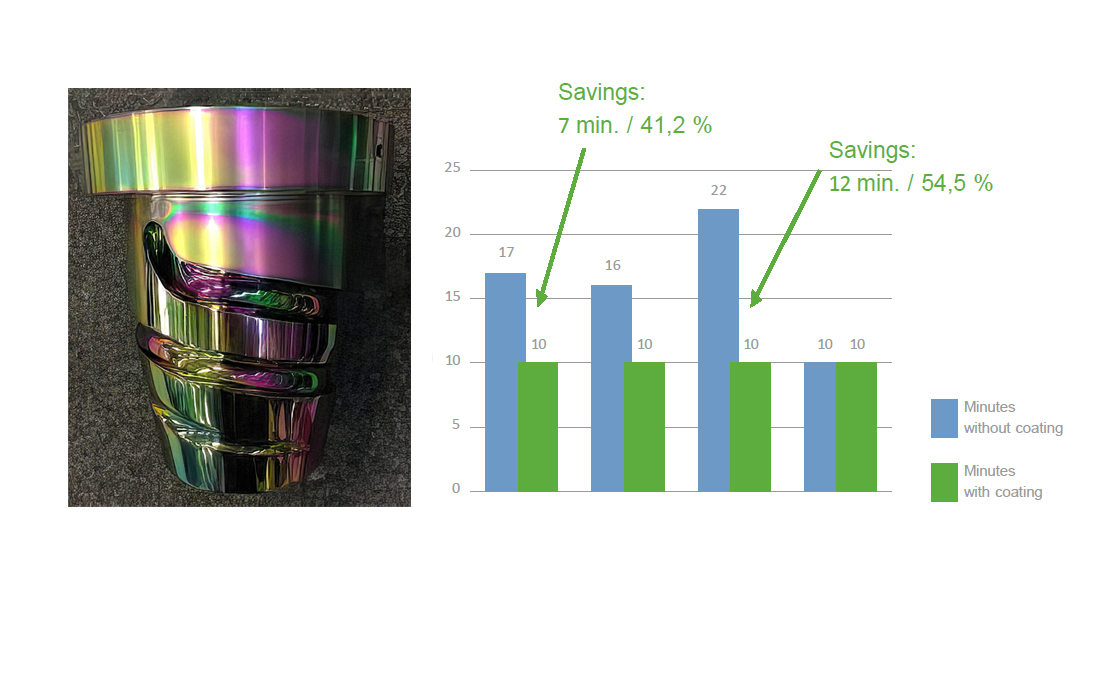
FIG 9 W. Müller’s plasma spray coating of amorphous metal onto flow channels of its die heads can significantly reduce color-change times, as shown in these four trials. Photo Credit: W. Müller GmbH

FIG 10 Dual hoppers like these help speed up color changes by allowing a quick switch of material feed to the second hopper without taking time to empty and clean the first hopper. Photo Credit: W. Muller GmbH
Besides metal coatings, equipment suppliers can offer other special features to facilitate color changes. W. Müller developed a MERC controller with an automatic purge program. It helps find the optimum extruder rpm for this operation and initiates auto shutoff of feed hoppers, among other functions.
In addition, W. Müller offers dual hoppers to save time on color changes (Figure 10). This way, the user can switch from one colorant hopper to another without having to clean out the old colorant from the hopper.
About The Authors
Andreas Kandt studied mechanical engineering at the Technical University of Berlin. He has worked for Bekum for 18 years in R&D and as managing director; for Kautex as managing director for about five years; for Davis-Standard as managing director for about 5 years; and for Hassia Packaging (today part of IMA Dairy and Food) for about five years. Since 2017 he has been director of business development at W. Müller GmbH in Germany. Contact a-kandt@w-mueller-gmbh.de; mullerheads.com.
Varinia Lück earned a bachelor’s degree in chemical engineering from Universidad del Valle de Guatemala and a master’s in product management from the University of Oulu in Finland. After internships at Colgate-Palmolive and A. Schulman (now LyondellBasell), Varinia joined W. Müller GmbH in 2018, where she serves as head of the Technology Center. She is responsible for R&D with a particular focus on circularity (using recycled materials and biomaterials), barrier technologies, color change and foaming. Contact lab@w-mueller-gmbh.com; mullerheads.com.


Related Content

Multilayer Solutions to Challenges in Blow Molding with PCR
For extrusion blow molders, challenges of price and availability of postconsumer recycled resins can be addressed with a variety of multilayer technologies, which also offer solutions to issues with color, processability, mechanical properties and chemical migration in PCR materials.
Read More
For Extrusion and Injection-Blow Molders, Numerous Upgrades in Machines and Services
Uniloy is revising its machinery lines across the board and strengthening after-sales services in tooling maintenance, spare parts and tech service.
Read More
Injection Foaming Tech Reduces Density, Increases Mechanical Properties
Based on an additive package custom-tailored to the application, Moxietec’s foaming technology promises stronger parts through consistent bubbles.
Read More
Running PET Flake? Here's How a Crystallizer Can Help
Crystallizers were designed and manufactured by many auxiliary equipment manufacturers in the 1970s with the mistaken belief that packaging-grade virgin PET would eventually become available to processors in amorphous, rather than crystalline pellet form.
Read MoreRead Next

Have You Considered the Sustainability Benefits of Liquid Color?
Add less pigment to the solid-waste or recycling streams, save energy, and reduce waste to landfill, among other advantages.
Read More
Run Lots of Colors? Time to Consider a Commercial Purging Compound
Processors who use commercial purging compounds will see a reduction in scrap levels, machine downtime and overall cost.
Read More
New Blow Molding Service Offerings from W. Müller
Several new aftermarket service packages are launched by W. Müller for extrusion blow molders.
Read More