
Installing, Removing and Cleaning Single-Screw Extrusion Screws
Removing the screw from the barrel is challenging, and improper removal can damage both components. Follow these steps to save time and money on screw installs, pulls and cleans.


Good preventative maintenance on single-screw extruders requires the periodic removal of the screw and the measurement of the outside diameter and overall inspection of the screw. Typically, the screw should be removed and inspected at least once a year or when the processing performance changes. This article provides a guideline for the safe removal and installation of screws.
New and rebuilt screws are inspected by the fabricator prior to shipment to the end user. Typically, every measurement on the screw fabrication print is checked. Moreover, the outside diameter (OD) at every flight is checked along with the overall straightness of the screw. Rarely does a screw get shipped to a customer that is out of specification or has surface blemishes. However, on rare occasion screws get shipped to customers with defects.


Installing Screws: Best Practices and Common Problems
When a new or rebuilt screw arrives, it should be inspected for blemishes and measured for channel depths, lengths and outside diameters. Typical outside dimensions and flight clearances as a function of barrel diameter were provided in the June 2023 issue of this magazine. When installing the screw into the barrel for the first time, a cold (room temperature) screw should always be installed into a cold and clean barrel. The barrel diameter will be the smallest at room temperature. The screw should slide into the barrel with little effort if the screw is at the correct diameter and without bends.
On several occasions, a new screw was inserted into a hot (processing temperature) and clean barrel. Since the barrel was hot, it had a diameter that was larger than the room temperature specification. If the screw has a manufacturing defect such as the OD is too large or a small local bend occurs, the screw may be able to be easily inserted into the barrel. When the screw heats up, it will increase in diameter. If the manufacturing error is large enough, the screw will become bound inside the barrel. Getting a bound screw out of a barrel will often damage both the screw and barrel. The disruption can cause long downtimes and lost production.
For example, a typical 2.5-in. diameter barrel will have an inside diameter of 2.506 in. at 250oC. The barrel when new and cold would have a diameter of 2.500-2.501 in. This 0.006-in. extra increase in the diameter can be enough to allow a screw with a small fabrication error to slide into the barrel.

FIG 1: A 2.5-in. diameter screw being pushed out of an extruder hot. The degraded resin (brown resin) at the flight edges was caused by Moffatt eddies. Source: Mark A. Spalding.
When the screw heats up, its OD will increase and can cause the screw to become bound inside the barrel. The bound screw can be very difficult to remove. Once a screw has been installed into a cold barrel and was determined to be free of defects, all subsequent installs can be done by putting the cold screw into a hot barrel.
Excessive force should never be used to install a screw. Years ago, a new 10-in. diameter screw was installed into an extruder. The screw slid into the barrel easily except for the last 5 in. That is, the screw could not be pushed into the barrel the last 5 in. Instead of pulling the screw out and inspecting for a fabrication error, the maintenance crew decided that it would push the screw all the way in by pushing the screw tip with a fork truck. The screw was bumped by the fork truck, and it was seated into the drive quill. The extruder was placed into production.
Excessive force should never be used to install a screw.
After many years of operation, plant engineers decided to switch the screw with a new high-rate screw. The old screw was pushed from the shank end using a medium-size hydraulic jack. The screw moved about 2 in. and became stuck. A larger jack was installed, and the screw was pushed out another 2 in. before it got stuck again. Finally, a very large jack was used to push the screw out of the drive quill. When the screw was out of the barrel, a large V-shaped scar was on the drive shank. There was also damage to the drive quill.
Only one person in the plant remembered that the screw was pushed into the drive quill using a fork truck years ago. Fortunately, the drive quill was able to be repaired so that the new screw could be installed. Plant personnel could not determine what caused the screw to bind in the drive quill. It could have been a bur or a high point on the shank, or even an error in the drive key.
In another scenario, a 120-mm diameter high-performance screw was designed for an injection molding process. During installation, both the screw and barrel were cold. The screw went in easily except for the drive spline. Unlike the previous example, the screw was removed and inspected. A fabrication error could not be identified. The maintenance crew placed bluing on the inside of the drive quill.
Next the screw was placed into the barrel and pushed into the quill. Bluing was transferred from the quill to the drive spline on the screw, revealing the high points on the spline. The screw was again removed, and small amounts of metal were removed where the bluing was located. After several iterations, the screw was easily installed into the barrel of the molding machine.
Removing and Cleaning a Screw the Right Way
Screws must be removed and cleaned periodically for inspection, troubleshooting and replacement. There are many variant procedures for removing a screw from an extruder or injection molding injection unit. In most cases, the extruder or injection machine should be operated at slow screw speeds with the hopper empty or the slide gate closed until resin stops coming out of the die. While hot, the transfer line and die are removed. Then the screw is pushed out of the barrel using a hydraulic pushing jack or a threaded push rod.
The screw should be pushed out about three to four diameters and the residual resin on the screw should be inspected for resin degradation, as shown by Figure 1. The degradation at the flight edges in this photograph was caused by extremely long residence times by the formation of Moffatt eddies. Moffatt eddies create a region that is stagnant, allowing time for the hot resin to degrade. For more details on Moffatt eddies and how to eliminate them, see the March 2025 issue of PT.
Steel tools should never be used to clean a screw as they may damage the base metal of the screw and the chrome plating.
Once the inspection on this short segment is finished, it should be cleaned using only brass tools, copper gauze, stearic acid and cotton cloth, as shown in Figure 2. After the segment is cleaned, another four to five diameters of the screw can be pushed out, and the process is repeated. The process should continue until the screw is completely out of the barrel.

FIG 2 Copper gauze, brass blade and a brass wire brush are needed for proper screw cleaning. The white container holds stearic acid flakes. Source: Timothy W. Womer.
With the barrel still hot, a brass brush the size of the barrel diameter should be wrapped with copper gauze, as shown in Figure 3. The gauze brush is then inserted into the barrel and is rotated using an electric drill. Stearic acid flakes can be sprinkled on the gauze to aid the cleaning process.
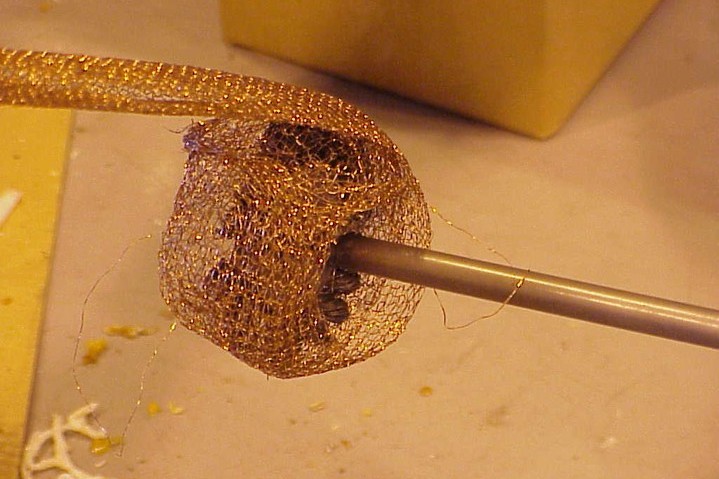
FIG 3 A brass wire brush wrapped with copper gauze used to clean the resin out of the barrel. Source: Timothy W. Womer
Steel tools should never be used to clean a screw as they may damage the base metal of the screw and the chrome plating. Moreover, resin should never be removed from a screw using a torch. The localized heating of the screw can change the grain structure of the base steel, decreasing the strength of the screw and potentially causing a bend. A photograph of a screw that was heated using an acetylene torch is shown in Figure 4. The circular regions were the targets for the torch.

FIG 4 This screw was heated using an acetylene torch during a cleaning process. The circular regions were the targets for the torch. Source: Timothy W. Womer.
Following the screw installation guide presented here could save a considerable amount time and costs by mitigating the chances of getting a screw bound in a barrel. Getting the screw out of the barrel can be a challenging process and can cause damage to the screw and barrel. Moreover, the lost production time can be costly, especially if product shipments are delayed.
ABOUT THE AUTHORS: Mark A. Spalding is a Fellow in Packaging & Specialty Plastics and Hydrocarbons R&D at Dow Inc. in Midland, Michigan. During his 40 years at Dow, he has focused on development, design and troubleshooting of polymer processes, especially in single-screw extrusion. He co-authored Analyzing and Troubleshooting Single-Screw Extruders with Gregory Campbell. Contact: 989-636-9849; maspalding@dow.com; dow.com.
Timothy W. Womer is a recognized authority in plastics technology and machinery with a career spanning more than 40 years and is a Certified Plastics Technician by the SPE. He has designed thousands of screws that have been used in all areas of single-screw plasticating. Before starting his own consulting company, TW Womer & Associates LLC, Womer worked in technical capacities for Xaloy, New Castle Industries, Spirex, Conair and NRM. He was elected to the Plastics Hall of Fame in 2012. Contact: 724-355-3311; tim@twwomer.com; twwomer.com.


Related Content

Why Are There No 'Universal' Screws for All Polymers?
There’s a simple answer: Because all plastics are not the same.
Read More
How to Select the Right Cooling Stack for Sheet
First, remember there is no universal cooling-roll stack. And be sure to take into account the specific heat of the polymer you are processing.
Read More
NPE2024 Wrap-Up: Sustainability Dominates Show Floor News
Across all process types, sustainability was a big theme at NPE2024. But there was plenty to see in automation and artificial intelligence as well.
Read More
How Compression Ratio Impacts Extruder Performance
Let’s investigate how compression ratio affects performance of an extruder processing LLDPE.
Read MoreRead Next

Follow These Purging and Preventive Maintenance Tips for Your Screws and Barrels
Processors can extend the life of equipment and improve productivity by coupling a preventive-maintenance program for their screws and barrels with routine use of chemical purging compounds..
Read More
How To Identify Resin Degradation in Single-Screw Extruders
Degradation can occur in many single-screw extrusion operations, and typically occurs due to minor design flaws in the screw. Here is how to track it down.
Read More
Troubleshooting Screw and Barrel Wear in Extrusion
Extruder screws and barrels will wear over time. If you are seeing a reduction in specific rate and higher discharge temperatures, wear is the likely culprit.
Read More


