The Importance of Hot Nozzle-Tip Mating Against a Cold Sprue Bushing
Done improperly, the result is a cold slug in the nozzle/sprue and a production stop. But there is a better way.
.jpg;width=70;height=70;mode=crop;format=webp)


Of all the issues in molding, one of the most irritating and time-consuming for processors is a plugged nozzle tip or stuck sprue. Literally hours are wasted daily in most shops.
The nozzle tip is the junction of the barrel and mold. It must be aligned and mate with the sprue bushing and seal to contain plastic pressures above 40,000 psi (2760 bar). The surfaces must mate perfectly with sufficient nozzle-touch pressure to ensure molten pressurized plastic goes into the sprue/mold and not anywhere else. Many of us have wasted hours cleaning nozzle leaks.


Sealing is not the only issue: We also have to deal with heat transfer from the hot nozzle tip to the relatively cold sprue bushing. It is metal-to-metal contact with a significant temperature difference (often ~300°F/167°C). This difference in temperature drives heat from the nozzle tip to the cold sprue bushing while also cooling the nozzle tip faster than its heater band can supply it. We have all fought resulting cold slugs or a plugged nozzle tip. Sometimes it breaks loose and ricochets off the stationary platen – a safety issue.
Our grizzled operator, whom I’ve dubbed Crusty Sr., understands this and responds by jacking up the temperature of the nozzle body to prevent cold slugs. This often fails and the next trick is to put a piece of cardboard as an insulator between the nozzle tip and sprue bushing. This gets things started, but few shots later it is another piece of cardboard and more scrap. It is a battle nobody wins. I am not a fan of this, since it is important to have a consistent cycle and uniform temperature for consistent parts.
Insulating the nozzle on a cold-runner mold is important.
This routine continues for many a production run. How many hours have you wasted on drooling, stringing or a tip clogged with unmelted polymer? All these problems are due to the nozzle transferring heat to the cold sprue. We can put a man on the moon but we have yet to find an answer to this problem that has been around for decades and costs huge profit and time losses for most molders.
Granted, this only applies to cold-runner molds, but that is a significant chunk of the molding market. What’s a processor to do? First, consultant and fellow columnist Jim Fattori developed a great product to address this.
Test out what a nozzle insulator will do to improve production. Try a simple “Nozzle Insulator” developed by Crusty Sr. It is easy to try out to prove this is a significant problem on your shop floor.

FIG 1 Insulator before use. (Photos: J. Bozzelli)
What is it and how does it work? See Figs. 1, 2 and 3.
If you would like to see what insulating the nozzle tip will do for your production on cold-runner molds here is a free deal! Send me a self-addressed stamped (one stamp) envelope (Injection Molding Solutions, 1019 Balfour St. Midland, Mich. 48640) and I will return it to you with four insulators to test free (offer available to the first 100 requests).
How many hours have you wasted on drooling, stringing or a tip clogged with unmelted polymer?
Use them like you used cardboard. (Do not tell me you never used cardboard … the torn corners on boxes give you away!) So try them out, without sprue break and taking all the appropriate safety precautions required by you and your shop: i.e., an appropriate nozzle (full-taper tip recommended), gloves, eye protection, face shield, empty barrel, etc. Use them at you own risk, and by sending the envelope you agree that I and my company – and Plastics Technology magazine/Gardner Business Media – are held harmless.
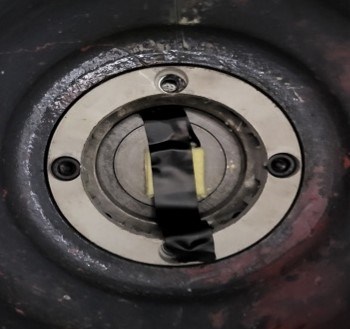
FIG 2 Insulator on sprue bushing.
After your trials, provide feedback to Plastics Technology at press@ptonline.com. Do these insulators indeed make a processor’s life easier and save production costs? Also, if possible, give us your best guess as to how much cold slugs, stuck sprues, etc. cost your company or plant per month. Does paying attention to this small piece of metal make you money?
Installation Procedure: Safety First!
Again, with all safety equipment required! Spray mold release into the sprue, then tape the insulator fabric to the sprue bushing, centering it on the sprue hole. Note: The first shot after installation will take about 10,000 psi plastic pressure to blow a hole in the insulator and the sprue might stick. Small fabric strands may hold onto the sprue, the fabric is that strong. Also do not try to cut the fabric – it will ruin the blade! After the first shot there should be no sprue sticking, normal or lower pressures, and no cold slug or initial spike in pressure upon injection ,etc. The fabric insulator does not melt or degrade and can be reused if kept clean.
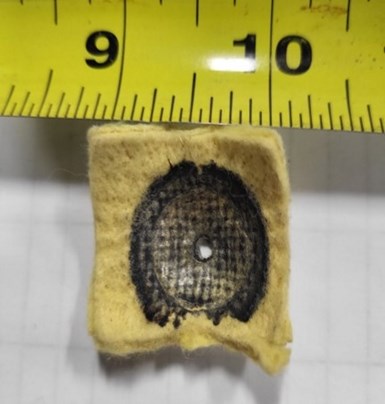
FIG 3 Insulator After Making Parts @ 550 oF (290 oC).
About the Author: John Bozzelli is the founder of Injection Molding Solutions (Scientific Molding) in Midland, Mich., a provider of training and consulting services to injection molders, including LIMS, and other specialties. E-mail john@scientificmolding.com or visit scientificmolding.com.
Related Content

Understanding Strain-Rate Sensitivity In Polymers
Material behavior is fundamentally determined by the equivalence of time and temperature. But that principle tends to be lost on processors and designers. Here’s some guidance.
Read More
How to Stop Flash
Flashing of a part can occur for several reasons—from variations in the process or material to tooling trouble.
Read More
The Strain Rate Effect
The rate of loading for a plastic material is a key component of how we perceive its performance.
Read More
Improve The Cooling Performance Of Your Molds
Need to figure out your mold-cooling energy requirements for the various polymers you run? What about sizing cooling circuits so they provide adequate cooling capacity? Learn the tricks of the trade here.
Read MoreRead Next

How to Prevent Nozzle Tip Leaks, Part 1
Instead of learning from your mistakes, stop making them in the first place.
Read More
How to Prevent Nozzle Tip Leaks, Part 2
Your very costly mold in that very expensive press is relying on the performance of a $20 nozzle tip that no one ever checks, and has a high probability of not doing its job. Stop learning from your mistakes and start learning how not to make them.
Read More
Time to Swap Out Those General-Purpose Injection Nozzle Tips
Still the standard in the industry, GP nozzle tips can cause a myriad of problems for molders. There are alternatives out there that should be examined.
Read More