
Make Every Shot Count: Mold Simulation Maximizes Functional Parts From Printed Tooling
If a printed tool only has a finite number of shots in it, why waste any of them on process development?

Share
Read Next


Injection molding simulation software has long been used to optimize a mold design prior to its fabrication. Now Moldex3D is working with additive manufacturing technology supplier Fortify to optimize the process that will be run on the printed tooling, maximizing its limited production run.
This is particularly useful when rapidly printed tooling is being used to expedite product design, and getting high quality parts in your hands quickly is the primary objective. As Moldex3D frames the situation: “For short-run quantities where defect-free parts are more important than a perfectly centered process, these starting parameters may be all you need.”


Moldex3D and Fortify acknowledge that under certain conditions hundreds and possibly thousands of parts could be molded from a printed tool, but it is much more common to mold 50 to 200 components from such a mold. The challenge of using a printed tool then becomes the fact that molding process development alone can take 10-20 shots before good parts come off the press. “When process development for a tool that is estimated to last 50 shots takes 20 shots to get a defect-free part, you are nearly 50% through the mold’s life before you have a representative part,” Moldex3D says.
To showcase the potential benefits of utilizing Moldex3D to apply simulation for the optimization of a tool design and process creation, the company created a test part design along with Fortify.
The companies settled on a complex part that could lead to defects if a good process was not utilized. The part design applied featured through-holes and ribs, with varying wall thicknesses — design aspects that can make defects such as weld lines, sink and hesitation highly possible.
Once the part design was finalized, the participants needed to choose the parting line, gate locations and orientations. To up the challenge for Moldex3D in creating a robust process for the part, the parting line was placed around the base edge of the part, while the gate was located in the bottom corner, leaving the largest boss a relatively long distance from the start of flow — a scenario that can often result in sinks.
Fortify notes that the molding tenets typically applied to its molds call for low injection pressure and velocity, challenging the simulation software to completely fill the part without sinks or visible weld lines while remaining within the recommended process parameters.
Moldex3D’s Scott Sazin says that once the design was finalized, the mold files, molding resin (Vydyne 47HT nylon 6/6) and the machine parameters for the 30-ton Nissei NEX-IV were all sent to Moldex3D to perform its benchmark simulation. Moldex3D also considered the thermal properties of Fortify’s DT tooling resin, as well as the 30-second air blast to cool the face of the tools which is part of Fortify’s molding process. Moldex3D ran four different processes with varying fill times, choosing the one with shortest fill time and lowest residual stress, automatically generating a report for Fortify prior to it running the tool in the real world.
The simulation’s proposed processing parameters included injection pressure, cooling time, fill time, pack pressure and packing time, all of which was compiled into a process sheet.
Prior to simulation, this same part had been molded in ResMart POM 27 and required about 2 hours of process development time. Applying Moldex3D process settings, Fortify achieved a full part without any visual defects in the second shot. Ultimately, the simulation saved nearly 25 shots on the lifetime of the mold and almost 2 hours of process development time.
“Fortify advises all of our customers on the value of pairing Moldex3D with Fortify’s printed molds,” Fortify’s Ben MacDonald says. “Any contract molder that is using Fortify’s printed molds should also be using Moldex3D to extract the most value out of each mold tool.”
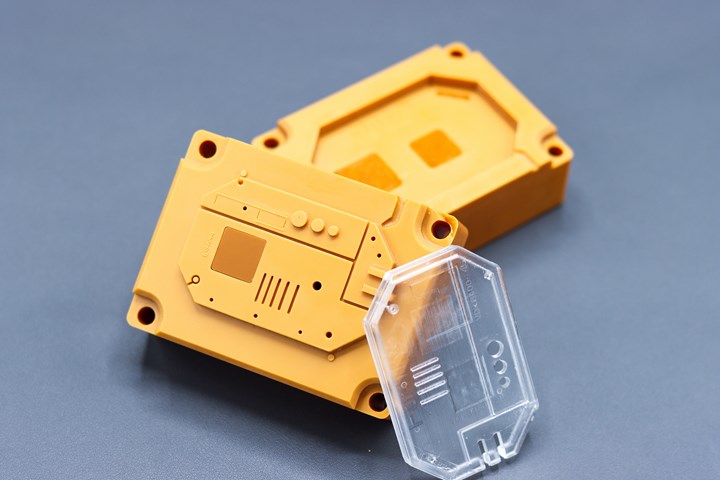
Moldex3D simulation was used to determine an optimized molding process for this injection molding tool printed by Fortify. Photo Credit: Fortify


Related Content

How 3D Printing Supports Toolmaking Workforce at This Multiscale Molder
At more than a century old, General Pattern has seen multiple evolutions in its business — the latest of which is the embrace of additive manufacturing technologies for mold tooling and beyond.
Read More
The Connector Conundrum: 3D Printed Mold Tooling’s Role in Innovation
ReelView Fishing faced an electronics obstacle in the development of its new technology for underwater video. Additive manufacturing for moldmaking allowed for the speed necessary to iterate to a solution. How inventors and invention will benefit from new ways of obtaining production-ready tooling.
Read More
Additive Technologies for Injection Mold Tooling Ride Tailwinds
NPE2024: Lowering barriers to additive manufacturing adoption in toolmaking.
Read More
420 Stainless Steel Now Qualified With TrueShape 3D Printing Technology
NPE2024: Mantle's additive manufacturing technology is designed for precision tooling.
Read MoreRead Next

Accelerating New Product Development with Quick Turn Tools: Raising the Bar of 3D Printed Tool Performance
This demo will showcase Fortify's methods used at their in-house molding center to back up these claims - including competitive benchmarking.
Read More
Printing Platform Allows Introduction, Orientation of Functional Fillers
A 3D printing startup technology’s ability to evenly disperse functional additives to photopolymers and align reinforcing fibers within the resin during cure is drawing moldmaking interest.
Read More
Injection Molding: Simulation Factors in Material Compression and Machine Response During Injection
Moldex3D version R17 increases prediction of filling speeds and pressures.
Read More