Should You Profile Injection Velocity?
Injection Molding Know How
If you can get by with one velocity, use only one, because fill time is easier to reproduce, and it is easier to set up the process.
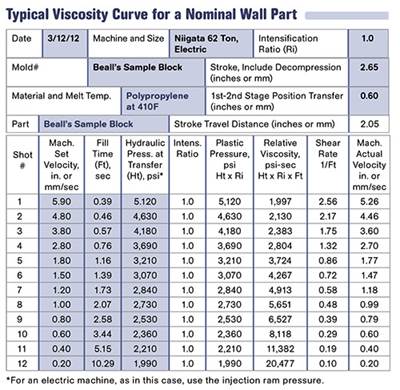
In my last column I reviewed the viscosity curve and detailed some of the information that can be gleaned from the data. The objective is to come up with a practical fill time—as opposed to guessing—based on data similar to mold-filling analysis. One of the side benefits of doing this is that one obtains the necessary data to determine if part-filling injection velocity should be profiled. Most machines today have between 5 and 10 stages of injection, but don’t use them unless necessary. “To profile or not to profile” should be a data-based decision.
My strategy is: Keep it simple. If you can get by with one velocity, use only one, because fill time is easier to reproduce, and it is easier to set up the process.
Some machines profile speed by percentages or in 10 equal segments. Those are nightmares to set up. Profiles must be done properly by position or volume. This is critical if you want to reproduce the setup on a machine with a different size barrel.
Some 95% of the machines that I evaluate are out of calibration, or drift in calibration, for velocity. So you need to duplicate fill times and not machine settings.
In a hydraulic machine, there is no brake and inertia may override valve moment, especially during deceleration. Electric machines do have a brake, but how well does it work? Imagine that you can move a throttle on a speedboat 10 times within 10 meters (~100 ft); but will the boat respond? The same principle applies to injection.
My strategy is: Do not profile unless you have to. Generally about 80% of your jobs will need only one velocity. How do you tell which ones? The parts made while doing the viscosity curve provide the answers. They will also tell you how many profile steps and what speeds you need and at what position/volume you need to change injection rate.
If you have done the viscosity curve correctly, you have eight to 12 short shots that cover the entire velocity range for your machine. Line them up from the fastest to the slowest injection rate, all with the same orientation—e.g., cosmetic side facing you. Inspect each part for cosmetics, warp, blush, jetting, burns, flash, or other problem. Ignore the size changes as those are due to the momentum or changeover issue (remember the no-brake discussion above). This sequence should show the influence of injection velocity on the part. For example, jetting may be seen at the high injection rates but disappear at slower injection rates.
Before I slow down due to jetting, burns, flash, etc., I try to fix the tool. Why not process around the problem, you ask? Well, your job depends on your company making a profit margin. For jetting, flash, and burns, your process fix will be to slow the injection velocity. That adds to cycle time. You cannot take it off the second stage, screw recovery time, cooling, or clamping time. Those were already optimized, so how could you speed them up? (If you can speed them up they were not optimized at the start.) If cycle time goes longer, profits get squeezed.
Take flash as an example. At slow injection rates and longer fill times, the viscosity of the plastic thickens dramatically, so you are fixing flash by forming a gasket around the parting line. So you can slow the injection rate and your flash will go away, but how much time did you add to the cycle?
Jetting, burns, and flash are tool problems, so fix the tool and don’t slow down injection. Remember, we are talking about profiling, not necessarily speed. If the part needs a long fill time, use one slow velocity. I am not saying you must have short fill times.
One problem that will cause me to slow down and suffer the consequences is a blush or some other cosmetic issue that nobody has any idea how to fix. Your sequence of test parts will show at what injection rate the blush is present and at what speeds it disappears. Use the highest velocity that does not give you the problem. If blush arises early in filling the mold, use this speed until you are past the problem. Correlate the flow front’s position after the problem is past and you have the position at which you can increase velocity. Two or three velocities should be all you need, not 10.
You have to worry about other machines in your shop that may run this mold. Can they reproduce this sequence of speeds and fill time? You do not want to limit scheduling so that a certain mold can only be used in one machine. Most of the time I have to profile is because of a tool or design problem. If possible, fix the tool.
Related Content
Why (and What) You Need to Dry
Other than polyolefins, almost every other polymer exhibits some level of polarity and therefore can absorb a certain amount of moisture from the atmosphere. Here’s a look at some of these materials, and what needs to be done to dry them.
Read MoreHow Much L/D Do You Really Need?
Just like selecting the extruder size and drive combination, the L/D should be carefully evaluated.
Read MoreHow to Set Barrel Zone Temps in Injection Molding
Start by picking a target melt temperature, and double-check data sheets for the resin supplier’s recommendations. Now for the rest...
Read MoreA Simpler Way to Calculate Shot Size vs. Barrel Capacity
Let’s take another look at this seemingly dull but oh-so-crucial topic.
Read MoreRead Next
Understanding Polymer Flow: Interpreting the Viscosity Curve
Take the time to do the viscosity curve on new molds. You will learn more in that hour than many learn in years about the process for this tool.
Read MoreTroubleshooting Screw and Barrel Wear in Extrusion
Extruder screws and barrels will wear over time. If you are seeing a reduction in specific rate and higher discharge temperatures, wear is the likely culprit.
Read MoreHow Polymer Melts in Single-Screw Extruders
Understanding how polymer melts in a single-screw extruder could help you optimize your screw design to eliminate defect-causing solid polymer fragments.
Read More.jpg;width=70;height=70;mode=crop)
