
Take Good Care of Your Extrusion Pressure Transducers
Eight tips on installing and maintaining melt-pressure sensors in your extruder will help them last longer and give you fewer problems.


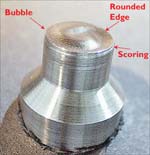
Damage such as a bubbled diaphragm, rounded edges, and scoring are signs of a hole machined too small for the transducer.
Galled threads may result from screwing a transducer into a mounting hole with incorrect thread size. An improper seal is likely to result, compromising safety and accuracy.
Melt-pressure transducers are used to improve extruder output and melt quality, improve production safety, and protect your machinery. Meeting product quality specifications such as part dimensions and surface finish with minimal material waste requires maintaining optimum processing pressure during production.
Transducers are sensitive components that are easily damaged if not installed and maintained correctly. Following a few simple guidelines will help ensure the longevity of your sensors and enable you to get accurate, reliable measurements.


Why sense melt pressure?
Melt-pressure instrumentation on an extruder can range from a single transducer measuring one pressure point to a series of transducers measuring the entire process and tied to instrumentation that will record data, sound an alarm, give warnings to take corrective actions, and relay information to a process-control system.
Stable output with reduced scrap and material waste is maintained by pressure transducers at the die entrance in conjunction with a pressure control device. Pressure measurements across a screen pack and melt pump are also important for safety and optimum performance.
A melt transducer downstream of the screen pack will alert operators if flow to the die is restricted, while one upstream of the screen pack will warn of a high-pressure situation that may produce excessive wear to the screw’s thrust bearing. For processors using melt pumps, measuring both inlet and outlet pressures ensures constant melt flow at the die and signals any restriction in melt flow that could damage the pump.
Tip #1: Mount them correctly
Damage to a pressure transducer is commonly caused by its installation in an improperly machined hole. In forcing a transducer into a too-small or eccentric hole, the transducer diaphragm may be crushed and the instrument will not function.
Tool kits available for machining the mounting hole will help to make sure the holes are properly sized. A mounting torque of 100 to 200 in.-lb (for 1/2-20 UNF threads) is essential to form an adequate seal, but excessive mounting torque will cause seizing. To prevent seizing, apply a high-temperature anti-seize compound to the transducer threads prior to installation. Transducers installed at a mounting torque above 500 in.-lb will be difficult to remove even when anti-seize compound is applied.
Tip #2: Check hole thread size
Abrasion from screwing a transducer into a mounting hole with an incorrect thread size will damage the instrument’s threads. This may prevent a tight seal, resulting in melt leakage, and the instrument will not function properly or safely. Correct dimensions for the mounting hole must be used to avoid thread galling. (The threads are generally the industry standard of 1/2-20 UNF 2B.) A mounting-well gauge plug should be used to verify that the mounting hole is correctly machined and cleaned.
Tip #3: Keep mounting holes clean
It is important to keep transducer mounting holes clean and free of any plastic build-up. Before an extruder is cleaned, all of the transducers should be removed from the barrel to avoid their being damaged. When they are removed, plastic is likely to flow into the mounting holes and harden. If this plastic residue is not removed, extensive sensor tip damage will result when the transducers are re-inserted.
A cleaning tool kit can be used to remove the plastic contamination. But note that repeated cleaning may produce “too deep” holes and result in damage to the transducer tip. If this occurs, spacers should be used to raise the transducer.
Tip #4: Select a good location
Transducers may be located in the barrel, before a screen changer, before and after a melt pump, or in the die. When a transducer is positioned too far upstream in the barrel, unmelted pellets may abrade the transducer tip, resulting in damage. If a transducer is positioned too far back in the mounting hole, a stagnant pool of melted plastic will build up between the transducer tip and the screw flights. Over time, this plastic will degrade to carbon, which will prevent transmission of an accurate pressure signal. On the other hand, if the transducer extends too far into the barrel the screw flights can shear off the sensor tip.
Tip #5: Clean with care
All the transducers should be removed before cleaning an extruder barrel with either a wire brush or special cleaning compounds. Either one of these can ruin the transducer’s diaphragm. The transducer should be removed while the barrel is hot and its tip wiped clean with a nonabrasive cloth. The transducer hole should be cleaned at the same time with a cleaning drill and guide sleeve.
Tip #6: Keep transducers dry
Although a standard transducer’s electronic circuitry is designed to withstand the rigors of the extrusion process, most transducers are not watertight and will not operate when wet. Make sure there are no leaks in the water-cooling jackets on the extruder barrel, which could damage the transducer. If you know that the transducer will be unavoidably exposed to water or moisture, specify watertight transducers.
Tip #7: Avoid cold starts
Both the transducer and extruder can be damaged if the extruder is not brought up to operating temperature before production begins. A sufficient “soak time” must be provided for the plastic to go from solid to molten state. In addition, if a transducer is removed from a cold extruder, material might adhere to the transducer tip, causing the diaphragm to tear off. Before removing the transducer, make sure the barrel is warm enough that any plastic present will be soft.
Tip #8: Don’t overpressure it
Even though transducers are designed to withstand 50% overpressure (in excess of the rated maximum), avoid risk by making sure to use a model designed for your range of extrusion operating pressures. A good rule of thumb is to use transducers that are built to withstand twice the rated pressure in your process. If so, the extruder would have to run at an extremely high (and unsafe) pressure level for the transducer to fail.
Douglas Joy is v.p. of marketing for Dynisco Instruments. He can be reached by e-mail at djoy@dynisco.com.


Related Content

How to Configure Your Twin-Screw Barrel Layout
In twin-screw compounding, most engineers recognize the benefits of being able to configure screw elements. Here’s what you need to know about sequencing barrel sections.
Read More
10 Ways to Improve Twin-Screw Compounding Performance
There are many techniques known to operators and plant engineers for increasing the performance of a twin-screw compounding extruder.
Read More
LFT-D Thrives in Automotive and Other Durables
Teijin Automotive acquires its 10th direct long-fiber thermoplastic system as demand for this technology soars.
Read More
More Than a Compounder: They Have the Science to Create New Custom Materials
Insight Polymers & Compounders leverages its expertise in polymer chemistry to develop next-generation materials.
Read MoreRead Next

Advanced Recycling: Beyond Pyrolysis
Consumer-product brand owners increasingly see advanced chemical recycling as a necessary complement to mechanical recycling if they are to meet ambitious goals for a circular economy in the next decade. Dozens of technology providers are developing new technologies to overcome the limitations of existing pyrolysis methods and to commercialize various alternative approaches to chemical recycling of plastics.
Read More
How Polymer Melts in Single-Screw Extruders
Understanding how polymer melts in a single-screw extruder could help you optimize your screw design to eliminate defect-causing solid polymer fragments.
Read More
Lead the Conversation, Change the Conversation
Coverage of single-use plastics can be both misleading and demoralizing. Here are 10 tips for changing the perception of the plastics industry at your company and in your community.
Read More