Part 1: Heat Deflection Temperature vs. Dynamic Mechanical Analysis
Does the industry need a better way of reporting the temperature-dependent behavior of plastics? With DMA, it already has one. But it’s been glacially slow to catch on.
Twenty years ago, a session at the Society of Plastics Engineer’s annual technical conference (ANTEC) was devoted to reviewing standard methods used to measure plastic properties that are customarily provided on a material data sheet. The objective of the session was to scrutinize the way we have always done things and propose alternative approaches where appropriate. The proceedings were published as a standalone work and the presentations made the rounds during that year to other organizations, including the Society of Automotive Engineers (SAE).
I made a presentation in that session devoted to the property of deflection temperature under load (DTUL), also known in the industry as the heat deflection temperature (HDT). In that paper I suggested that the industry needed a better way of reporting the temperature-dependent behavior of plastic materials. The alternative method I proposed is known as dynamic mechanical analysis (DMA).
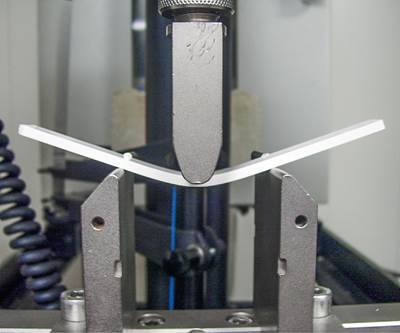
Twenty years later, questions are still being posted on various industry sites about the relative utility of HDT vs. DMA. Most of the answers to these questions suggest a lack of familiarity with DMA and a comfort level with the way we have always done things--which, given the stakes, is somewhat disturbing. The test for HDT was developed in the early years of plastic testing and it is not difficult to see how it would have been considered useful 40 or 50 years ago. If there is an interest in identifying a temperature range where a material might fail, placing a beam of that material under some type of load and then raising the temperature until the material softens or melts appears to make sense.
Little was expected of plastic materials at that time. The concept of plastics as engineering materials was just beginning to enter the conversation within the industry and the general public still thought of these materials as suitable only for toys, straws, and low-end housewares, despite the fact that nylon and polyester were well established and polymers like acetal, polycarbonate and polysulfone were coming into their own. Today we make parts for medical devices, cars and trucks, and the aerospace industry. Metal replacement occurs often; and even applications that were pioneered in the 1960s, such as plastic gears, are achieving greater precision and higher power ratings than were considered achievable even 10 years ago.
With this increased sophistication, it would be expected that engineers and designers would need a more complete picture of the temperature-dependent behavior of plastic materials. But almost all the information available on the effects of elevated temperatures remains limited to a measurement of HDT. The problem with this narrow view of polymer behavior is that very few engineers and designers understand what this test is measuring.
I once received a part drawing that called out a particular grade of flame-retardant ABS. A note on the drawing stipulated that the part was to withstand continuous exposure to a temperature of 190 F (87 C). The requirement was unrealistic, particularly because the time frame associated with “continuous” was not defined, and the number looked suspiciously familiar. A check of the data sheet showed that this temperature was the published HDT. It took a long conversation to explain to the engineer who had written the requirement that the HDT could not be treated as a representation of long-term elevated-temperature performance.
Like most properties provided on a datasheet, HDT defines what does not work; it tells us nothing about what a material can do. This was stated very plainly by a representative from a material supplier many years ago when he told attendees at a technical session, “Just remember, if there is a number on the data sheet, something bad happened at that point.” Tensile strength is quoted at yield or at break, outcomes that we never want to experience in the real world. Impact resistance provides the energy needed to break the test specimen. And HDT defines the temperature at which a molded test specimen of a very specific geometry undergoes a certain degree of bending when placed under a given stress.
The stresses used under the ASTM protocol are so low as to be laughable: 66 psi (0.455 MPa) and 264 psi (1.82 MPa). A few months ago, I received a call from a university professor who had been asked by a client to perform the HDT test. He was unfamiliar with the procedure and when he calculated the amount of force that would be needed to achieve the required stress, the value he obtained was so low that he was convinced he had made an error. But he had not made a mistake; the stresses associated with the test are ridiculously low. I routinely see finite-element analysis (FEA) plots that show maximum stresses of 3000-5000 psi (20-35 MPa). What possible relevance can measurements of elevated-temperature performance have when they are made at stresses that are less than 10% of those at which we plan to use our parts? What would we obtain from an HDT test performed at these higher stress levels?
The folks at ISO have attempted to inject a little reality into the test. ISO 75, the method that corresponds to ASTM D 648, calls out a third stress level of 1160 psi (8.00 MPa). However, it has been slow to catch on. It is not hard to see that as the stress level associated with the HDT test increases, the temperature at which failure occurs will decrease. The magnitude of this decrease will depend greatly upon the material being tested, for reasons that will become evident as we fill in the picture with additional data. But as an example, the HDT of a 15% glass-fiber reinforced nylon 6 is measured at approximately 400 F (205 C) under a stress of 264 psi. At 1160 psi the value will decline to approximately 175 F (80 C).
There is an obvious reluctance on the part of material suppliers to start publishing the lower values, particularly since they know that many people who read data sheets do not look at the fine print that defines the test conditions. In addition, almost all unfilled materials would fail at room temperature under this higher stress. If a test designed to measure elevated-temperature performance produces immediate failure at room temperature in thousands of materials when realistic stresses are applied, it raises questions about the utility of the test in general.
So why do we continue to do it? The simplest answer is that we have always done it that way. Or perhaps the industry is unsure of what to replace the test with. As is the case with almost all of the values on a data sheet, they represent points on a curve. Tensile yield strength is a point on a tensile stress-strain curve. The impact resistance is a point on a plot of collected energy over the duration of the impact test. And the HDT is a point at which the modulus of the material being tested declines to a specific point. In an era when we aspire to replace aluminum and steel, the obvious question is, why not just provide the curve and let the engineers find the point that is of interest to them for their applications? In our next article we will do just that.
ABOUT THE AUTHOR Mike Sepe is an independent, global materials and processing consultant whose company, Michael P. Sepe, LLC, is based in Sedona, Ariz. He has more than 40 years of experience in the plastics industry and assists clients with material selection, designing for manufacturability, process optimization, troubleshooting, and failure analysis. Contact: (928) 203-0408 • mike@thematerialanalyst.com.
Related Content
How Do You Like Your Acetal: Homopolymer or Copolymer?
Acetal materials have been a commercial option for more than 50 years.
Read MoreThe Effects of Time on Polymers
Last month we briefly discussed the influence of temperature on the mechanical properties of polymers and reviewed some of the structural considerations that govern these effects.
Read MoreThe Fundamentals of Polyethylene – Part 2: Density and Molecular Weight
PE properties can be adjusted either by changing the molecular weight or by altering the density. While this increases the possible combinations of properties, it also requires that the specification for the material be precise.
Read MoreThe Fundamentals of Polyethylene – Part 1: The Basics
You would think we’d know all there is to know about a material that was commercialized 80 years ago. Not so for polyethylene. Let’s start by brushing up on the basics.
Read MoreRead Next
Cycle Time: Science vs. Rules of Thumb, Part 1
What temperature must the polymer reach so the part can be ejected from the mold? Here, more than for any other variable, ‘rules of thumb’ unfortunately prevail.
Read MoreAdvanced Recycling: Beyond Pyrolysis
Consumer-product brand owners increasingly see advanced chemical recycling as a necessary complement to mechanical recycling if they are to meet ambitious goals for a circular economy in the next decade. Dozens of technology providers are developing new technologies to overcome the limitations of existing pyrolysis methods and to commercialize various alternative approaches to chemical recycling of plastics.
Read MorePeople 4.0 – How to Get Buy-In from Your Staff for Industry 4.0 Systems
Implementing a production monitoring system as the foundation of a ‘smart factory’ is about integrating people with new technology as much as it is about integrating machines and computers. Here are tips from a company that has gone through the process.
Read More
.jpg;width=70;height=70;mode=crop)






.png;maxWidth=300;quality=90)


