
How to Get Rid of Bubbles in Injection Molding
First find out if they are the result of trapped gas or a vacuum void. Then follow these steps to get rid of them.
.jpg;width=70;height=70;mode=crop;format=webp)


One of the top causes of cosmetic rejects in molded parts is bubbles. This troublesome part defect not only results in appearance problems but impairs physical properties as well. Bubbles are a common occurrence and are often difficult to resolve.
In troubleshooting bubbles, many molders make the mistake of guessing at what the bubbles are, and then immediately start adjusting process parameters to eliminate them. I urge you to resist the temptation to start tweaking, and start by defining what the bubbles actually are.


There are only two possibilities:
1. Trapped gas, which includes air, moisture vapor, volatiles from the resin, or decomposition gases from the polymer or additives.
2. Vacuum void.
It is important to determine which type of bubble your part has, and what the root cause might be. Determining bubble type will allow you to pinpoint the source and determine your next course of action to eliminate the problem. How do you test to determine if it is gas or a vacuum void? Many claim (as I once did) that you can tell by the shape, location, or some other characteristic of the bubble or bubbles. But you can be fooled easily by this approach. There is a simple test you should use instead. It takes less than 15 minutes but requires a little patience to conduct.
It’s important to determine which type of bubble your part has, and what the root cause might be.
Test your part by gently warming the part area containing the bubble or bubbles until it softens. I emphasize gently because of the tendency of some operators to pick up the nearest torch and aim it at the part. Plastics do not quickly transfer heat through the nominal wall, so our friend with the torch will likely set the part on fire.
Instead, use a heat gun or something similar. Then as you gently warm the area of the part where the bubble is, the bubble should change form. If it is a gas bubble, the gas will warm up and expand, raising the surface, and often will pop as the part surface softens. If there is no air in the bubble and it’s a vacuum void instead, the bubble will collapse due to the atmospheric pressure pushing on the softened surface of the part. Now you know more of what the problem is.
There are some conditions required for this test to work. Ideally, find a bubble at least 3 mm (about 0.125 in.) or larger in diameter and make sure the part is no more than 4 hr old. It is possible for the bubble to start out as a void, but over time air migrates through the plastic and the void becomes a gas bubble. That is perhaps hard to believe, but during my last public seminar the class and I were treated to some striking evidence.

On quick inspection you might assume this bubble is trapped gas.
Check out Figs. 1, 2, and 3.
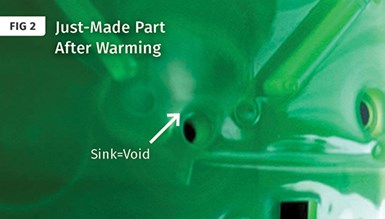
Tested a few minutes after molding, the defect now looks like a sink.
Figure 1 is the part before heating. Figure 2 is a part tested a few minutes after molding and Fig. 3 is a part tested 16 hr after molding. In Figure 1 you can see the bubble; it looks like a gas bubble, right? Most would assume so. Figure 2 shows the part after testing, and you can now see a depression or sink.
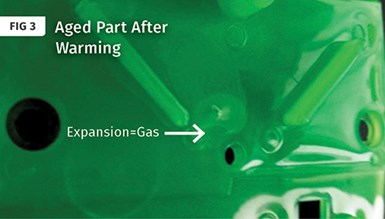
Some 16 hr later, the bubble has expanded. It turns out it was not a gas or air bubble, but a vacuum void.
Figure 3 is a part tested after 16 hr, and you now see the bubble expanded. Despite appearances, it was not originally a gas or air bubble but a vacuum void, as the freshly molded part provided a sink upon warming.
Trapped Gas
Let’s start our troubleshooting discussion assuming your test proved that it was indeed a gas bubble—that is, the bubble expanded and even made a pop when it burst. Gas bubbles may stem from flow-front issues, such as converging fronts, jetting, or mold/machine problems such as non-vented core pins, poor venting (try vacuum venting), too much decompression, or resin degradation due to overheating or long residence times. The gas may appear from water vapor, volatiles from the resin, or decomposition byproducts. Air trapped in ribs or non-vented projections off the nominal wall will be pushed out as the part fills or packs, leaving a trail of bubbles. Determining where the gas is coming from is more important than knowing the composition of the gas, in most cases. There is no one simple test to find out.
The first step in the procedure is to take off hold or second stage by adjusting the hold pressure down to a very low number and see if the bubbles are still there. If so, at least you don’t have to worry about the parameters involved with second stage. Assuming you still see bubbles, the next check is to learn the filling pattern to determine if the gas is air trapped upon filling the part.
With second stage off and making a 99% full part by volume, do a short-shot study. That is, decrease the shot size from 99% full to 5% full by 10% increments. Do not start short and increase shot size, as you may get a different flow pattern. In addition, this test requires the process to be velocity controlled for first-stage injection. If the first stage is pressure limited, you may not get the consistency needed for accurate results.
One source of bubbles that is rather odd is the venturi effect.
Where and when do the bubbles show up? Examine the flow pattern of each part to see if the plastic flow front is coming around on itself, or if there is a hesitation of the flow front in filling a thin section of the part. Are the bubbles always in the same area? If so, that means there is a fixed place from which the bubbles are coming. Note if there is a race-tracking effect or jetting that can cause air to become trapped in the polymer.
Check ribs or any projections off the nominal wall. If they are short it means there is air trapped in that area and it is being pushed out to form bubbles when the rib is filled. Sometimes you actually see a trail of bubbles coming from this projection. Do the bubbles only appear after the part is 85% full? If so, it could be a venting issue. Check the vents.
One source of bubbles that is rather odd is the venturi effect. There are several possibilities for a venturi effect to suck air into the melt flow: ribs, ejector pins, poor mating of nozzle tip to sprue bushing, nozzle misalignment, and separated plates in a hot runner. These are much harder to detect but as you rule out other sources, the tool must be checked. Apply bluing agent near the hot-runner drops and on plate mating surfaces, being careful not to allow any onto the flow path. If the bluing agent shows up on startup, you have found the source of the problem. Another common source of bubbles is too much decompression, especially in hot-runner molds.
Yet another source is the screw, more specifically the rear zone or feed section. General-purpose screws with L/D of 18:1 or lower can be the culprit. Try using a lower rear-zone temperature and/or higher backpressure. Another solution may be to pull a vacuum on the mold just before injection.
Voids
A void occurs during cooling while the part is inside or outside the mold, usually in thick sections. In thick sections of a part, the center cools slowly and the polymer shrinks more, pulling away from itself to form a bubble. If you run the mold hotter and the bubble goes away, but you have a sink as a result, that is an indication your bubble was a void. Voids and sinks are signs of internal stress and are warning signs that the part may not perform as expected.
Insufficient plastic is the main reason for sinks or voids, so packing more material into the cavity is recommended. Make sure you have a consistent cushion and are not bottoming the screw so that you can properly pack out the part. Higher hold pressures or longer hold time may help, but many times the gate is freezing before you can adequately pack out the center of the nominal wall.
Thin down the nominal wall. Core out the thick section, if possible.
To solve voids or sinks, try slow fill rates, use of gas counterpressure, or increasing backpressure. Ensure the runner or gate is not freezing too early and that longer hold times will allow more packing during the second stage. If the gate is freezing off too soon, a slight opening of the gate may be all that is needed, as a small change in diameter results in a longer gate-seal time. Also try reducing melt temperature, if possible.
Other approaches to eliminating voids or sinks is to thin down the nominal wall. Thicker is not always stronger in plastic parts. Thick nominal walls should be redesigned to be thinner with ribs for strength. This will save plastic and cycle time.
Core out the thick section, if possible. Changing the gate location to fill thicker areas in the mold first may allow more polymer into the part before the gate freezes. You may also try raising the mold temperature and/or ejecting the part sooner, which can prevent voids by allowing the outside walls to collapse during cooling, though that may result in sinks.


Related Content

Three Key Decisions for an Optimal Ejection System
When determining the best ejection option for a tool, molders must consider the ejector’s surface area, location and style.
Read More
Understanding the Effect of Pressure Losses on Injection Molded Parts
The compressibility of plastics as a class of materials means the pressure punched into the machine control and the pressure the melt experiences at the end of fill within the mold will be very different. What does this difference mean for process consistency and part quality?
Read More
A Systematic Approach to Process Development
The path to a no-baby-sitting injection molding process is paved with data and can be found by following certain steps.
Read More
Using Data to Pinpoint Cosmetic Defect Causes in Injection Molded Parts
Taking a step back and identifying the root cause of a cosmetic flaw can help molders focus on what corrective actions need to be taken.
Read MoreRead Next

Vacuum Venting Keeps Molds Running Longer
In tough economic times, facing hungry competition here and abroad, molders cannot afford to ignore preventable problems that slow cycles, cost machine downtime and mold maintenance, and waste material on reject parts.
Read More
How Vacuum Venting Can Solve Outgassing and Air Entrapment in Injection Molds
When conventional venting methods fail, vacuum venting can effectively solve issues related to outgassing and air entrapment in injection molds. Here’s how.
Read More
How to Fix Outgassing Problems in Injection Molding
Gas and air entrapment can cause a variety of problems in injection molding, including part burns, short shots, voids and blemishes, even clogged vents. Vacuum venting can solve all these problems, and increase output in the molding process.
Read More