
Mold-Clamping Details for Profit
Taking time to sweat the details of clamping is not much fun, but they do make a difference in a company’s bottom line.
.jpg;width=70;height=70;mode=crop;format=webp)
Proper attention to clamp setup can go far toward minimizing mold damage and wear and optimizing cycle time for maximal part quality and minimal rejects.
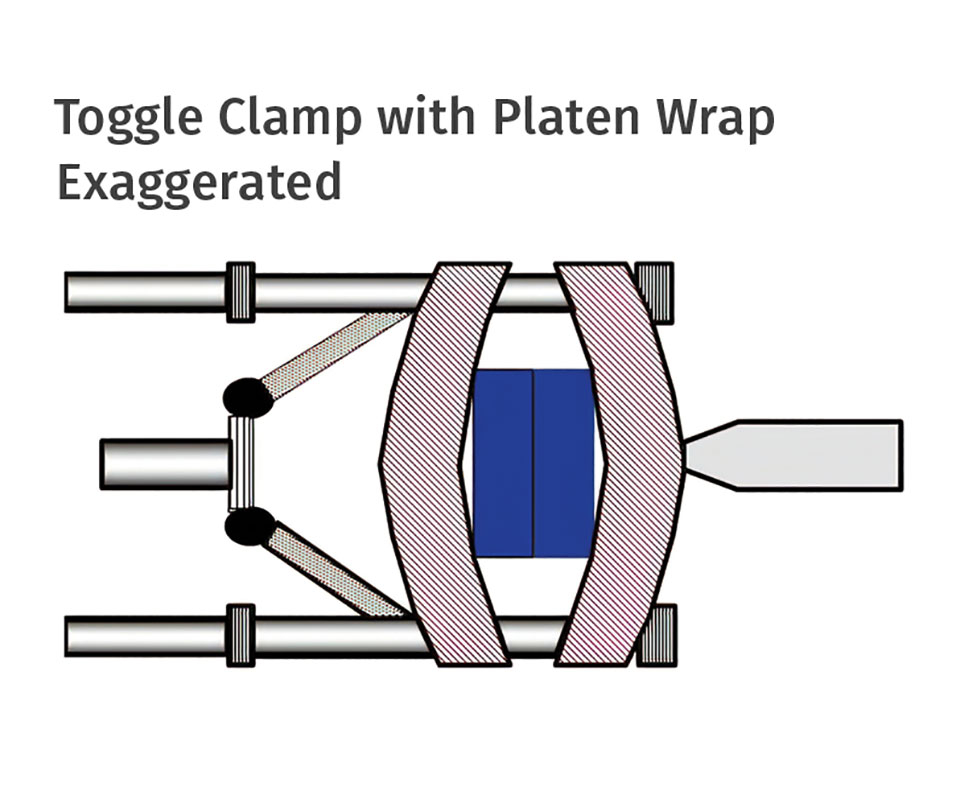
Most of the clamping force, especially in toggle clamps, is on the corner of the mold. Clamping forces can be so high that the platen actually bows in the center, know as platen wrap.

Of the hundreds of variables involved in injection molding, setting up clamp movements often gets less attention than it deserves, both in setup and maintenance. Proper clamp setup and performance requires talent and attention to details. Sequencing core pulls and setting break-away speeds, acceleration, deceleration, clamp tonnage, mold protection, and ejection are some of the requirements for setting up the clamp. All these settings influence part quality (flash, for example), clamp performance, cycle time, and part cost. Clamping is an area where the processor has significant influence over the cost of molding parts. As an example, foul up the mold-protection setting and you can severely damage a tool, shutting down production with no quick fix.
The purpose of the clamp and platen mechanisms are:


- Hold the mold.
- Close the mold with appropriate core-pull sequences and mold protection.
- Open the mold with appropriate core-pull sequences.
- Hold the mold closed with sufficient and uniform force to withstand injection pressures.
- Eject the part(s).
What amazes me is the number of details required for each purpose. About two years ago I collaborated with four colleagues on a column about the proper way to mount a mold. Around that time, my fellow columnist Jim Fattori wrote his own column about locating rings and platen damage. Two articles just to cover the first of our purposes listed above, and the columns provided plenty of details, tips, and reasons to respect those that do this job. Let’s look at the rest of the list.
Closing the mold again requires attention to details. The first and one of the most daunting challenges is to ensure the core pulls, cam actions, or any other internal or external mold movements are sequenced and working properly. This is no small chore, and with such a variety of cores, horn pins, safeties, etc., I have no simple “To Do” list to follow. All I can offer is that if at all possible, have the moldmaker there for the first mounting and processing setup for his “work of art.” Breaking something on the initial trial of a $250,000 mold is humiliating, to say the least.
Once the mold sequences are lined out, use the mold-movement safety mode to close the mold slowly with low pressure to figure out the position of the mold/clamp where you want mold protection to become functional. Set the mold-protection start position and a slow speed to protect the core, horn pin or other delicate part of the mold. This is not the last fraction of an inch before mold touch. Set a mold-protection speed, force and distance to ensure that the momentum at production speeds does not overcome mold protection. Then check this with a foam cup cut to the proper height. There is often a delicate balance between cycle time and mold protection. Poor mold protection often results in breaking core pins, which require subsequent repairs that result in profit-killing downtime. Conversely, a mold-protection sequence that is set too slow results in excess cycle time, another profit killer.
Next on the list is opening the mold. My recommendation is to open slowly for the first few millimeters. Parts do not always release equally from all sides at the same instant. Sometimes the part is held via vacuum or other factor that needs time to release. Jerking the mold open only exacerbates the problem. So open the mold slowly for a short distance, something I rarely see, due to the demand for faster cycles. But making an unusable part chews up cycle time to make another. If release is an issue, search for a mold feature that will alleviate it. It will be a large payback to add something like polish, hone, radius, vacuum break or air poppet to help release the part and keep cycle time down.
Speed is important, but due to the huge mass of these platens and the subsequent momentum, the processor needs to accelerate to the appropriate mold-open speed and distance that allow for mold deceleration to the full-open position. This acceleration and deceleration also apply to mold closing. The mass of the platens is huge and if you do not set these correctly you can have your machine jumping out of its location. Many a Crusty Sr. can tell you stories of machines ripping out electrical and water lines, literally walking across the floor. A significant safety concern! I have seen railroad rails bolted to the floor in an effort to keep the machines from hopping around. Granted, some machines are easier than others to set up for this acceleration and deceleration, but it is important to deal with the momentum of massive platens traveling at high speed. The machine should not be jerking around! Open and closing the mold is one issue, keeping it closed during first- and second-stage injection is another.
Keeping the mold closed sounds simple, but again getting it done right requires attention to the details. First, the mold should take up more than 70% of the platen area. Why? Most of the clamping force, especially in toggle clamps, is on the corners of the mold. Clamping forces can be so high that the mold actually bows in the center. This is called platen wrap (see accompanying illustration). This is why a spotting press does not always tell what is happening in an actual injection molding machine. The spotting press does not provide the high pressures of molding-machine clamps. Parting lines can be perfect in the spotting press, but not so in the molding machine. Some mold builders actually pre-stress the mold by using slightly longer support pillars in the center of the mold to compensate. Clamp closing forces need to be uniform and just a bit more than is needed. More is not better.
Do not simply max out the clamp pressure for every mold mounted in the machine. Too high a clamp force only wears the mold faster, especially the parting line and vents. Start with the lowest likely clamp pressure and dial up or down as needed. It is also nice if the machine auto-compensates clamp pressure as the mold warms up and expands. Consistent clamping force is best for a consistent process. This is a must-have for molding machines.
Finally, the last step: ejection. And again there are details to getting it done right. My suggestions are similar to those for mold opening: Slowly eject for the first couple of millimeters, then accelerate to the minimum distance necessary to eject the part(s). Parts rarely eject uniformly off the mold. To become a believer, view a high-speed video of parts being ejected. Expensive yes, but ever so educational. You will often see one side or corner of the part stick or twist. Slow ejection gives it time to break away without twisting or warping the part. Also, parts will not pop off and fly off so fast that they ricochet off the stationary side and get scratched or fly onto the greased tiebars or rails. Lost parts equal lost profits.
Moreover, it is important to use the minimum pressure possible to eject the part(s). Why? Ejector pins are hardened and can gall after multiple strokes. Galling can get so bad that the pin sticks and actually breaks—with a portion of it still sticking out. The machine will retract the ejector plate; there will be no indication to the machine that anything is wrong. It will then close the mold, forcing the broken piece of ejector pin into the other side of the mold, causing significant and costly damage. If the ejection pressure is set properly—just enough to push the ejector pins out—when galling occurs, there will not be enough force to finish the ejection stroke, and the machine will stop with an alarm for ejection. The machine operator would then check the mold and ejection operation, spot the broken ejector pin and call maintenance. Yes, you still have downtime but it will be one heck of lot cheaper than mold damage.
Bottom line: Taking time to sweat the details for clamping is not much fun, but they do make a difference in the company’s bottom line. Take the time to train processors and setup personnel. Provide them time, tools and equipment so they can execute the details of molding. Machines, molds, and wages cost big money; you might as well get the most for your investment. Questions welcome.
ABOUT THE AUTHOR: John Bozzelli is the founder of Injection Molding Solutions (Scientific Molding) in Midland, Mich., a provider of training and consulting services to injection molders, including LIMS, and other specialties. Contact john@scientificmolding.com; scientificmolding.com.


Related Content

Solve Four Common Problems in PET Stretch-Blow Molding
Here’s a quick guide to fixing four nettlesome problems in processing PET bottles.
Read More
The Strain Rate Effect
The rate of loading for a plastic material is a key component of how we perceive its performance.
Read More
Improve The Cooling Performance Of Your Molds
Need to figure out your mold-cooling energy requirements for the various polymers you run? What about sizing cooling circuits so they provide adequate cooling capacity? Learn the tricks of the trade here.
Read More
The Importance of Melt & Mold Temperature
Molders should realize how significantly process conditions can influence the final properties of the part.
Read MoreRead Next

Beyond Prototypes: 8 Ways the Plastics Industry Is Using 3D Printing
Plastics processors are finding applications for 3D printing around the plant and across the supply chain. Here are 8 examples to look for at NPE 2024.
Read More
For PLASTICS' CEO Seaholm, NPE to Shine Light on Sustainability Successes
With advocacy, communication and sustainability as three main pillars, Seaholm leads a trade association to NPE that ‘is more active today than we have ever been.’
Read More