
How to Know When Your Process is Ready to Make Acceptable Parts
Focus on six key metrics to help you determine when a process is lined out and stable enough to start production.
.jpg;width=70;height=70;mode=crop;format=webp)


When do you know that your press, process, and mold are at a steady state and making acceptable parts? This is a simple question with no simple answer. Consider—as I often have—the hundreds of variables involved in injection molding. Think about processing variables such as melt temperature, screw design, check-valve design and repeatability, injection speed, cushion repeatability, etc. Then consider machine issues like calibrations for pressures, speeds, consistency, wear, etc. Now add in mold variables such as wear, water-line hook-up, flow consistency, and temperature fluctuations. Given all this, it’s hard to tell when you have reached the point of feeling comfortable to start collecting parts for the production order.
Perhaps newer computer-driven machines make it easier for a processor or quality-control technician to watch many of these variables. But how many do you pick, which are pertinent to this part, and what are the tolerances? Some shops try doing this, but they find out rather quickly that one of those variables soon goes out of whack. Depending on how this variable was set up, it may reject the part or shut the process down.


Either way, the processor has yet another issue to deal with. The machine or controller may need an adjustment, but which variable needs adjusting? As soon as the processor walks away thinking the problem has been solved, yet another tolerance falls out of range, which triggers another hiccup. Factor in that some jobs are troublesome to restart, plus the likelihood that there are new jobs to start up, or even a stuck part that needs digging out. That might get old Crusty, the grizzled processor, a little frazzled and he or she might accidently scratch the mold while digging the part out.
You may think I am exaggerating, but take the time to follow a processor around for a few hours and note how many machines he/she has to keep running. Bottom line: time and resin are wasted, parts are rejected, production suffers and Crusty throws in the towel. How can quality control and the processor take care of production issues? There are a huge number of variables.
There is significant pressure to make parts but no clear path for what to do.
No question, this is a complex issue and there is pressure on QC and processors to make production happen. Actually, this is part of the reason why many shops cannot find enough processors. There is significant pressure to make parts but no clear path for what to do. This is evident from the number of emails and phone calls I get from molders asking if I know of any good processors who are available.
How would I handle all this? My approach to determining if a process is lined out and stable enough to start production focuses on six key metrics. Over the years, this strategy has worked 95% of the time.
1. Fill Time: This must be constant and must not vary by more than ±0.04 sec for most jobs. It needs to be the same from lot to lot, machine to machine, winter, or summer, etc. It is not allowed to vary. To get fill time constant, set the machine up with a Delta P (higher pressure available than the process needs) and the machine must be load compensated. If you do not have consistent fill time, fix the machine. If this mold goes into another press, do not worry about the velocities on the setup sheet; use whatever velocity provides the target fill time for the same first-stage-only shot. Fill time should be stable within three to five shots; if not, something is wrong. Find out what. Do not profile injection unless absolutely necessary, and it is not necessary most of the time.
Fill time should be stable within three to five shots; if not, something is wrong.
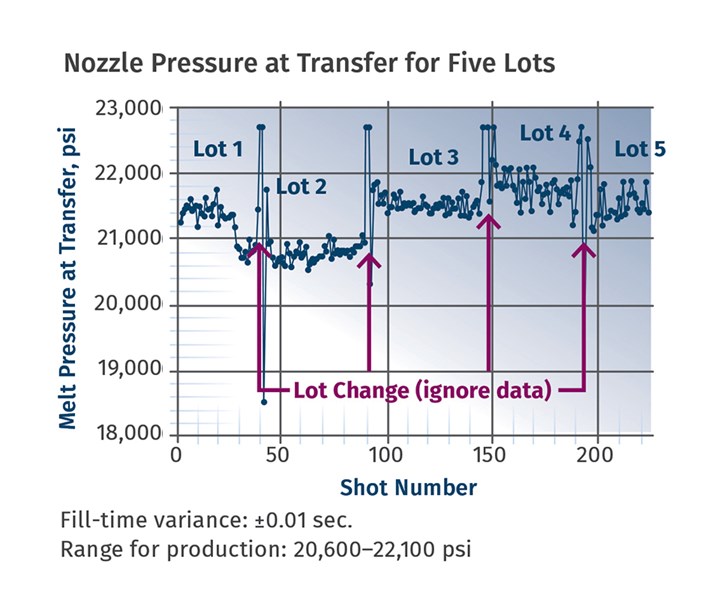
2. Pressure at Transfer: This is the pressure at switchover from first to second stage (fill to pack-and-hold). On startup this number will trend up or down for some period of time. How long, I cannot tell you. It depends on the part, resin and mold. After some period of time, this number should vary within a range—it should not trend. It should not be the same number every time. What is the allowable range? It is different for every part. To find the range, take data over time during process development and all subsequent runs. If the pressure is still trending after 20 to 40 shots, find out why. Do not go into production or continue your DOE. While this pressure may change with different lots and colors, the range should not. If you work in plastic pressure, not hydraulic pressure, it should be the same from one machine to another (using identical nozzle tips).
3. Cushion: Specifically, this refers to the cushion at the end of hold, not minimum cushion. This should be stable. My rule is ±1-1.5 mm. If not, get a new check valve. I suggest a radiused valve over the Castle-ring style.
4. Screw Recovery Time: This should not vary by more the ±2% shot to shot. If it does vary, check the screw, ensure the feed throat is PID temperature controlled and at an appropriate temperature for that resin.
5. Cycle Time: It must be consistent! If cycle time is operator dependent, put an overall cycle timer on the machine. (This device works by setting a cycle time on it that allows the operator to do whatever is necessary, and when they shut the door nothing happens until the cycle timer times out, then the mold closes. If you are running a job with gate seal, allow a ±1-1.5% variation in cycle. If you are running a process where the gate is not sealed at the end of second stage or pack and hold, zero variation in cycle time is allowed. Change cycle time and you change the part.
6. Part Temperature: Measured via an infrared gun (pick a spot on the part) or IR camera for the whole part. As the process starts, the part temperature will trend. Once part temperature stops trending, you know the process is stable. It should stabilize about the same time as transfer pressure. This provides information on mold- and melt-temperature consistency. Allowable variance is ± ~10º F (5º C)
The accompanying graph shows a process being challenged during process development with five different resin lots. Note that each lot is slightly different, yet the machine compensated automatically by adjusting injection pressure, keeping fill time the same. The question is: Are the parts within specification? In this case, all lots produced parts to specification on a critical medical part. We learned an initial range of pressures that would provide parts to specification. The range may change as additional production data is obtained.
In summary: While there is a fair amount of work to get these six metrics lined up during initial process development, it is worth it for a stable production process. It will make startup easier and more robust and provide clues to what is wrong if the process is unstable.
About the Author: John Bozzelli is the founder of Injection Molding Solutions/Scientific Molding in Midland, Mich., a provider of training and consulting services to injection molders, including LIMS, and other specialties. Contact john@scientificmolding.com.


Related Content

How to Reduce Sinks in Injection Molding
Modifications to the common core pin can be a simple solution, but don’t expect all resins to behave the same. Gas assist is also worth a try.
Read More
How to Get Rid of Bubbles in Injection Molding
First find out if they are the result of trapped gas or a vacuum void. Then follow these steps to get rid of them.
Read More
How to Stop Flash
Flashing of a part can occur for several reasons—from variations in the process or material to tooling trouble.
Read More
Best Methods of Molding Undercuts
Producing plastics parts with undercuts presents distinct challenges for molders.
Read MoreRead Next

INJECTION MOLDING: Develop Guidelines—Not Strict Procedures— For a Robust Molding Process
‘Fool-proof’ dos and don’ts will prove foolhardy in a process with so many variables. You aren’t slinging burgers.
Read More
The Cosmetic Process Window: Key to a No-Tweak, Robust Process
Establishing a process with the widest possible cosmetic window can help put your injection molding on cruise control.
Read More
Injection Molding: Is There a ‘Most-Important’ Process Parameter?
A case can be made for multiple variables—fill balance, fill time, injection pressure, cavity pressure—as most important. But there is something else altogether that is essential to successful injection molding.
Read More